Your restaurant menus get handled constantly. Customers browse them several times per meal, servers stack them between rushes, and they catch spills and fingerprints. Restaurant menu brochure printing offers a better solution than basic laminated sheets. You need something that holds more menu items, feels substantial in customers’ hands, and withstands heavy daily use while looking professional.
A properly designed brochure menu provides multiple panels to organize your offerings logically, dedicated space to highlight signature dishes with detailed descriptions, and creates a polished dining experience. The right paper stock and fold style transform your menu into an effective branding tool that reflects your restaurant’s identity and stands up to constant handling.
This guide walks you through the complete ordering process. You’ll learn how to choose the right fold type for your space, prepare your design files correctly for professional printing, select paper stocks and finishes that last, and place your order with confidence. By the end, you’ll know exactly what you need to create menus that look sharp and perform well.
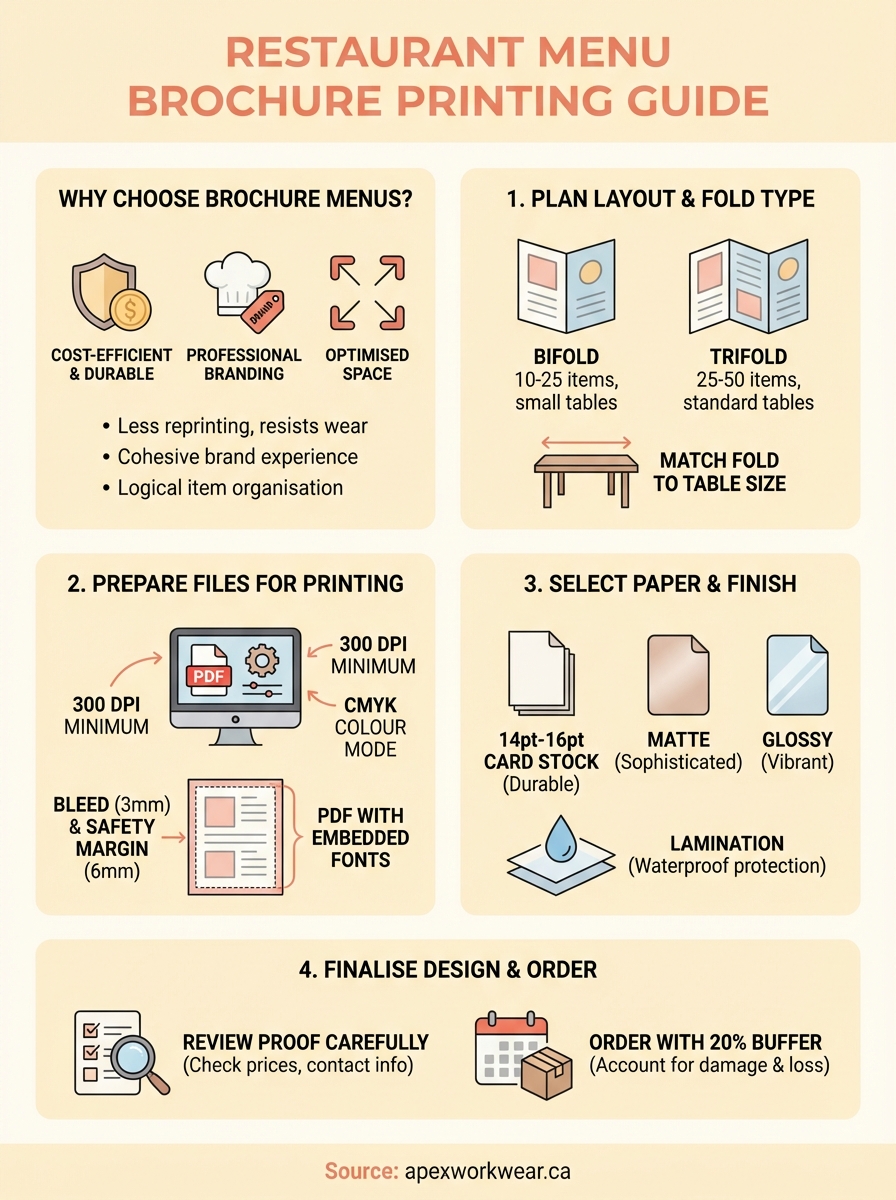
Why choose brochure menus for your business
Brochure menus solve specific challenges that restaurants face daily. You get more display area than single-page menus, better protection against wear, and a format that customers already understand from years of handling similar materials. These menus work particularly well for establishments with diverse offerings or those wanting to create distinct sections for drinks, mains, desserts, and specials.
Cost efficiency and durability
Single-sheet menus require frequent reprinting because they wear out quickly. Brochure menus made from heavier card stock resist tearing, handle moisture better, and maintain their appearance through hundreds of uses. You’ll replace them far less often, which reduces your annual printing costs significantly despite the higher initial price per unit.
The folded structure adds inherent strength to the menu. Three or four panels distribute stress across multiple creases rather than concentrating it in one area. Your servers can stack them without worry, and customers can browse without accidentally tearing pages. This durability matters especially during busy periods when menus move quickly between tables.
Restaurants typically save 40-60% on annual menu printing costs by switching from disposable single sheets to durable brochure formats.
Professional presentation and branding
Your menu creates a first impression before customers order. A well-executed brochure format signals that you’ve invested in quality and pay attention to details. The additional panels give you room to tell your restaurant’s story, explain your sourcing philosophy, or highlight chef specialties without cramping your food descriptions.
Restaurant menu brochure printing allows you to incorporate brand elements consistently across multiple surfaces. You can dedicate the front panel to your logo and atmosphere photography, use inside panels for menu items organized by category, and reserve the back for contact information or social proof. This structured approach creates a cohesive brand experience that single-page menus struggle to achieve.
Brochure formats also accommodate seasonal variations elegantly. You can design insert panels for limited-time offerings that slide into existing menus, letting you promote specials without reprinting your entire menu. This flexibility keeps your menu fresh while controlling costs.
Space optimization for your offerings
Expanding restaurants often outgrow single-page menus but hesitate to add loose pages that create handling problems. Brochure menus provide six usable surfaces in a trifold format or four in a bifold, giving you room to expand your offerings without overwhelming customers. You organize items logically across panels, guiding diners through appetizers, mains, and desserts in a natural reading flow.
The fold creates natural breaks between menu sections. Customers pause at each panel, which encourages them to consider items they might skip on a crowded single page. You can use panel breaks strategically to separate price points, highlight premium items, or create distinct breakfast and lunch sections.
Panel organization also helps customers with dietary restrictions find suitable options quickly. You can dedicate specific sections to vegetarian, gluten-free, or allergy-friendly items, making your menu more accessible without cluttering individual item descriptions with multiple icons and warnings.
Step 1. Plan your menu layout and fold type
Your fold choice determines how customers interact with your menu. You need to select a format that fits your table size, organizes your offerings logically, and creates a natural reading flow. Start by counting your menu items and grouping them into categories. This gives you a realistic view of how much space you need and helps you avoid cramming too much information into inadequate panels.
Common fold types and their uses
Bifold menus create four usable panels when folded once down the middle. This format works well for restaurants with 10-25 items across 2-3 categories. You typically place your logo and branding on the front panel, display menu items on the two inside panels, and use the back for contact details or daily specials. Bistros, cafes, and quick-service restaurants favour this layout because customers can scan the entire menu without excessive page turning.
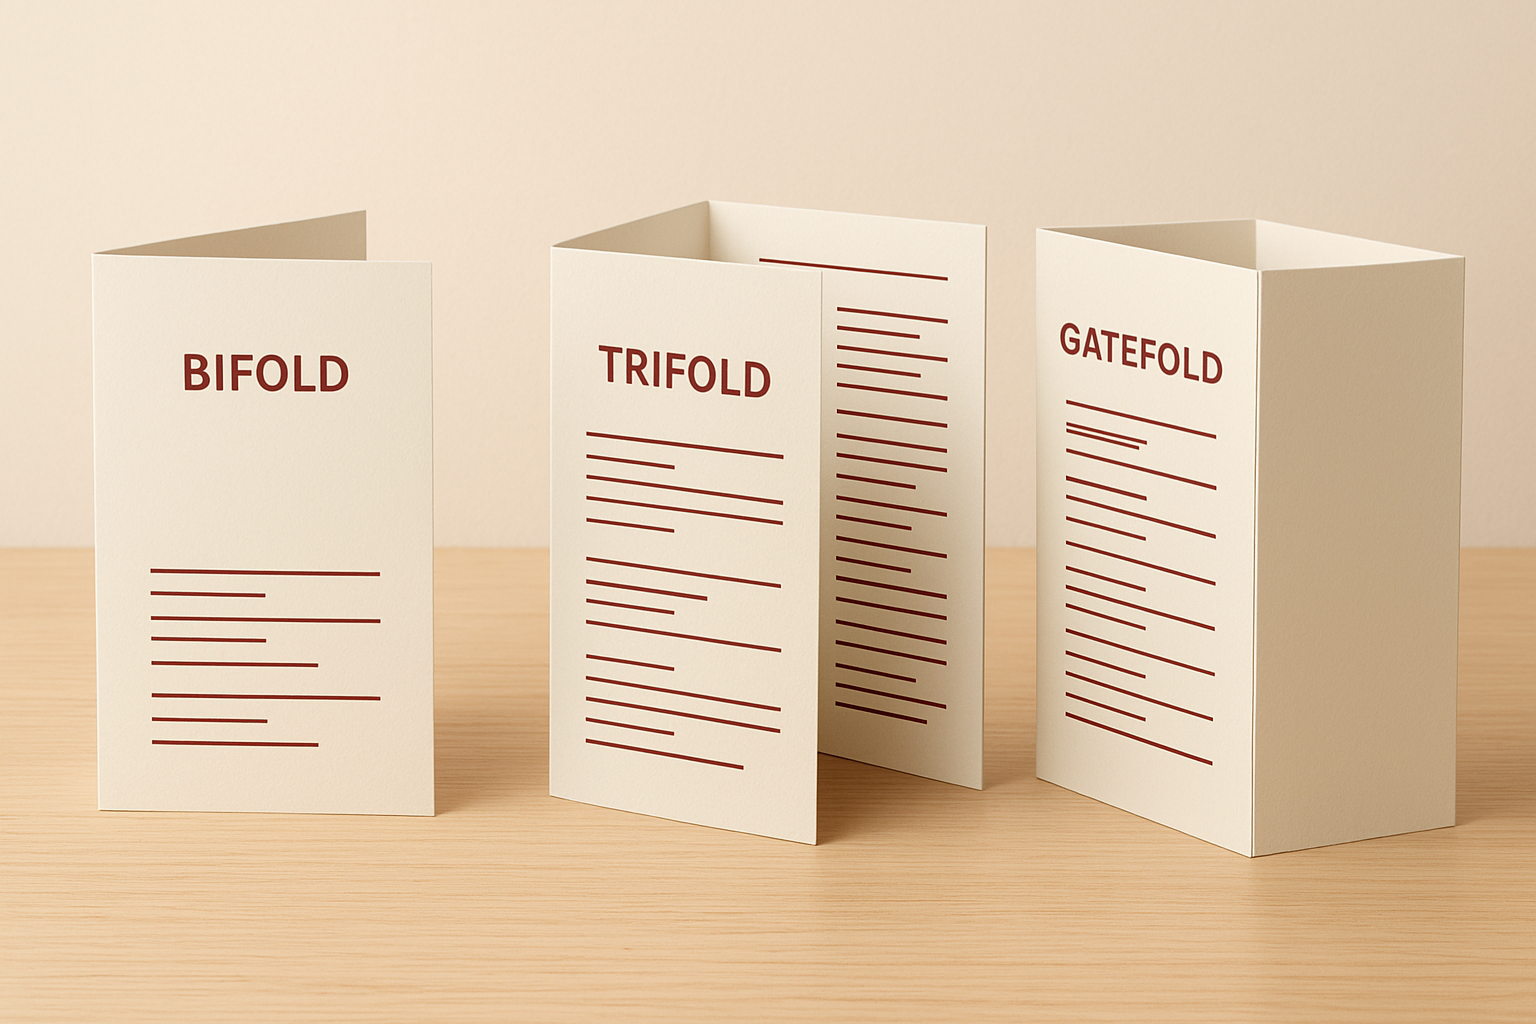
Trifold menus offer six panels and handle larger inventories of 25-50 items comfortably. The Z-fold or C-fold creates three equal sections that customers open progressively. You dedicate each inside panel to a specific category: appetizers, mains, and desserts flow naturally from left to right. Full-service restaurants and establishments with wine lists use trifolds to separate beverages from food items clearly.
The trifold Z-fold format increases customer engagement by 35% compared to single-page menus because it encourages sequential browsing through distinct sections.
Gate fold and accordion styles provide even more panels for extensive menus, but they require more table space and can overwhelm diners. Reserve these formats for prix fixe menus, wine lists, or special event menus where comprehensive presentation justifies the additional bulk.
Match format to your space
Measure your table dimensions before finalizing your fold type. Standard restaurant tables accommodate 8.5" x 11" menus comfortably when folded, but smaller cafe tables need 8.5" x 14" trifolds folded down to more compact sizes. Your menu should sit flat without hanging over table edges or requiring customers to hold it awkwardly while reading.
Consider how servers handle and store your menus between uses. Bifold formats stack efficiently and fit standard storage slots near host stands. Trifold menus take slightly more space but still organize neatly. Restaurant menu brochure printing companies typically stock these standard sizes, which keeps costs reasonable and turnaround times fast.
Step 2. Prepare your file for professional printing
Professional printers require specific file formats and settings to produce sharp, accurately coloured menus. You cannot simply submit a Word document or low-resolution image and expect quality results. Proper file preparation prevents costly reprints, delays, and colours that look different from your screen. Take time to set up your files correctly before uploading them to your printer.
Set up correct file formats and resolution
Submit your menu design as a PDF file with fonts embedded and images set to 300 DPI minimum. This ensures text remains crisp and photographs reproduce clearly. Most professional restaurant menu brochure printing services reject files below 300 DPI because they produce blurry results when printed at full size. Save your PDF using the "Press Quality" or "High Quality Print" preset in Adobe software to maintain proper resolution.
Avoid submitting Microsoft Word, PowerPoint, or low-resolution JPGs. These formats cause font substitution problems, image degradation, and layout shifts during printing. Your printer cannot fix these issues without redesigning your entire menu from scratch.
Include bleed and safety margins
Bleed prevents white edges from appearing when cutting machines trim your menus. Add 3mm of extra design area beyond your final menu size on all edges. If your finished bifold menu measures 8.5" x 11" folded, your design file should measure 8.75" x 11.25" to accommodate bleed. Extend background colours and images into this bleed zone, but keep all text and logos at least 6mm inside the trim line.
Menu File Setup Template:

Final Size (folded): 8.5" x 11"
Final Size (flat): 17" x 11"
Bleed Zone: Add 3mm (0.125") all edges
Safety Margin: 6mm (0.25") from trim
File Size with Bleed: 17.25" x 11.25"

Safe Zone for Text: 16.5" x 10.5" (centre area)
Place critical information like prices, dish names, and contact details within the safety margin. Content positioned too close to edges risks getting cut off during trimming.
Files without proper bleed settings cause 60% of menu reprints, adding 5-7 days to production time and doubling your costs.
Convert colours to CMYK mode
Your screen displays colours in RGB mode, but commercial printers use CMYK inks. Convert your entire design to CMYK before submitting files to avoid unexpected colour shifts. Bright blues and vibrant greens often appear duller in CMYK than they look on screen. Preview your PDF in CMYK mode to see how colours will print, then adjust problematic shades before finalizing your order.
Step 3. Select the best paper and finish
Paper choice directly affects how long your menus last and how professional they feel in customers’ hands. You need stock heavy enough to resist tearing and handle moisture from condensation or spills, but not so thick that bifold or trifold menus become difficult to fold cleanly. The finish you apply determines whether colours pop under your restaurant’s lighting and how easily fingerprints and food residue wipe away. Make these selections based on your actual service conditions rather than aesthetics alone.
Paper weight and stock options
14pt or 16pt card stock provides the minimum thickness for durable restaurant menu brochure printing. Lighter stocks feel flimsy and crease poorly when folded multiple times. Heavier 100lb cover stock (approximately 16pt) strikes the best balance between durability and foldability for most establishments. Your menus maintain their shape after repeated handling while still folding crisply along scored lines.
Matte stocks reduce glare under bright dining room lighting and create a sophisticated, understated appearance. You sacrifice some colour vibrancy compared to glossy papers, but text remains highly readable and the surface resists showing fingerprints. Cafes and bistros with natural lighting favour this option because it photographs well for social media posts.
Restaurants using 16pt card stock with protective finishes report 3-4 times longer menu lifespan compared to standard 10pt or 12pt stocks.
Glossy stocks make food photography vibrant and colours intense, which works well for establishments emphasizing visual appeal. The shiny surface attracts more fingerprints and shows wear faster than matte alternatives. Consider reserving glossy finishes for special event menus or prix fixe offerings that you replace frequently rather than everyday service menus.
Finish types and protection
Lamination creates a plastic coating that completely seals your menu against moisture, grease, and repeated wiping. You can clean laminated menus with standard sanitizing solutions between uses without damaging the print. The coating adds slight thickness and makes folded menus slightly stiffer, but the waterproof protection justifies this trade-off for high-volume restaurants and family dining establishments.
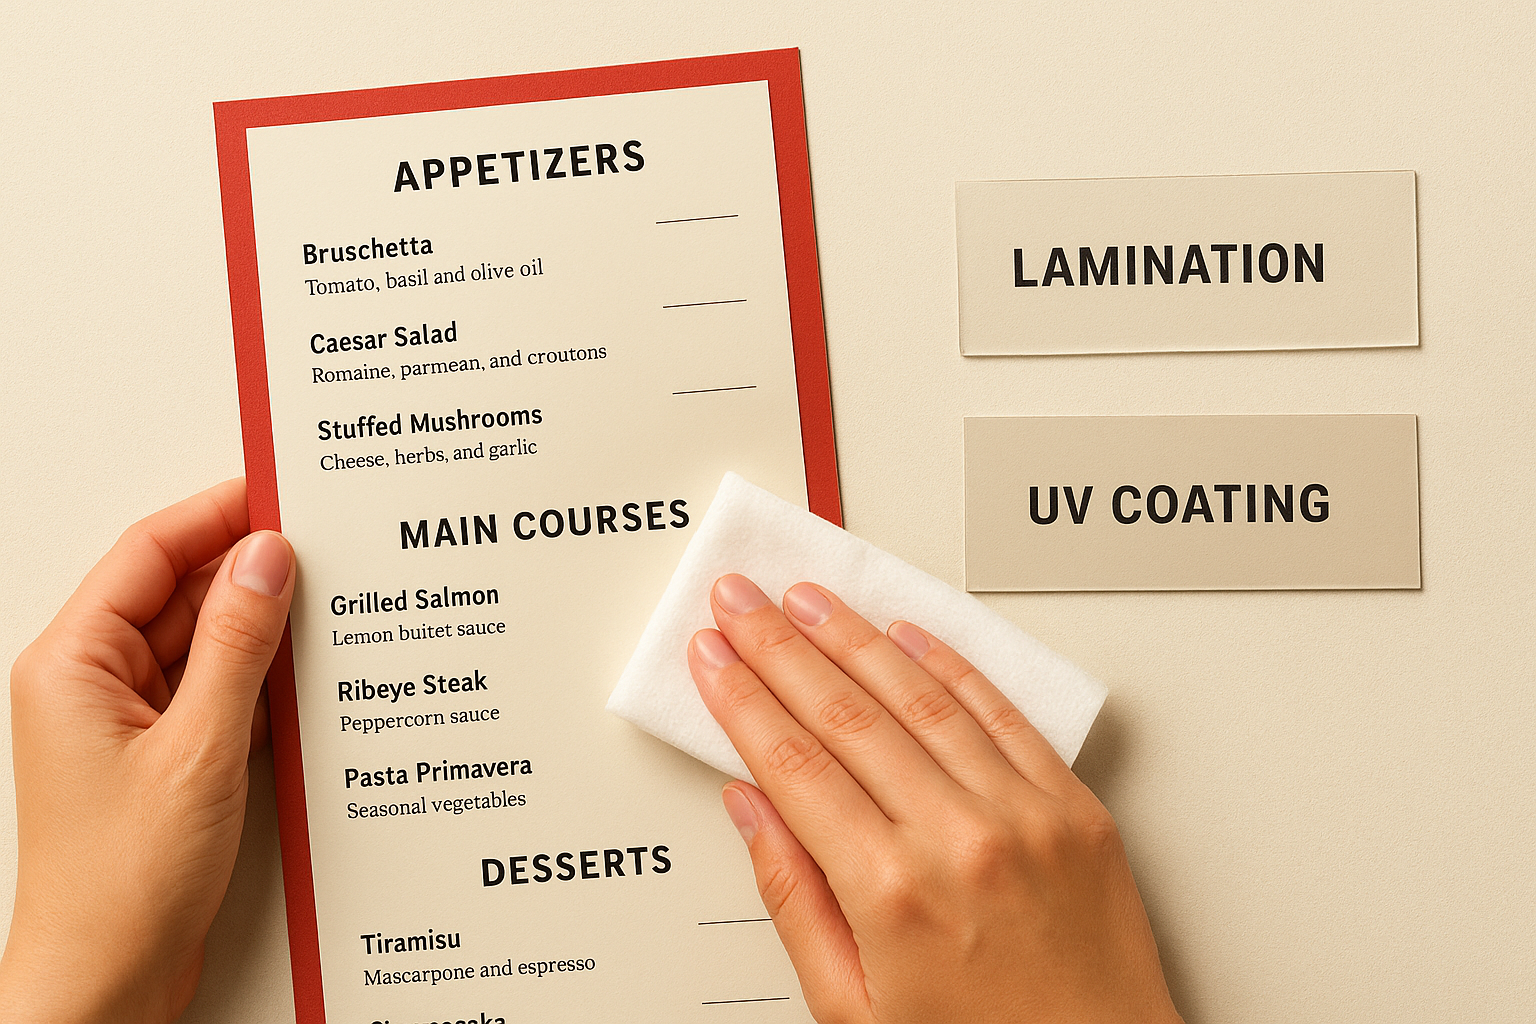
UV coating applies a liquid finish that dries to a protective layer without the thickness of lamination. Your menus retain flexibility while gaining scratch resistance and some moisture protection. This finish costs less than lamination and works well for restaurants where menus stay relatively clean but need protection from handling wear.
Step 4. Finalise the design and order
Your design file is ready and paper selections are complete. Now you need to review your proof carefully and place your order through a reliable printer. This final step prevents expensive mistakes that become obvious only after you receive hundreds of misprinted menus. Take your time reviewing proofs because corrections after printing cost significantly more than catching errors beforehand.
Review your proof carefully
Request a digital proof from your printer before approving production. Check every detail systematically rather than skimming through pages. Start with critical information like prices, phone numbers, addresses, and website URLs. A single transposed digit in your phone number renders your entire menu batch useless for customer contact purposes.
Verify that fold lines appear in correct locations. Your printer should mark crease positions on the proof so you can confirm text and images align properly across panels. Important content should never fall directly on fold lines where it becomes difficult to read or risks damage from repeated opening and closing.
Final Proof Checklist:

☐ All prices accurate and formatted consistently
☐ Spelling and grammar checked twice
☐ Phone numbers and addresses correct
☐ Logo placement and colours match brand guidelines
☐ Fold lines positioned correctly
☐ All images high resolution (300 DPI minimum)
☐ Text inside safe margins (6mm from edges)
☐ Bleed extends 3mm beyond trim lines
☐ Colours converted to CMYK mode
☐ Fonts embedded in PDF
Professional printers report that 80% of customer-requested reprints stem from errors customers failed to catch during proof review, not printing mistakes.
Place your order with confidence
Order slightly more menus than you need immediately to account for damage during use and future losses. Calculate three months of typical usage based on table count and turnover rate, then add 20% extra. Running out of menus during busy periods forces you to rush reorders at higher costs.
Confirm your printer’s production timeline before submitting payment. Restaurant menu brochure printing typically requires 5-7 business days for standard orders, with rush services available for urgent needs. Plan ahead for seasonal menu changes rather than paying premium prices for expedited production. Save your final approved proof file and order specifications for easy reordering when you need additional copies or want to update specific sections while keeping the overall design consistent.
Ready to update your restaurant branding
You now have a complete framework for ordering professional menus that withstand daily service demands. The right fold type organizes your offerings logically, proper file preparation ensures sharp printing results, and quality paper stocks with protective finishes keep menus looking fresh through hundreds of uses. Your investment in restaurant menu brochure printing pays off through reduced replacement costs and enhanced customer perception.
Start by reviewing your current menu structure and identifying which fold format suits your item count and table dimensions. Gather your design files, verify they meet technical specifications, and select paper stocks that match your service conditions. Most establishments complete the entire ordering process within a few hours and receive finished menus within a week.
Apex Workwear handles your restaurant printing needs with fast turnaround and expert design support. Get your free quote today and receive professional guidance on paper selection and file preparation for menus that represent your brand properly.