You’ve designed the perfect business cards, flyers, or banners for your brand. The colours are spot-on, the layout looks sharp on screen, but then you get the printed product back and something’s off. Maybe there’s an unexpected white edge, or worse, part of your design got cut off. Understanding crop marks and bleed marks is essential for anyone preparing files for professional printing, and it’s one of the most common areas where small businesses run into trouble.
At Apex Workwear, we print everything from business cards and flyers to large-format banners and custom apparel tags. We see firsthand how proper print file setup makes the difference between a product you’re proud of and one that needs a costly reprint. Whether you’re working with a designer or handling things yourself, knowing how these marks function gives you control over the final result.
This article breaks down exactly what crop marks and bleed marks are, why they matter, and how to set them up correctly in popular design tools. By the end, you’ll have the practical knowledge to prepare print-ready files that come out looking professional every time.
Why printers need crop marks and bleed marks
When you send a file to a commercial printer, the actual printing happens on large sheets of paper that hold multiple copies of your design, or on sheets bigger than the final trimmed size. The printer then uses industrial cutting equipment to trim these sheets down to the finished dimensions you ordered. Crop marks and bleed marks give the print operator exact visual guides for where to cut and how much extra design should extend beyond the trim line. Without these marks, the cutting process becomes guesswork, and your finished product suffers.
The mechanical cutting process
Commercial printers use guillotine cutters or rotary trimmers that slice through thick stacks of paper in a single motion. These machines are fast and precise, but they still require clear reference points to align the blade. Crop marks (also called trim marks) appear as small lines in the corners of your design, showing the operator exactly where the final edge should be. The cutting blade follows these marks to separate your business cards, flyers, or brochures from the larger printed sheet.
The machine operator lines up the crop marks with the blade’s position, then brings the cutter down. Even with modern equipment, there’s a margin of mechanical tolerance, usually around 1 to 2 millimetres in either direction. This slight variation is why bleed becomes necessary.
Your design needs to account for the fact that cutting equipment can shift by a millimetre or two, even when operated by experienced professionals.
Accounting for paper movement
Paper isn’t a rigid material. During the printing process, sheets can expand or contract slightly depending on humidity, temperature, and the amount of ink applied. When the printer stacks multiple sheets for cutting, this natural movement means the crop marks might not align perfectly across every sheet in the stack. Bleed marks indicate how far your background colours, images, or patterns should extend past the crop marks to compensate for this shift.
If your design stops exactly at the crop line and the cut shifts inward by even 1 millimetre, you’ll see an unwanted white border on the finished piece. Bleed ensures that your design extends far enough beyond the trim that any slight misalignment still results in colour reaching the edge. Professional printers rely on both sets of marks to deliver consistent, edge-to-edge results across every piece in your print run.
The parts of a print file: trim, bleed and safe area
Every print-ready file divides into three distinct zones that work together to protect your design during the cutting process. Understanding how these zones relate to crop marks and bleed marks helps you position elements correctly and avoid common printing mistakes. Think of your design as having invisible boundaries that define where different types of content should sit.
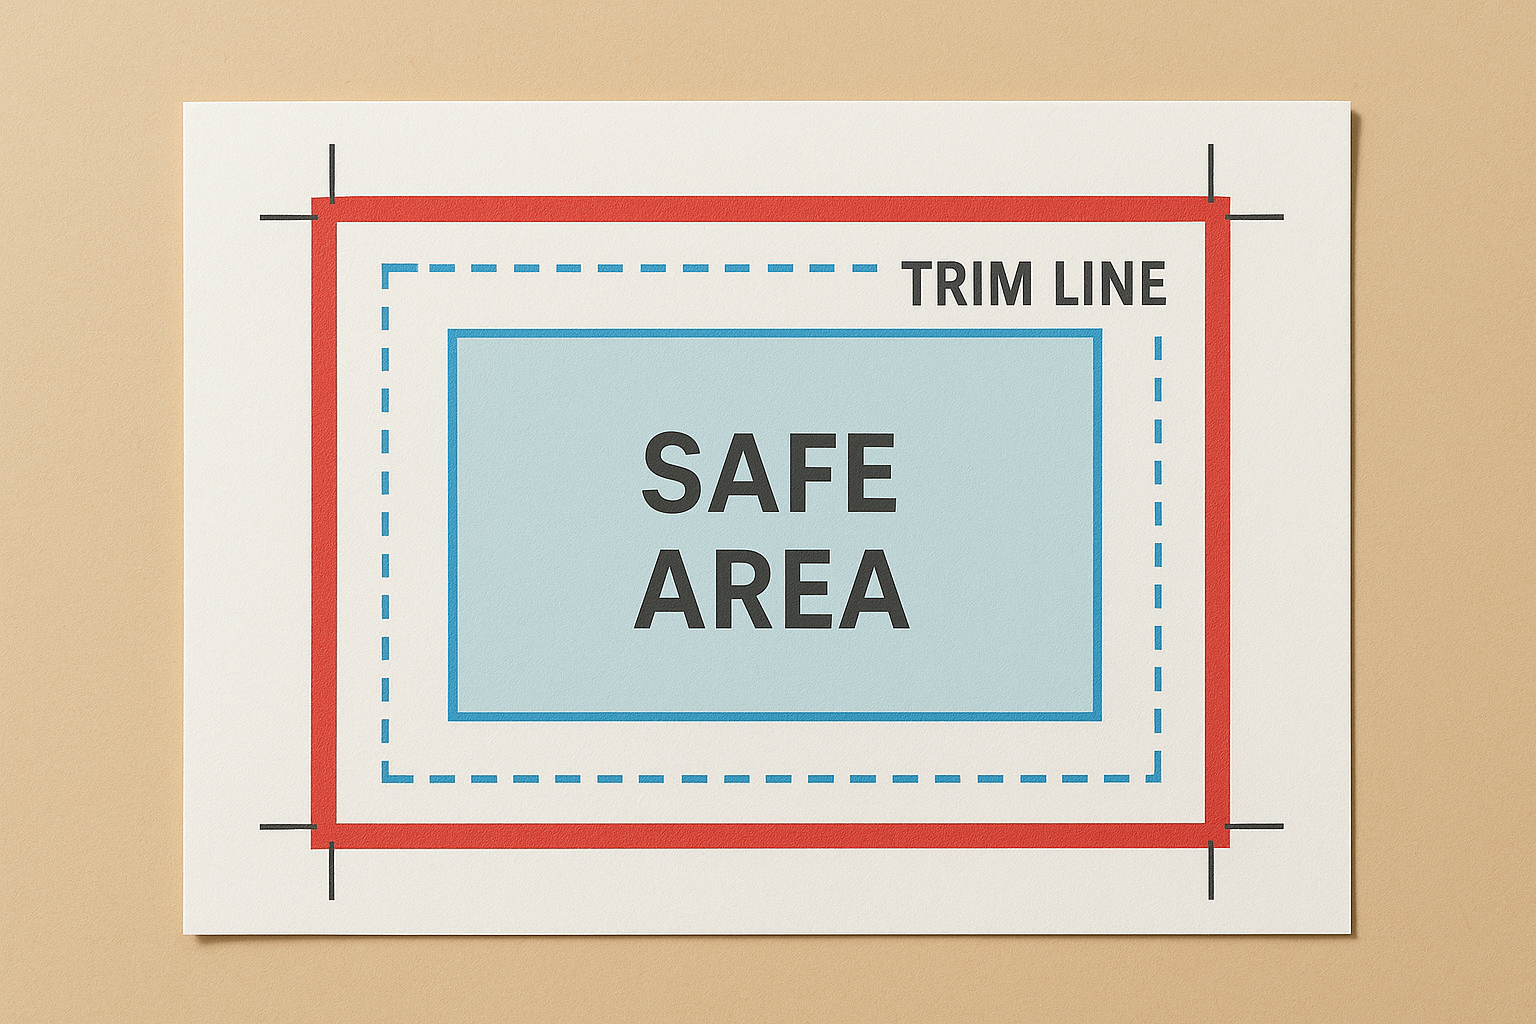
Trim size (final dimensions)
The trim size represents the exact dimensions of your finished printed piece. If you order business cards at 3.5 × 2 inches, the trim is that final measurement. Crop marks sit just outside this area, showing the printer where to cut. You design your layout around this size, but you don’t stop your backgrounds and images exactly at this line.
Bleed zone (safety buffer)
Bleed extends outward from the trim line, typically by 3 millimetres on all sides. Any background colours, patterns, or images that touch the edge of your design must extend into this zone. This extra design area accounts for slight variations in cutting and paper movement. When the printer trims your piece, the blade might land anywhere within a millimetre or two of the crop marks, so the bleed ensures colour still reaches the edge.
Your backgrounds and edge-to-edge images should always extend into the bleed zone, but critical elements like text should never appear there.
Safe area (text and critical elements)
The safe zone sits inside the trim line by at least 3 millimetres. Place all text, logos, and important visual elements within this area to guarantee they survive the cutting process. If your text sits too close to the trim line and the cut shifts slightly outward, you risk cropping off part of your message. Professional designers always keep critical content in the safe zone.
Common bleed sizes and rules of thumb
Most commercial printers work with standard bleed measurements that have become industry norms through decades of production experience. When you prepare files for printing, you’ll encounter these measurements regardless of whether you’re ordering business cards, flyers, or banners. Understanding these common dimensions helps you set up your files correctly the first time and avoid back-and-forth revisions with your print provider.
Standard bleed for most print products
For business cards, flyers, brochures, postcards, and similar small-to-medium format items, the standard bleed measures 3 millimetres (approximately 0.125 inches or 1/8 inch) on all sides. This measurement applies to the vast majority of print jobs you’ll encounter. When you design a business card that trims to 3.5 × 2 inches, your actual design area should measure 3.625 × 2.125 inches to account for the bleed on all four edges.
The 3-millimetre standard gives printers enough room to compensate for cutting variations without making your design files unnecessarily large.
Large-format printing variations
Banners, posters, and yard signs often require larger bleed areas because the cutting equipment operates at a bigger scale. For these products, expect bleed requirements between 6 and 10 millimetres (0.25 to 0.5 inches). A 24 × 36 inch poster might need 6-millimetre bleed, making your design canvas 24.5 × 36.5 inches before trimming. Always check your printer’s specifications for crop marks and bleed marks on large-format jobs, as requirements vary based on the production method and finishing options you choose.
How to add crop marks and bleed marks in design tools
Most professional design software includes built-in settings for adding crop marks and bleed marks to your files. You’ll find these options in the document setup or export menus, depending on which program you use. The exact steps vary between applications, but the underlying concept stays consistent: you define your trim size, specify your bleed amount, and let the software generate the marks automatically when you export for print.
Adobe InDesign and Illustrator
InDesign gives you the most straightforward approach. When you create a new document, enter your final trim dimensions in the width and height fields, then add your bleed amount (typically 3 millimetres) in the bleed section. The software automatically extends your workspace by that amount. When you export as PDF, tick the box for "Crop Marks" under the marks and bleeds section, and your file includes both types of marks positioned correctly.
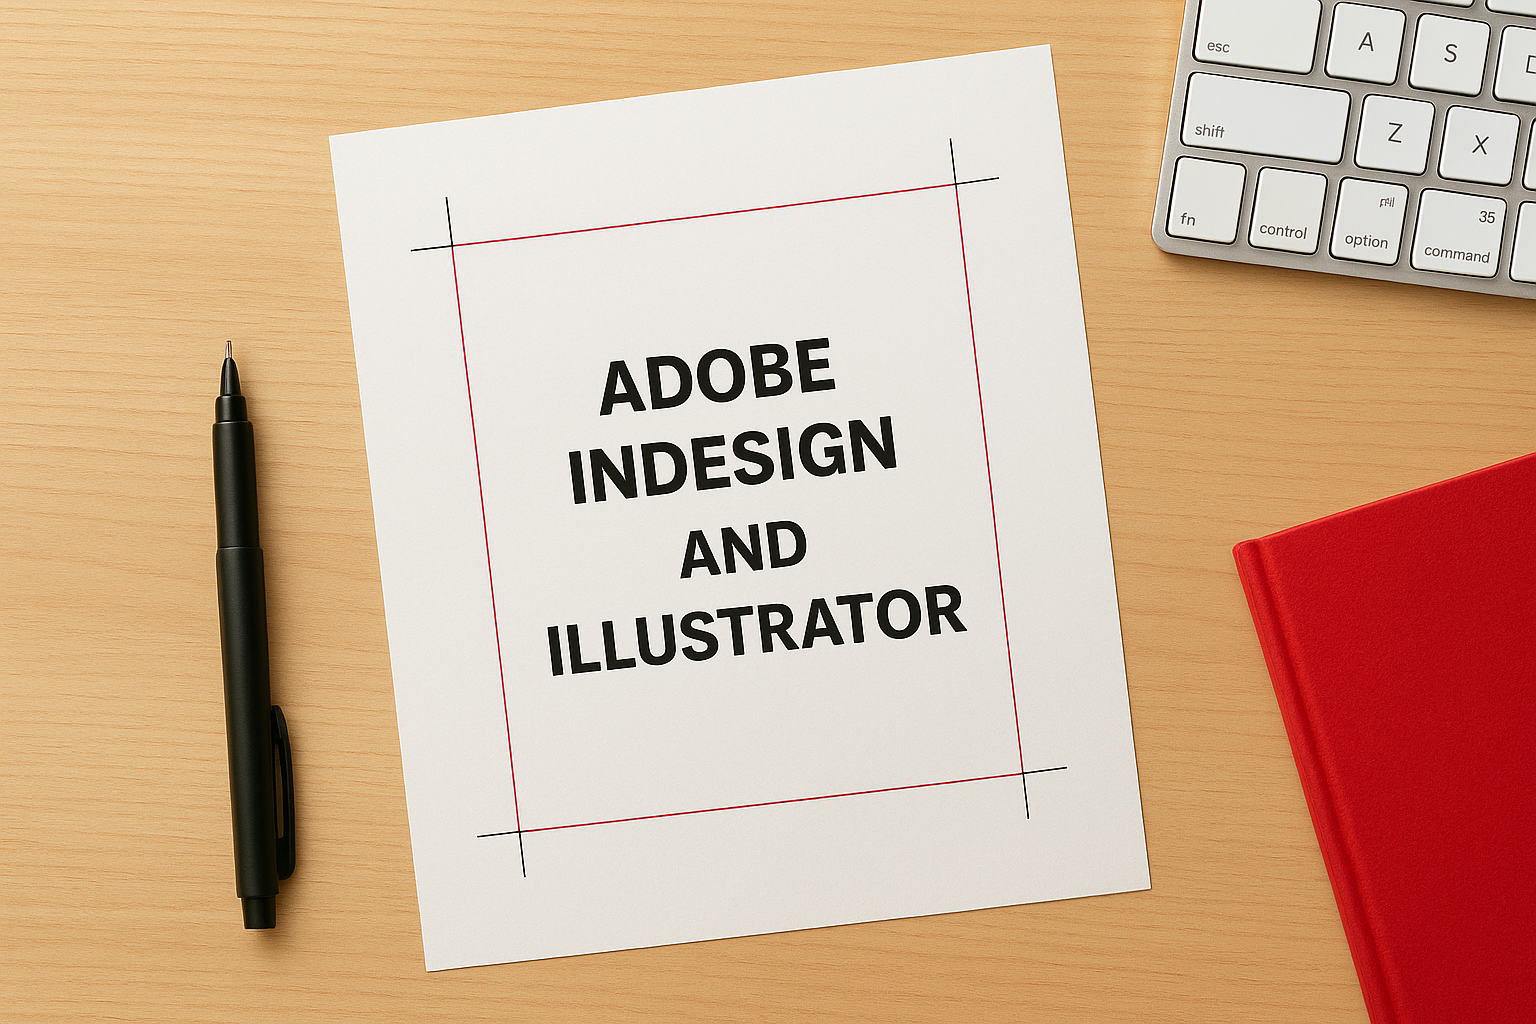
Illustrator works similarly through the artboard setup. You define your artboard size as the trim dimensions, then set bleed in the document setup menu. Export your file as PDF/X-1a or PDF/X-4 with crop marks enabled for print production.
Affinity Designer and Publisher
Affinity products handle bleed through the document setup panel, where you specify bleed amounts for each edge. The software displays your bleed area in red when you’re working. During export, select "Include bleed" and "Include crop marks" in the PDF export options to generate a print-ready file with all necessary guides.
Your design software should show you the bleed area visually while you work, making it easier to extend backgrounds correctly.
Online design platforms
Platforms like Canva typically require you to manually extend your design canvas beyond the final trim size to create bleed. Calculate your total dimensions (trim plus 6 millimetres for 3-millimetre bleed on each side), then design at that larger size. These tools rarely add automatic crop marks, so you might need to communicate your intended trim size directly to your printer.
Troubleshooting: white edges, cut-off text, odd marks
Even when you follow standard practices for crop marks and bleed marks, you might encounter problems when your printed products arrive. These issues typically stem from misunderstanding the relationship between trim, bleed, and safe zones, or from technical errors in your file setup. Recognising what went wrong helps you fix the problem for your next print run without wasting money on trial and error.
White edges appearing on printed pieces
You’ll see unwanted white borders when your background colours or images stop at the trim line instead of extending into the bleed zone. The cutting blade shifted slightly inward during production, exposing the unprinted area beyond your design. Go back to your original file and ensure all backgrounds and edge-to-edge images extend at least 3 millimetres past the crop marks on every side.
If you see white edges on your printed materials, your design didn’t include enough bleed to compensate for normal cutting variations.
Text or logos cut off at edges
Critical elements placed too close to the trim line get cropped when the blade shifts outward during cutting. You designed text or logos right up to the crop marks without leaving a safe margin. Pull all important content at least 3 millimetres inside the trim line. This safe zone protects your message from mechanical tolerances in the cutting process.
Strange marks or lines on finished prints
Odd lines or marks usually come from visible crop marks or bleed guides that weren’t removed during production, or from objects in your design file extending into areas they shouldn’t. Check your PDF export settings to ensure crop marks fall outside the trim area, and verify that no stray design elements sit in the bleed zone.

Quick recap and what to do next
Understanding crop marks and bleed marks removes the guesswork from preparing print-ready files and protects your designs from costly production errors. Crop marks show the printer where to cut, bleed extends your backgrounds 3 millimetres beyond the trim line to prevent white edges, and the safe zone keeps your text and logos at least 3 millimetres inside to avoid cropping. These three zones work together to account for mechanical variations in commercial cutting equipment.
When you prepare your next print project, set up your document with the correct bleed dimensions, extend all backgrounds into the bleed zone, and position critical elements safely inside the trim area. Most design software automates crop mark placement when you export as PDF, making the technical side straightforward once you understand the principles.
Need business cards, flyers, banners, or other printed materials that come out right the first time? Get a free quote from Apex Workwear and work with a Canadian printer who reviews your files before production, provides digital proofs, and delivers professional results within 5-7 business days.