You designed a business card that looks perfect on screen, but when the printed cards arrive, your logo is cut off or there’s an awkward white border around the edge. This happens when you ignore business card bleed and safe area, two printing concepts that determine where your design gets trimmed and where your important content should live. Bleed is the extra margin that extends beyond the cut line, while the safe area is the inner zone where all text and logos must stay to avoid getting chopped during cutting.
This article breaks down exactly what bleed and safe area mean, why they matter for print quality, and how to set them up correctly. You’ll get standard measurements in inches, millimetres and pixels, learn common design mistakes that ruin business cards, and discover how to work with templates and printers. By the end, you’ll know how to create print-ready files that produce professional cards every time.
Why bleed and safe area matter for business cards
Commercial printers cut hundreds or thousands of cards at once using high-speed guillotine cutters. These machines are accurate to within fractions of a millimetre, but they’re not perfect. A slight shift of 0.5mm in either direction can expose white paper edges if your background doesn’t extend beyond the cut line, or trim off your logo if it sits too close to the edge. Business card bleed and safe area prevent both problems by creating buffer zones around your design.

The cost of ignoring print margins
You waste money when a print run fails because your design wasn’t set up correctly. Most printers won’t accept files without proper bleed, and those that do will often produce cards with visible white borders or cropped text. Reprinting an order costs you time and money, especially if you’ve already distributed cards with errors. Your business also loses credibility when you hand someone a card with cut-off contact information or a logo that’s partially missing.
Setting up bleed and safe area correctly the first time protects your investment and ensures professional results.
Cards with proper margins look sharp and intentional. The background colour or image extends right to the edge without gaps, and all your text stays fully visible. This attention to detail signals that you care about quality, which reflects positively on your brand.
How to set up bleed and safe area correctly
You start by creating your document at the full bleed size, not the finished card size. This means your canvas includes the extra margin that extends beyond where the printer will cut. Most design programs like Adobe Illustrator, Photoshop, or Canva let you set custom dimensions when you create a new file. Enter the bleed dimensions first, then add guides or a separate layer to mark where the trim line (finished size) and safe area sit.
Setting up your canvas and guides
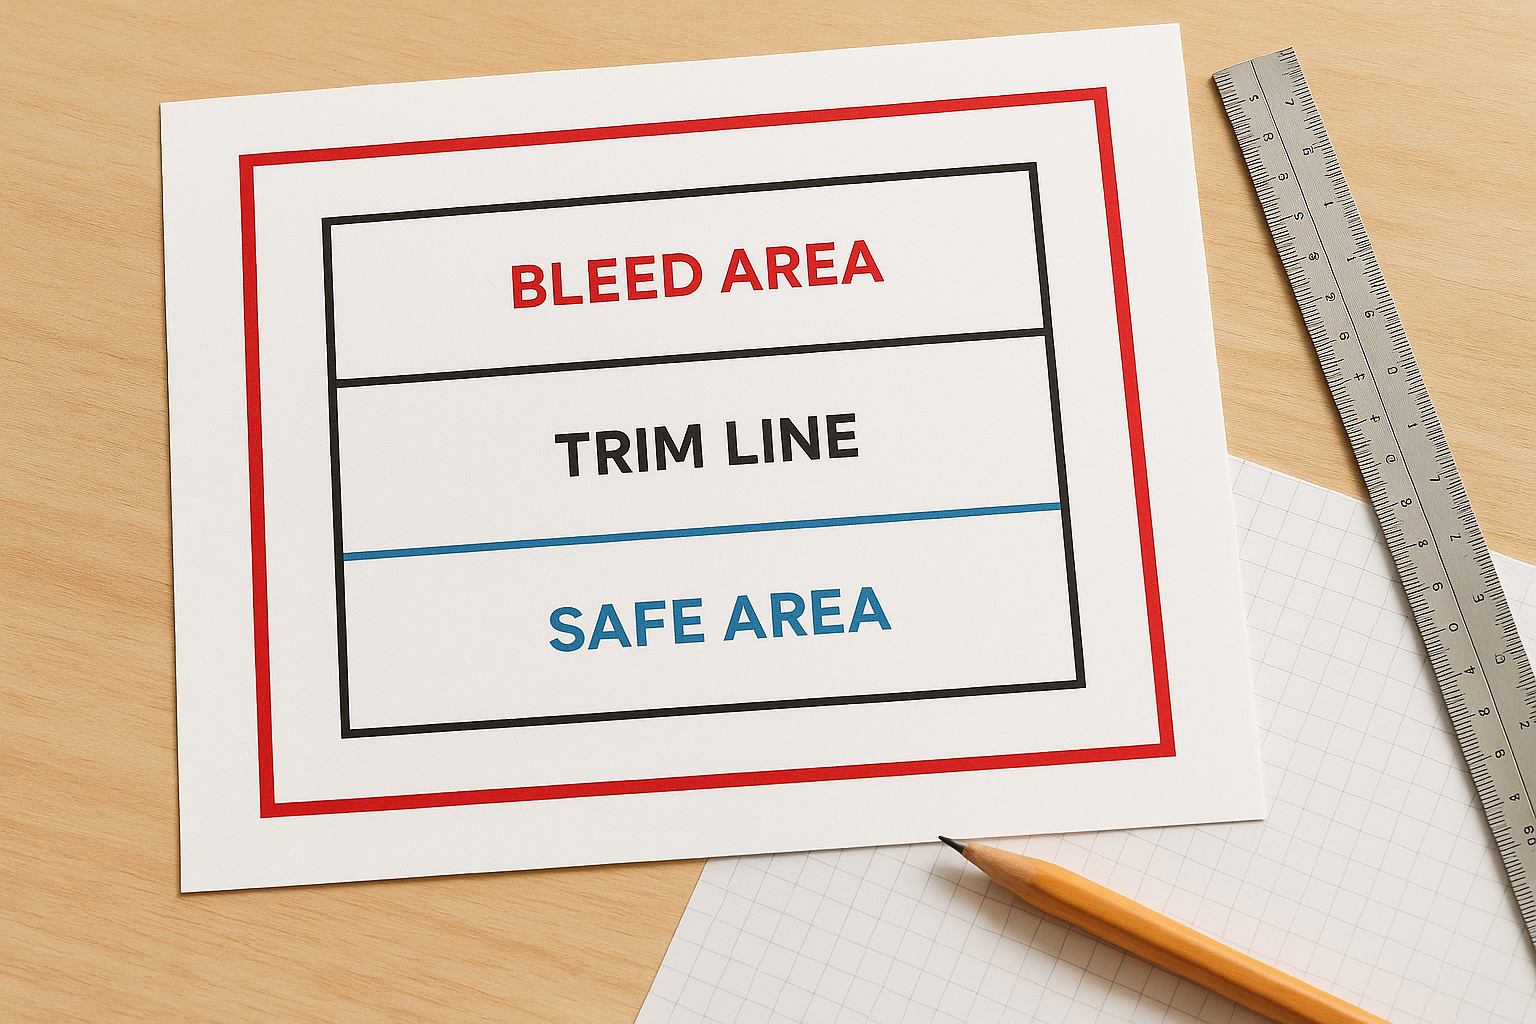
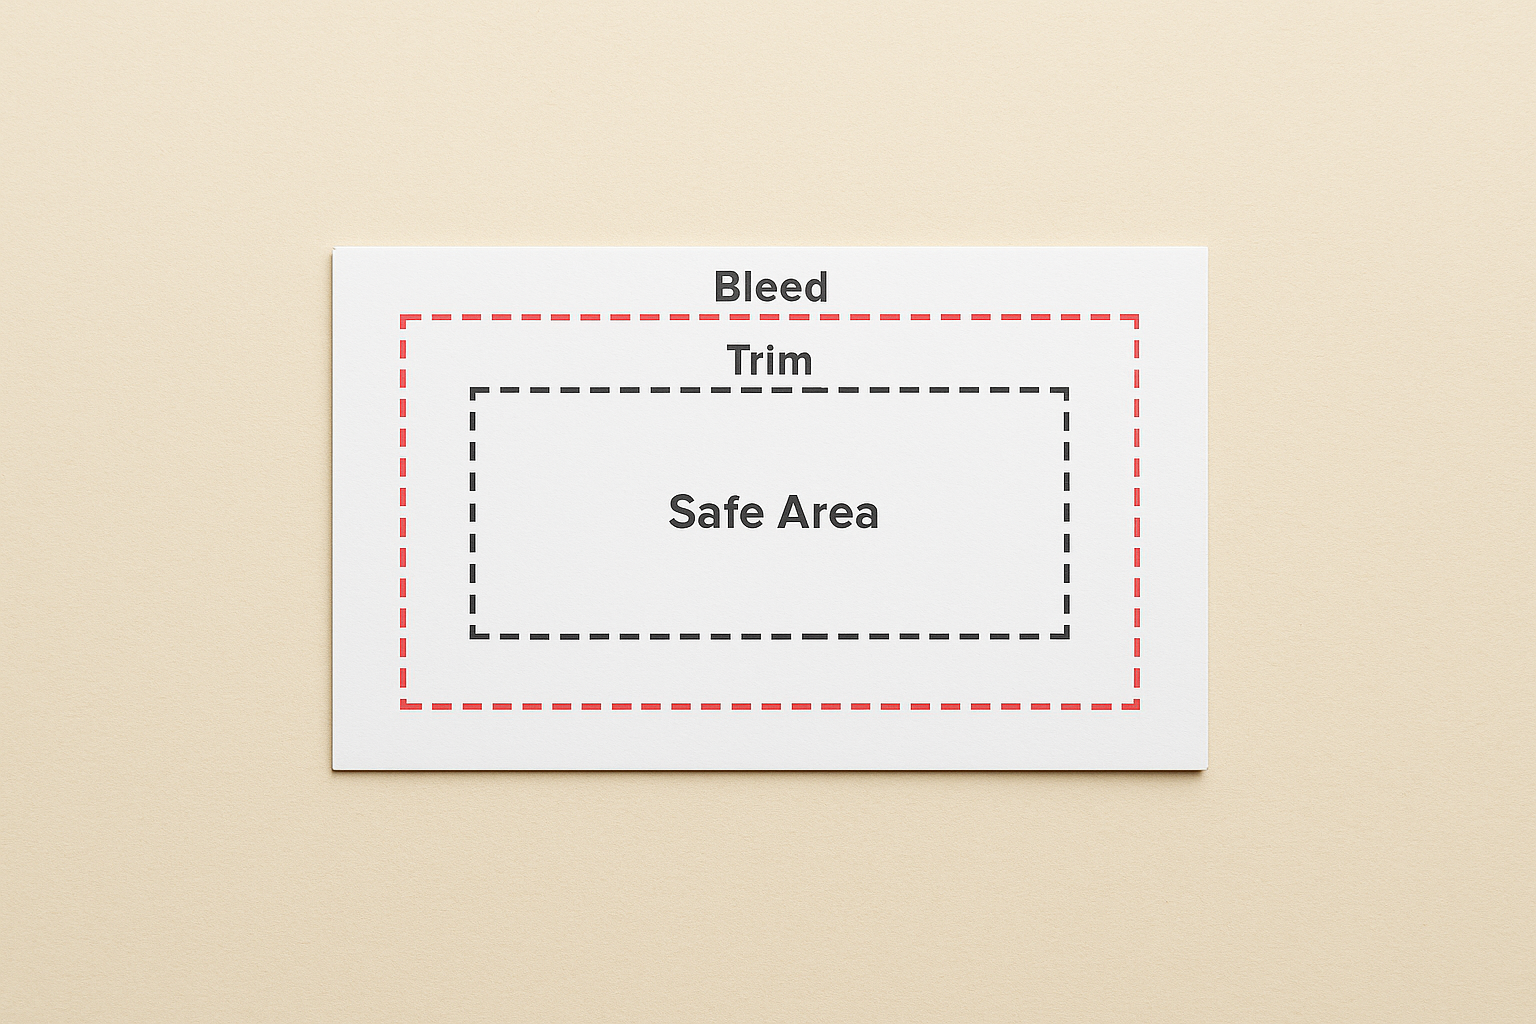
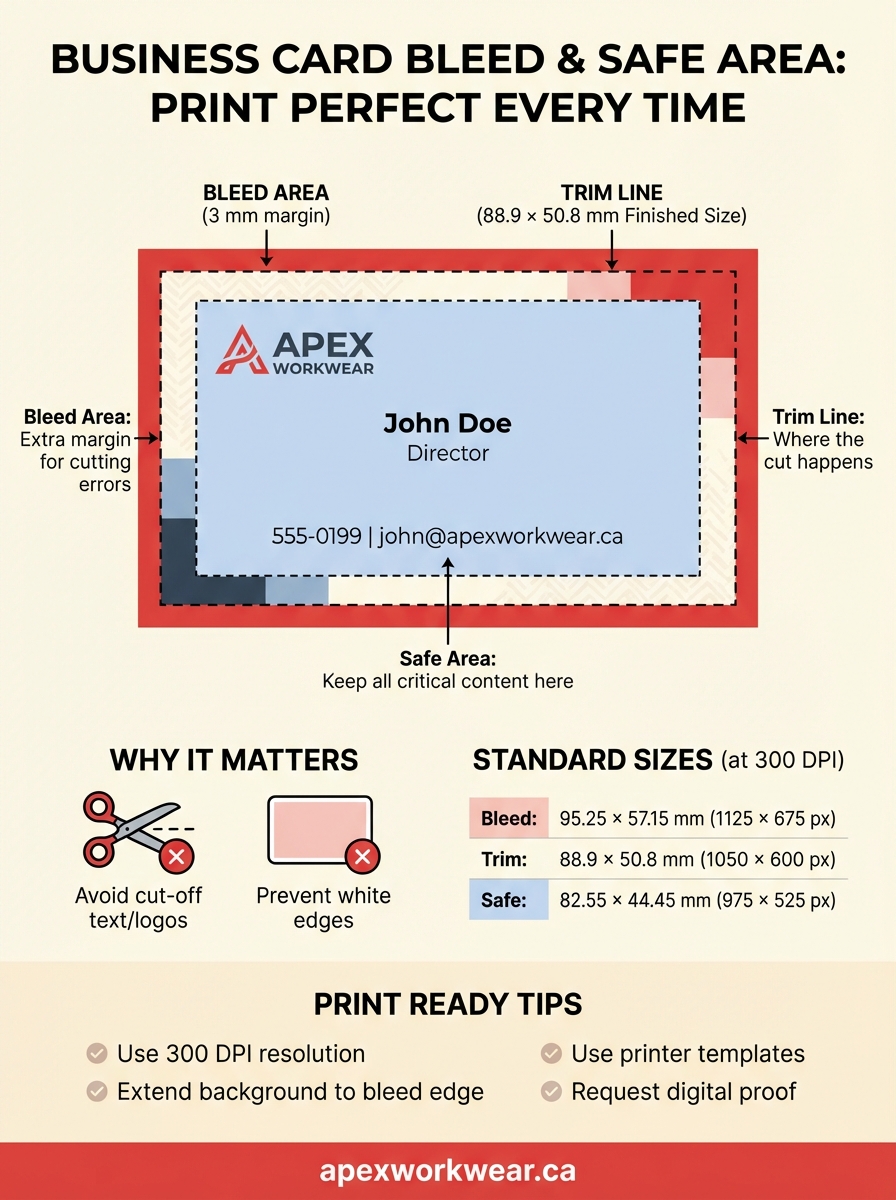
Your design software should show three distinct zones: the outer bleed area, the trim line in the middle, and the inner safe area. Create these as non-printing guides or reference layers so you can see exactly where each boundary falls. If you’re using a template from your printer, these guides are typically already built in as coloured lines or boxes. The bleed zone is usually marked in red, trim in black, and safe area in blue or green.
Templates eliminate guesswork by providing pre-measured zones for your business card bleed and safe area.
Placing your design elements
Extend any background colours, patterns, or images all the way to the outer bleed edge. This guarantees no white gaps appear if the cut shifts slightly. Keep all your text, logos, and critical contact information inside the safe area, at least 3mm (about 0.125 inches) from the trim line. Elements that touch or cross the trim line create risk because you can’t predict which side of the line the blade will fall on. Your design can span the middle zone between safe area and trim, but anything important must stay protected inside the safe boundary.
Standard sizes in inches, millimetres and pixels
Standard sizes for business card bleed and safe area follow industry conventions that most Canadian and North American printers use. The finished card measures 3.5 × 2 inches (88.9 × 50.8 mm), but your design file must include additional space for bleed and protective margins for the safe area. These measurements stay consistent across commercial printers, which makes it easier to design once and print anywhere.
Standard business card dimensions
The trim size represents where the printer cuts your card, which is 3.5 × 2 inches in imperial measurements or 88.9 × 50.8 mm in metric. This matches the size of credit cards and fits standard wallet slots. Your full document with bleed extends to 3.75 × 2.25 inches (95.25 × 57.15 mm), adding 0.125 inches (3 mm) on all four sides. The safe area sits inside the trim line at 3.25 × 1.75 inches (82.55 × 44.45 mm), protecting your text and logos from accidental trimming.
Design programs and printers use these three measurements (bleed, trim, safe area) as the foundation for every print-ready business card file.
Converting to pixels for digital design
Digital designers work in pixels rather than physical measurements. A standard business card at 300 DPI (dots per inch) translates to 1050 × 600 pixels for the trim size. The full bleed size becomes 1125 × 675 pixels, and the safe area measures 975 × 525 pixels. Your design software needs the 300 DPI resolution to produce sharp printed results, as anything lower creates blurry or pixelated cards. Screen resolution (72 DPI) works for websites but fails completely in print production.
Common layout and design mistakes to avoid
Designers routinely make the same errors when they create business cards without understanding how print production works. The most damaging mistake is placing text or logos within 2mm of the trim line, which almost guarantees that some of your cards will have cut-off information. Another frequent problem occurs when you fail to extend backgrounds to the full bleed edge, leaving your printed cards with thin white borders that look cheap and unprofessional.
Ignoring the safe area boundaries
You risk losing critical information when you position phone numbers, email addresses, or website URLs too close to where the printer cuts. Even if most cards in your batch look acceptable, variations in cutting precision mean some cards will have partially trimmed text. QR codes placed near edges become unscannable, and social media handles get chopped in half. Your business card bleed and safe area measurements exist specifically to prevent these failures, yet designers ignore them because their screen preview looks fine.
Keep all essential elements at least 3mm inside the trim line to guarantee they survive the cutting process.
Creating files at the wrong size or resolution
Starting your design at the finished 3.5 × 2 inch size without accounting for bleed forces your printer to reject the file or add white margins. Similarly, designing at 72 DPI instead of 300 DPI produces blurry printed cards, even if the file looks sharp on your monitor. Export your final file as a high-resolution PDF with bleed marks included, not as a JPEG or PNG screenshot.
Using templates and working with a printer
Most professional printers provide free downloadable templates that include all the correct business card bleed and safe area measurements built in. You download the template in your preferred format (AI, PSD, or PDF), then drop your design elements into the pre-marked zones. This eliminates calculation errors and ensures your file matches what the printer expects. Templates show exact bleed, trim, and safe boundaries as coloured guide lines that don’t print.
Requesting printer specifications
Contact your printer before you start designing to confirm their specific requirements. Ask for their exact bleed dimensions, preferred file format, and colour profile (usually CMYK for print). Some printers want crop marks included in your PDF, while others add them during production. Getting these details upfront prevents rejected files and delays.
Request a digital proof before the full print run to catch any remaining issues with margins or placement.
Bring your design to print
You now understand how business card bleed and safe area measurements protect your design from cutting errors and produce professional results. Set up your files with proper margins from the start, extend backgrounds to the full bleed edge, and keep all text inside the safe zone. These three steps prevent costly reprints and ensure your cards look sharp when you hand them to potential clients.
Canadian businesses need reliable printing partners who understand these technical requirements and deliver consistent quality. Apex Workwear prints business cards with expert design review included, catching margin issues before production begins. You get digital proofs to confirm everything sits in the correct zones, plus fast turnaround and free shipping in the Greater Toronto Area. Your designs arrive printed exactly as intended, with clean edges and perfectly positioned content.