You’ve spent hours perfecting a design for your business cards, banner, or custom apparel labels, only to have the printer kick it back because the file wasn’t set up correctly. Nine times out of ten, the fix comes down to your pdf x-1a export settings. PDF/X-1a is the standard that professional print shops rely on to ensure your colours, fonts, and layout reproduce exactly as intended, with no surprises on press.
Getting these settings right isn’t complicated, but it does require knowing where to look in your design software and what each option actually does. This guide walks you through the exact export configurations you need in Adobe Illustrator, InDesign, and Photoshop, plus a few alternatives, so your files are print-ready from the start.
At Apex Workwear, we produce custom apparel and printed business products for companies across Canada, and improperly exported PDFs are the single most common reason orders get delayed. We put this guide together based on what we see every day in production, so you can skip the back-and-forth and get your project to print faster.
What PDF X-1a is and when you should use it
PDF/X-1a is a subset of the PDF standard built specifically for print production. The "X" stands for exchange, and the "1a" refers to the first generation of the standard, which enforces strict rules about how colour, fonts, and transparency are handled inside the file. Every element must be fully self-contained: fonts are embedded, all colours are converted to CMYK or spot, and transparency is flattened. A commercial printer can open the file and send it to press without guessing at anything.
PDF/X-1a removes all the variables that cause colour shifts, font substitutions, and rendering errors on press.
The technical specs that matter for print
Understanding what PDF/X-1a enforces helps you apply your pdf x-1a export settings correctly the first time. The standard mandates specific conditions for every element in your file before a printer can accept it.

| Specification | PDF/X-1a Requirement |
|---|---|
| Colour mode | CMYK and/or spot colours only (no RGB or Lab) |
| Transparency | Must be flattened before export |
| Fonts | All fonts must be fully embedded |
| Images | All images must be embedded, not linked |
| Bleed and trim | Must be defined within the file |
| Encryption | Not permitted |
| JavaScript/actions | Not permitted |
These rules exist because a commercial RIP (Raster Image Processor) needs predictable, complete data to drive the press correctly. If your file contains RGB images or unembedded fonts, the RIP either guesses or throws an error, and neither outcome is good for your final printed piece.
When to use PDF/X-1a vs other PDF formats
You should use PDF/X-1a any time you send a file to a professional print shop for offset or digital press production. This covers business cards, flyers, brochures, banners, and custom labels. If a printer’s spec sheet lists PDF/X-1a as an accepted format, treat it as the safest and most reliable choice.
Other PDF formats, like PDF/X-4, support live transparency and RGB colour, which can be useful in certain workflows. However, not every print shop or RIP system handles PDF/X-4 consistently, so PDF/X-1a remains the most universally accepted format for commercial print. When you are unsure what your printer supports, PDF/X-1a is the format that causes the fewest problems.
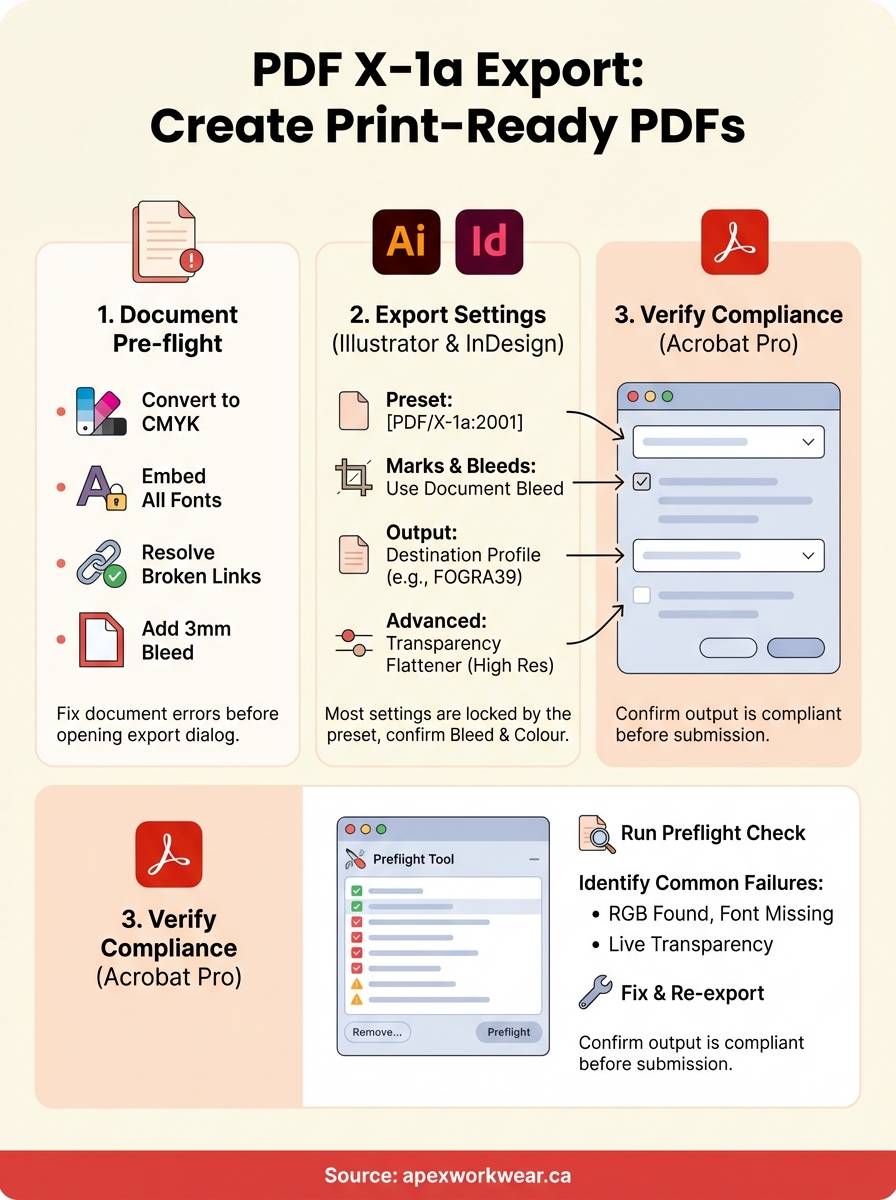
Pre-flight checklist for PDF X-1a compliance
Before you touch your pdf x-1a export settings, your document itself needs to be correct. Exporting a file with the wrong colour modes or missing fonts will still produce a non-compliant PDF, regardless of how carefully you configure the export dialog. Running through this checklist before you export saves you from submitting a file that fails your printer’s automated preflight system.
Fix your document before you open any export dialog. The export settings cannot correct underlying document errors.
What to verify in your document before exporting
Go through each item below before you open your export dialog. These are the most common failure points that produce PDF/X-1a non-compliance, and catching them now costs far less than a delayed print job.
- Colour mode: Convert all RGB and Lab swatches to CMYK. Check each placed image individually, not just the document swatches panel.
- Fonts: Confirm every typeface is active on your system so it can be fully embedded on export.
- Image links: Resolve all missing or modified links before exporting. Broken links produce low-resolution or absent image output.
- Transparency: Flatten live effects such as drop shadows and blending modes manually, or confirm your export settings handle flattening automatically.
- Bleed: Add at least 3mm of bleed on all sides if any element runs to the page edge.
- Colour profile: Assign a press-standard CMYK profile such as Coated FOGRA39, or use the profile your printer specifies.
Confirm your printer’s specifications
Your printer may require specific CMYK profiles or trim settings that differ from general defaults. Request their print specification sheet before you lock in your document setup. Matching these requirements now prevents revision rounds after you submit your file.
Export PDF X-1a from Adobe Illustrator
Illustrator is one of the most common tools for creating print-ready artwork, and its Save As dialog gives you direct access to all the pdf x-1a export settings you need. The process is straightforward once you know which options to select, but skipping a single setting can produce a non-compliant file that your print shop’s preflight system will reject.
Steps to export from Illustrator
Open your finalised document, then follow these steps in order to produce a compliant file:

- Go to File > Save As and choose Adobe PDF (.pdf) from the format dropdown.
- In the Save Adobe PDF dialog, open the Adobe PDF Preset dropdown and select [PDF/X-1a:2001].
- In the Marks and Bleeds panel, tick "Use Document Bleed Settings" or enter 3mm manually on all four sides.
- In the Output panel, set the Destination to your agreed CMYK profile, such as Coated FOGRA39.
- In the Advanced panel, confirm the Transparency Flattener is set to High Resolution.
- Click Save PDF.
Selecting the [PDF/X-1a:2001] preset automatically locks most critical settings, so only bleed and colour profile need manual confirmation.
Settings to double-check before saving
After selecting the preset, two panels still need your direct attention before you click Save PDF. In the Output panel, verify that Colour Conversion is set to "Convert to Destination" and that the destination profile matches exactly what your printer specified. In the Advanced panel, confirm the Subset Fonts Below field is set to 100%, which forces full font embedding rather than partial embedding, preventing font substitution errors on press.
Export PDF X-1a from InDesign and Photoshop
Both InDesign and Photoshop handle pdf x-1a export settings slightly differently from Illustrator, but the core requirements stay the same. Knowing the exact menu path and which options to confirm in each application means you can produce a compliant file consistently, regardless of which tool you used to build your design.
Export from InDesign
InDesign is built for multi-page print layouts, and its export dialog is the most feature-complete of the three applications. Use these steps to export your file correctly:
- Go to File > Export and select Adobe PDF (Print) from the format dropdown.
- In the Export Adobe PDF dialog, choose [PDF/X-1a:2001] from the Adobe PDF Preset dropdown.
- In the Marks and Bleeds panel, enable "Use Document Bleed Settings" or enter 3mm on each side manually.
- In the Output panel, set Colour Conversion to "Convert to Destination" and select your agreed CMYK profile.
- Click Export.
Selecting the PDF/X-1a:2001 preset in InDesign locks colour and transparency requirements automatically, so you only need to confirm bleed and output profile manually.
Export from Photoshop
Photoshop requires one extra step because it is a raster-based application: your document must already be in CMYK mode before you export. Go to Image > Mode > CMYK Colour first if it is not already set. Then follow these steps:
- Go to File > Save As and choose Photoshop PDF.
- Select the [PDF/X-1a:2001] preset from the Adobe PDF Preset dropdown.
- Confirm that Embed Fonts and Flatten Image are both enabled before saving.
- Click Save PDF.
Verify your PDF and fix common failures
Once you apply your pdf x-1a export settings and save the file, confirm the output is compliant before submitting it to your printer. A visual check of the file is not enough to catch technical errors. Adobe Acrobat Pro’s preflight tool is the most reliable way to run a structured check against the PDF/X-1a standard and catch any issue your export dialog may have missed.
Run a preflight check before every file submission, even if you followed every export step correctly.
Use Acrobat’s preflight tool to check compliance
Open your exported PDF in Adobe Acrobat Pro, then navigate to Tools > Print Production > Preflight. In the Preflight dialog, search for "PDF/X-1a" and select the matching profile from the results list. Click Analyse and wait for Acrobat to finish. The tool returns a detailed report listing every failure with a plain description, so you know exactly which element is non-compliant and where it sits in the document.
Fix the most common PDF/X-1a failures
Most preflight failures come from a short list of predictable causes that repeat across different design files. Reviewing the table below helps you match each error message to the correct fix without rebuilding your document.
| Failure | Cause | Fix |
|---|---|---|
| RGB colour found | Placed image not converted | Re-export image in CMYK from source |
| Font not embedded | Font missing from system | Install font and re-export |
| Transparency not flattened | Live effect left in document | Expand appearance and re-export |
| Bleed insufficient | Document bleed not set | Add 3mm bleed and re-export |
| Encryption present | PDF saved with password | Re-save without security settings |
After you fix the flagged items, run the preflight check a second time to confirm no new errors were introduced. This final pass takes under a minute and protects you from submitting a file with a hidden compliance issue.
Wrap up and send your file with confidence
Following the pdf x-1a export settings in this guide gives you a print-ready file that holds up under any professional printer’s preflight system. You now know how to set up your document before export, configure the correct output options in Illustrator, InDesign, and Photoshop, and run a structured compliance check in Acrobat before you submit anything. Each step builds on the previous one, so skipping ahead is the fastest way to create a problem you will need to fix later.
Submitting a clean, compliant file means faster production, fewer revision rounds, and a final printed piece that matches your design exactly. Whether you are printing business cards, banners, custom labels, or branded apparel materials, the process is the same every time once you build the habit.
Ready to put your print-ready file to use? Order custom print products and apparel from Apex Workwear and get your order into production quickly.