You’ve spent hours perfecting your business card design, only to receive the final print with your logo partially chopped off at the edge. This happens more often than you’d think, and it’s almost always because the safe margin for print design wasn’t properly set up. Understanding these measurements can mean the difference between a polished result and a costly reprint.
At Apex Workwear, we produce custom print products daily, business cards, flyers, banners, presentation folders, and more. We see firsthand how proper margins, bleed areas, and safe zones affect the final trimmed piece. Whether you’re designing materials yourself or sending files to our team, knowing these specifications ensures your important content stays exactly where it belongs after the paper cutter does its job.
This guide covers the standard measurements for safe margins across common print products, explains how bleed works in practice, and clarifies the relationship between trim lines and safe areas. You’ll walk away with specific numbers you can apply immediately to your next design project, so your text, logos, and graphics remain intact and professionally positioned every time.
Safe margin, bleed, trim, and safe area
Before you send any file to print, you need to understand four distinct zones on your design canvas. These measurements work together to ensure your printed piece looks exactly as intended after the production process. Many designers confuse these terms or use them interchangeably, which leads to preventable printing errors and disappointed clients.
Understanding bleed
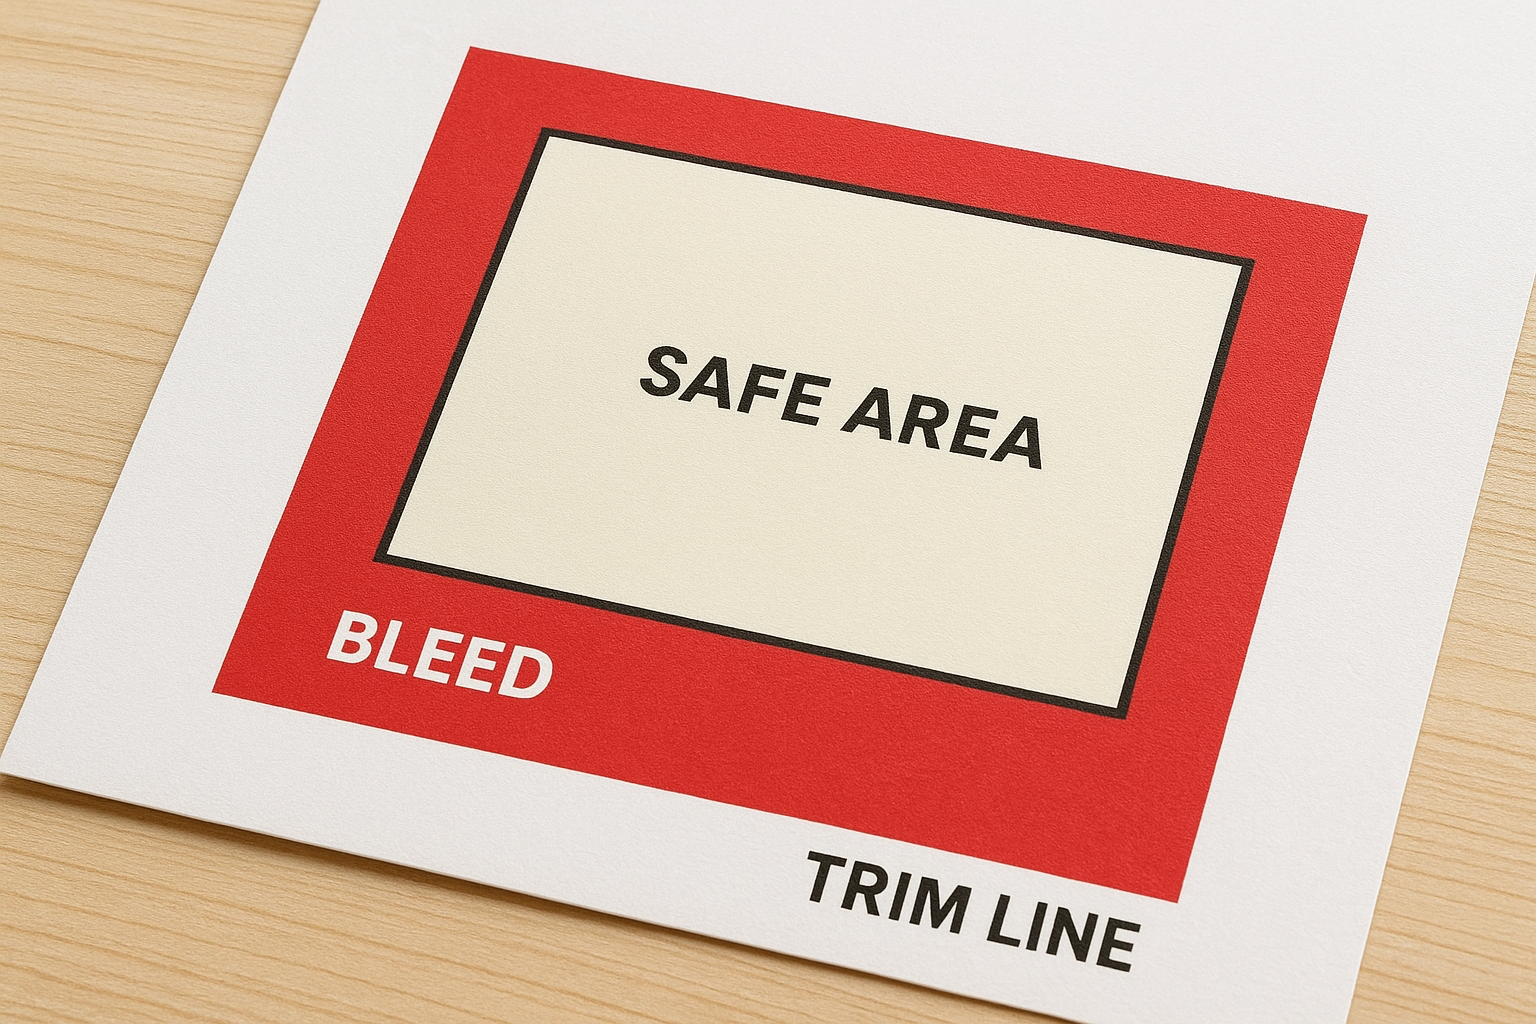
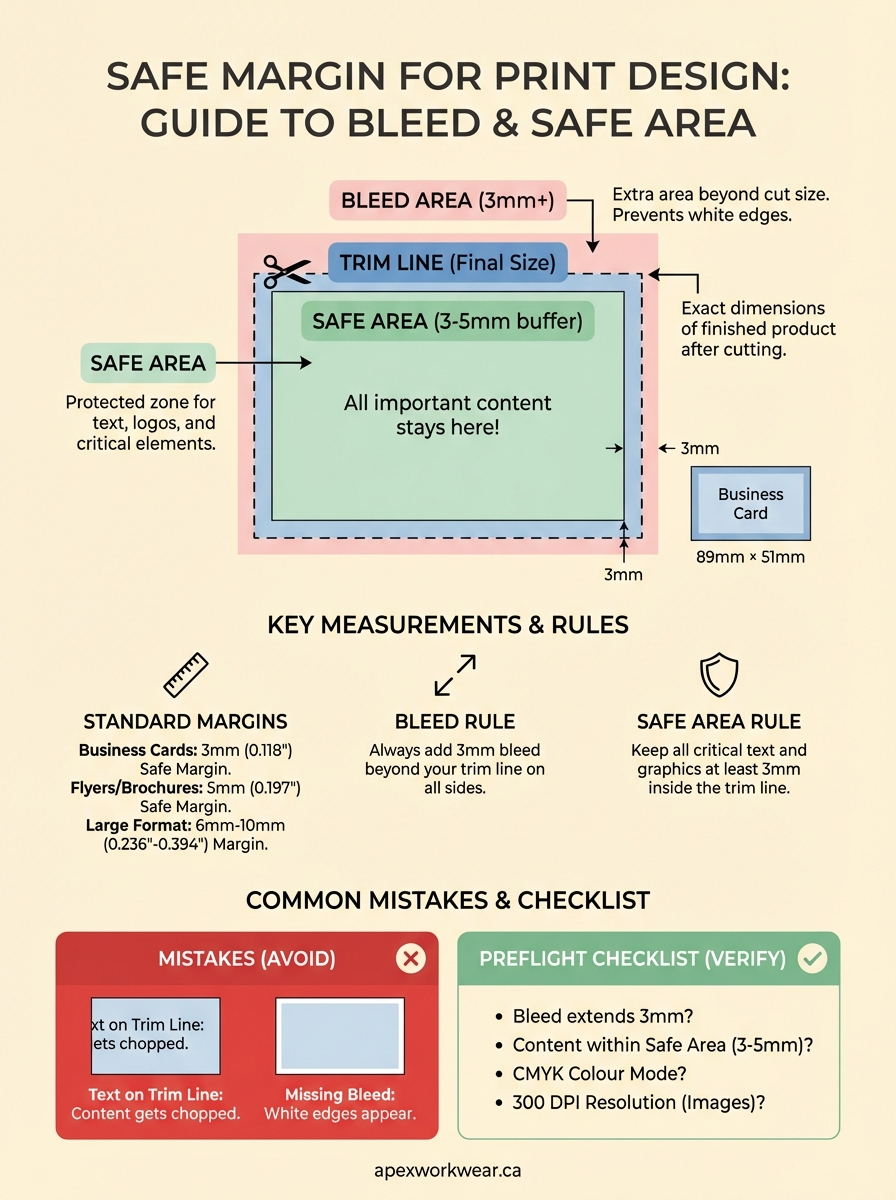
Bleed refers to the extra area beyond your final cut size where your background colours, images, or design elements extend. You add bleed to prevent white edges from appearing if the cutting process shifts slightly. Most printers request a 3mm bleed on all sides, though some large-format items may require 6mm. Your design software should display this bleed area as a coloured guide extending past the document edge.
The trim line
The trim line marks the exact dimensions of your finished product after cutting. A standard business card has a trim size of 89mm × 51mm in Canada, while a letter-sized flyer trims to 216mm × 279mm. Printers use industrial cutting machines that slice through large sheets, and this line represents where the blade cuts. Nothing critical should sit directly on this line because cutting tolerances vary slightly between print runs.
Safe area defined
Your safe area sits inside the trim line by 3mm to 5mm on all edges. This protected zone ensures that text, logos, contact information, and other critical elements survive the cutting process intact. The safe margin for print design prevents your important content from getting accidentally trimmed if the paper shifts during production.
Keep all text and essential graphics at least 3mm inside the trim line to guarantee they appear on your final printed piece.
Why safe margins matter in print
Print production involves mechanical cutting processes that operate at high speeds across thousands of sheets per day. Your design file gets printed on larger sheets alongside other jobs, then trimmed down to the final size using industrial guillotine cutters. While these machines cut accurately, they allow for tolerances of roughly 1mm to 2mm in any direction. This slight variation happens because paper shifts microscopically during the cutting process.
Production tolerances aren’t perfect
Every print shop works within acceptable tolerance ranges that account for natural material behaviour. Paper expands and contracts based on humidity levels in the production facility. Sheets stack unevenly when cut in large batches. The cutting blade itself creates microscopic movement as it slices through paper, meaning your trim line might land 1.5mm to the left on one batch and 1.5mm to the right on another. Without proper safe margins, your phone number could disappear partially, or your company name might lose its last letter.
Protecting your brand’s professional image
A safe margin for print design ensures your business materials look polished and intentional rather than sloppy. When customers receive a business card with text uncomfortably close to the edge, it signals carelessness. Adequate margins create visual breathing room that makes your content easier to read and more pleasant to hold.
Proper margins protect both your message and your reputation by ensuring every printed piece meets professional standards.
Standard safe margin sizes in mm and inches
The safe margin for print design varies slightly depending on your product type, but most print shops follow industry-standard measurements that you can apply across projects. These numbers represent the minimum distance you should maintain between critical content and the trim line to ensure nothing important gets cut off during production.
Business cards and small formats
Standard business cards require a 3mm (0.118 inch) safe margin on all four sides. This measurement accounts for cutting tolerances while maintaining comfortable white space around your text. Your card’s trim size measures 89mm × 51mm in Canada, so your safe area becomes 83mm × 45mm. Postcards, loyalty cards, and similar small formats follow this same 3mm rule regardless of their final dimensions.
Flyers, brochures, and letter-sized products
Letter-sized materials typically use a 5mm (0.197 inch) safe margin to accommodate larger cutting equipment. A standard flyer at 216mm × 279mm should keep text within 206mm × 269mm. Brochures, door hangers, and presentation folders benefit from this slightly larger buffer because readers handle these items more frequently, making edge proximity more noticeable.
Always add 3mm bleed beyond your trim line while keeping safe margins 3mm to 5mm inside the trim line.
Large-format items
Banners, posters, and yard signs require 6mm to 10mm (0.236 to 0.394 inch) margins due to their size and cutting methods. Your larger surface area amplifies any cutting variation, making generous margins essential for professional results.
How to set margins and bleed in design files
Setting up your safe margin for print design correctly in your design software prevents problems before files reach the printer. Most design applications include built-in tools for establishing bleed areas and guide lines that mark your safe zones. You configure these settings during document creation or adjust them afterwards through your software’s preferences.
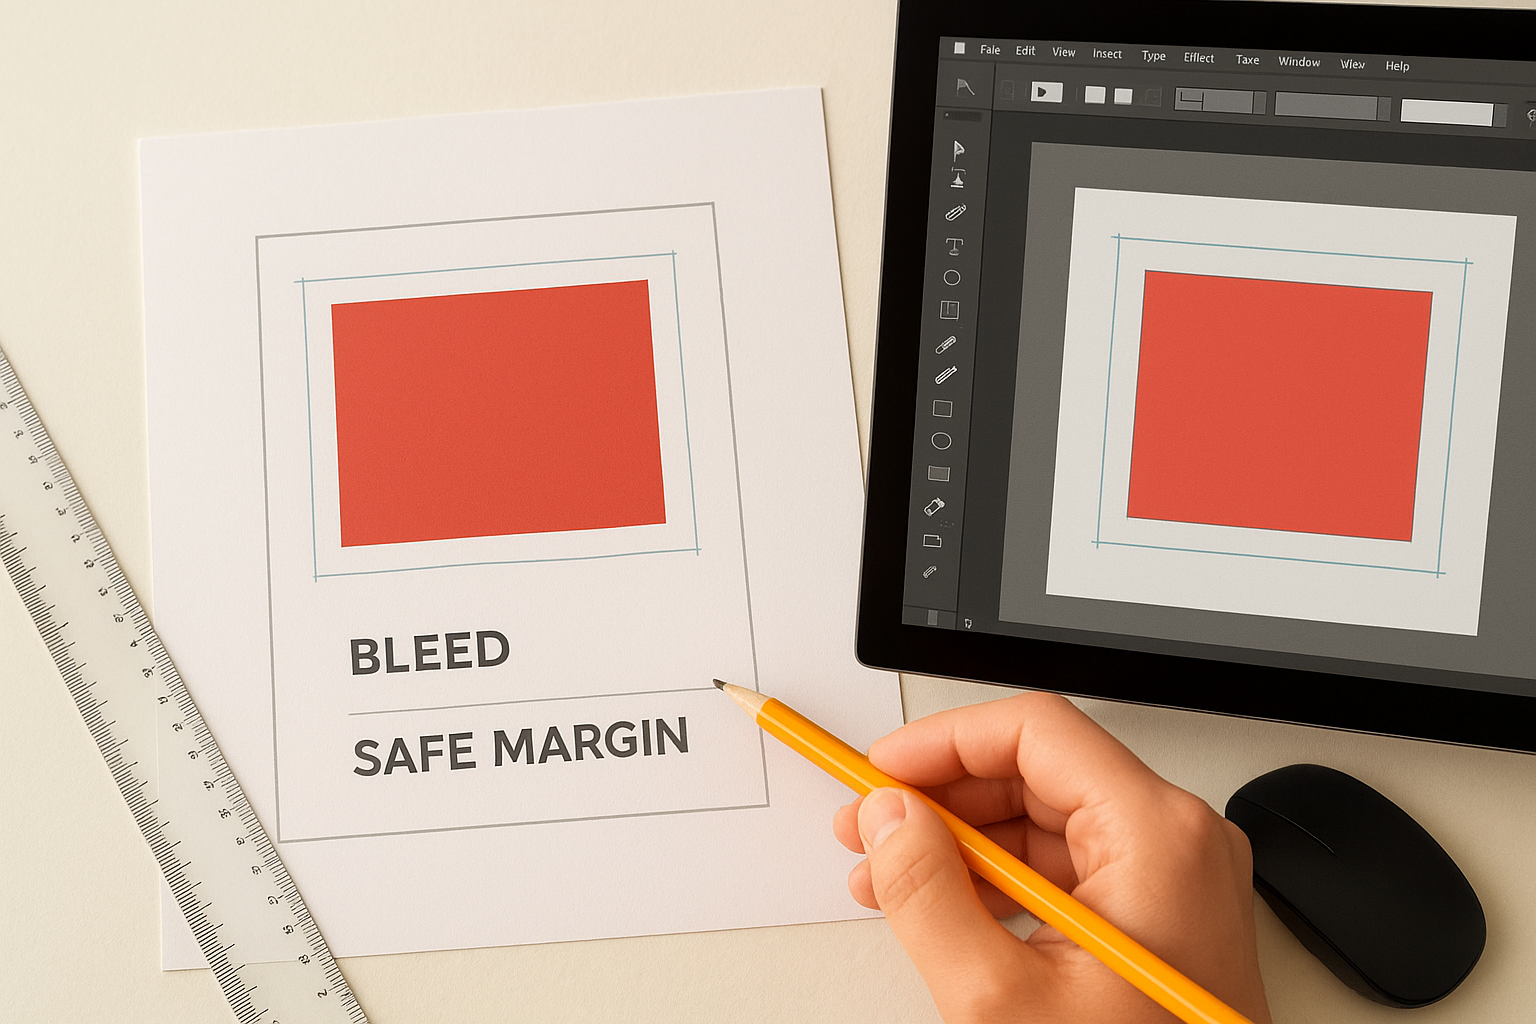
Adobe InDesign and Illustrator
InDesign lets you define bleed settings when you create a new document. Enter 3mm in all four bleed fields under the "Bleed and Slug" section. After your document opens, add guides manually by dragging from the ruler, positioning them 3mm inside your trim edge to mark your safe area. Illustrator follows a similar process through Document Setup, where you activate the bleed settings and manually place guide lines for your content boundaries.
Configure bleed and safety guides before placing any content to avoid repositioning elements later.
Other design software options
Canva, Affinity Designer, and similar tools require you to manually extend your canvas size to accommodate bleed. If your trim size measures 89mm × 51mm, create your document at 95mm × 57mm to include 3mm bleed on all sides. Place guide lines 3mm from each edge to mark where your safe content area begins, ensuring text and logos remain protected during the cutting process.
Common mistakes and a preflight checklist
Designers regularly submit files with preventable errors that force reprints or result in compromised final products. You can avoid these issues by checking your work against common pitfalls before sending files to production. Understanding where most mistakes occur helps you create a systematic review process that catches problems early.
Typical design errors
Placing text directly on the trim line represents the most frequent mistake across all print products. Your contact details, logo edges, or important graphics end up partially cut off because you positioned them exactly at the document boundary. Another common error involves forgetting to extend backgrounds and images into the bleed area, which creates unsightly white edges on the finished piece. Converting RGB colour files to CMYK happens last minute, resulting in unexpected colour shifts that don’t match your screen preview.
Pre-submission checklist
Run through this verification process before you submit any print file. Check that your safe margin for print design maintains 3mm to 5mm inside the trim line for all text and critical elements. Confirm your bleed extends 3mm beyond the trim edge on all sides. Verify your colour mode matches print requirements (CMYK). Ensure images sit at 300 DPI resolution minimum for sharp output.
Always review your file with guides visible to confirm content stays within safe boundaries and bleed extends properly.
Quick recap
Your safe margin for print design protects critical content from cutting tolerances during the production process. You need to maintain 3mm to 5mm inside the trim line for text and logos, while extending backgrounds and images 3mm beyond the trim edge as bleed. These measurements ensure your printed materials look professional after the cutting equipment does its job, preventing partially cut text or unwanted white edges.
Setting up your files correctly from the start saves time and prevents costly reprints. Configure bleed settings in your design software, place guide lines to mark safe boundaries, and verify your work against a preflight checklist before submission. Small format items like business cards require 3mm margins, while larger products need 5mm to 10mm depending on their size.
When you’re ready to bring your designs to life, Apex Workwear produces custom print products with expert review and guidance included. We check your files and provide feedback to ensure your finished pieces meet professional standards every time.