You need brochures for an upcoming event or customer handout. You want something more substantial than a flyer but simpler than a full catalog. Bi fold brochures give you four panels to work with when you fold a single sheet in half. But when you start shopping around, you hit a wall of choices. What size should you pick? Which paper stock? Matte or gloss? How much will it cost? And who can actually print them without making you jump through hoops?
This guide walks you through the entire ordering process. You’ll learn exactly what to specify, how to prepare your files, and where to find reliable printers in Canada.
We’ll cover everything from choosing the right size and finish for your brand to getting your design print ready. You’ll see what affects pricing, how to compare quotes, and what turnaround times to expect. By the end, you’ll know how to order bi fold brochures with confidence.
What to know before you order bi fold brochures
Bi fold brochure printing works differently than ordering business cards or flyers. You’re dealing with four usable panels when you fold a single sheet in half, and each panel needs to tell part of your story. The front cover grabs attention, the two inside panels deliver your message, and the back panel includes your call to action or contact details. Most printers offer standard sizes and finishes, but you’ll need to understand what’s available before you can make smart choices about your project.
Common bi fold brochure sizes
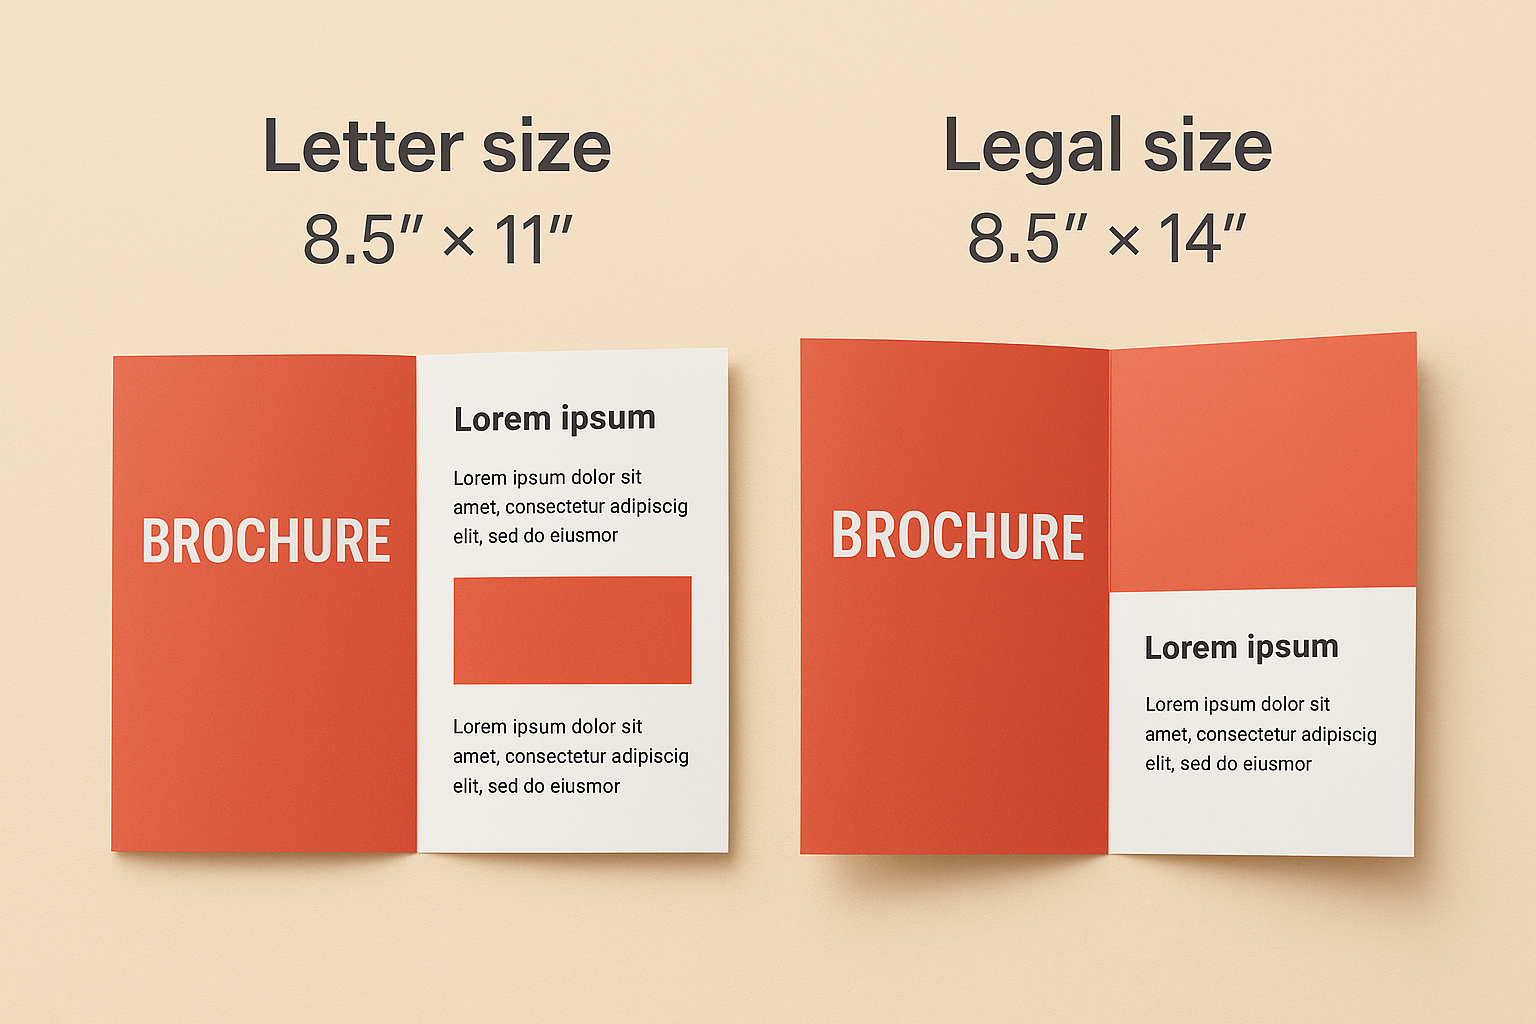
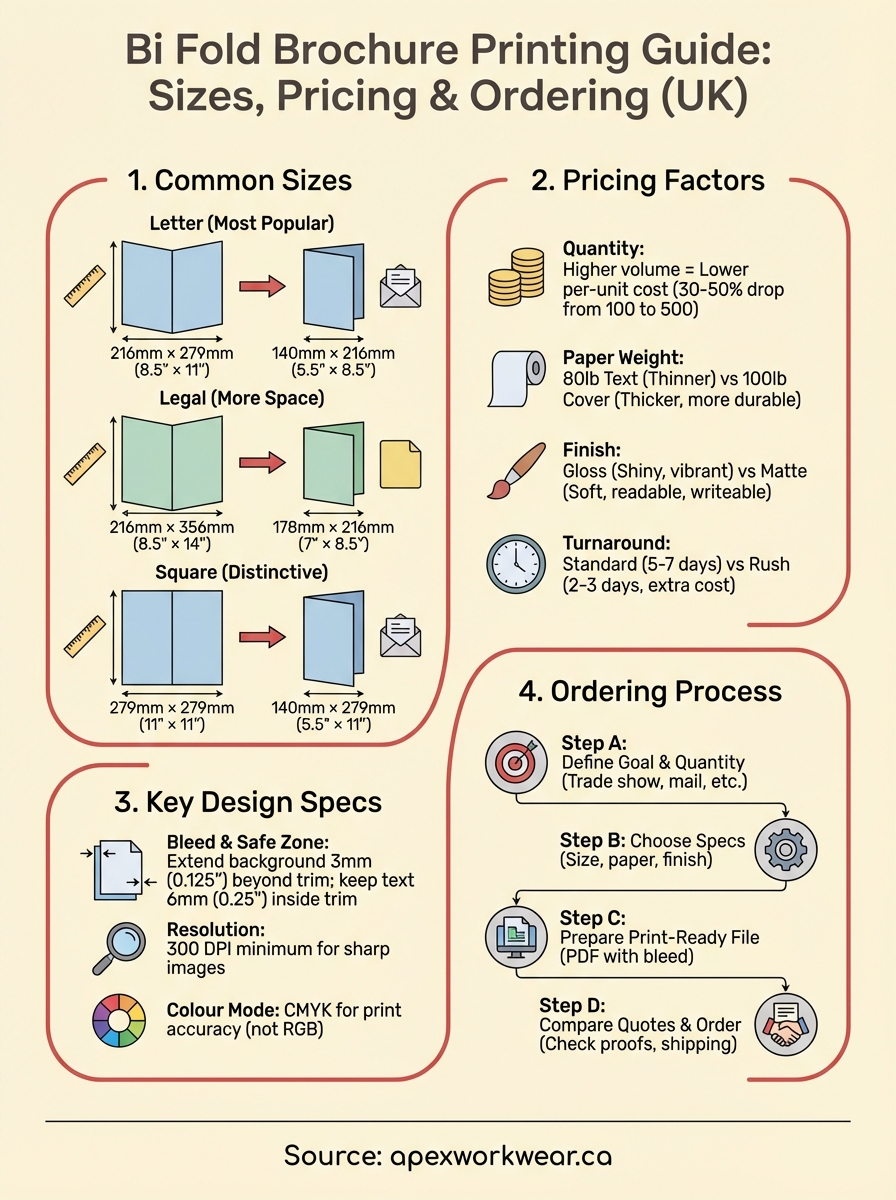
Letter size (8.5″ × 11″) is the most popular choice in Canada. When folded, it becomes 5.5″ × 8.5″, which fits easily into most racks, folders, and envelopes. You can also order legal size (8.5″ × 14″) for more content space, though this creates a longer folded piece at 7″ × 8.5″. Some printers offer square formats like 11″ × 11″ for a more distinctive look, but these often cost more and require custom envelope sizes if you’re mailing them.
Standard pricing factors
Your final cost depends on four main variables: quantity, paper weight, finish, and turnaround time. Ordering 100 brochures will have a higher per-unit cost than ordering 500 because setup costs get spread across fewer pieces. Paper weight typically ranges from 80 lb text (thinner and more flexible) to 100 lb cover stock (thicker and more premium). The finish you choose (matte, gloss, or uncoated) affects both look and price, with gloss usually costing slightly more.
Prices typically drop by 30-50% per unit when you move from 100 to 500 copies.
Rush orders add to your costs. Standard turnaround runs 5-7 business days for most Canadian printers, but you can often pay extra for 2-3 day production if you’re in a hurry.
Step 1. Define your brochure goal and quantity
Start by writing down exactly what you need your brochure to do. Are you handing them out at a trade show? Mailing them to prospects? Leaving them in a waiting room? Your distribution method directly affects how many you need and which specifications make sense. A brochure that sits in a rack needs durability, while a mailed piece needs to fit standard envelope sizes. Your goal determines everything else about your order.
Identify your distribution method
Different uses require different quantities. Trade show handouts typically need hundreds or thousands of copies because you’re distributing them freely to anyone who stops by your booth. Direct mail campaigns need exact counts based on your mailing list plus 10% extra for mistakes and replacements. If you’re stocking multiple locations like retail stores or offices, multiply your per-location needs by the number of sites. Sales presentations usually need smaller runs of 50-100 copies because you’re giving them to qualified prospects only.
Calculate your quantity needs
Work backwards from your timeline and distribution plan. Count how many people you expect to reach, then add 20% buffer stock for unexpected opportunities. Consider your shelf life too. Product information changes fast, so ordering 5,000 brochures with pricing that might change in three months wastes money. Most bi fold brochure printing orders fall between 100 and 1,000 copies because this range balances per-unit costs with the risk of outdated information.
Ordering 250-500 copies typically offers the best balance between cost per unit and avoiding excess inventory.
Write down your final quantity before you start shopping for printers. This number locks in your budget range and helps you compare quotes accurately.
Step 2. Choose size, layout, paper and finish
Your specifications directly control how professional your brochures look and how much you pay. Canadian printers stock standard sizes that keep costs down, but you can also request custom dimensions if your design demands it. Each choice you make (size, paper weight, finish) affects both your total cost and how people perceive your brand. Paper weight determines durability, finish controls how light reflects off your brochure, and size dictates where you can display or mail your pieces.
Standard size options
Letter size (8.5″ × 11″) works for most bi fold brochure printing projects in Canada because it folds to 5.5″ × 8.5″, which fits standard brochure racks, display holders, and #10 envelopes. This size gives you plenty of space for text and images without overwhelming readers. Legal size (8.5″ × 14″) creates a taller, more distinctive folded piece at 7″ × 8.5″, but you’ll pay more for the extra paper and it won’t fit standard display fixtures. Some printers offer custom sizes like 11″ × 17″ that fold to tabloid dimensions, though setup charges often apply for non-standard cuts.
Pick letter size unless you have a specific reason to go larger. Most Canadian businesses stick with 8.5″ × 11″ because it keeps costs predictable and works with existing display equipment.
Paper stock choices
Paper weight ranges from 80 lb text (similar to magazine pages) up to 100 lb cover stock (thick like a postcard). Text weight (80-100 lb) costs less and works well for high-volume handouts where you’re distributing hundreds of copies. Cover stock (80-100 lb) feels more substantial in your hands and survives multiple handlings better, making it ideal for brochures that sit in waiting rooms or get mailed. Heavier paper costs more per unit but projects higher quality.
Most printers use 80 lb gloss text as their baseline because it balances cost and quality. You’ll pay roughly 15-25% more to upgrade to 100 lb cover stock, but the difference in feel is immediately noticeable. Order sample packs from your printer if you’re unsure which weight matches your brand image.
Finish comparisons
Three finish options dominate bi fold brochure printing: gloss, matte, and uncoated. Gloss finish creates vibrant colours and sharp images with a shiny surface that reflects light. It shows fingerprints easily and creates glare under bright lights. Matte finish offers softer colours with no glare, making text easier to read in any lighting. You can write on matte surfaces with pens, which helps for order forms or registration brochures. Uncoated paper has no coating at all, giving you a natural, textured feel that works well for environmentally conscious brands but shows less colour vibrancy.
Gloss typically costs 10-15% more than matte, while uncoated usually matches matte pricing.
Choose gloss for photo-heavy brochures where colour impact matters most. Pick matte when readability and reduced glare trump colour intensity. Select uncoated for eco-friendly brands or when you want a handcrafted feel.
Layout considerations
Your content determines which panels carry your most important information. The front cover (panel 1) needs your headline and main visual because it’s the first thing people see. Panel 2 (inside left) typically introduces your offer or problem statement. Panel 3 (inside right) delivers details, features, or benefits. The back panel (panel 4) includes your contact information, call to action, and logo. Canadian printers expect you to number your panels correctly in your design files, with panel 1 being the right half of your flat sheet and panel 4 being the left half when viewing the unfolded layout face-up.
Sketch your content across all four panels before finalising sizes and finishes. This prevents expensive redesigns after you’ve already placed your order.
Step 3. Prepare a print ready brochure design
Your printer needs files that meet specific technical requirements before they can start production. Print ready files eliminate delays caused by resolution issues, colour problems, or incorrect dimensions. Most Canadian printers reject files that don’t meet their specifications, which pushes your delivery date back by days while you fix and resubmit. You need to prepare your design with exact measurements, proper colour modes, and sufficient resolution to avoid these problems.
File format and resolution requirements
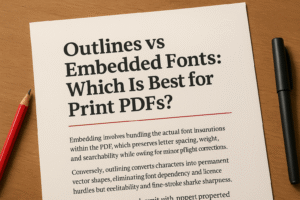
Submit your bi fold brochure printing files as PDF with embedded fonts and images. Printers prefer PDF because it locks your layout exactly as you designed it, preventing font substitution or image shifting. Your images need 300 DPI (dots per inch) minimum at full size to print sharp and clear. Lower resolution works fine on screens but creates blurry prints. Convert all colours to CMYK colour mode instead of RGB, because printers use cyan, magenta, yellow, and black inks that can’t reproduce RGB colours accurately. RGB blues and greens often print duller than they appear on your monitor.
Files under 300 DPI or in RGB colour mode will delay your order by 2-3 business days for corrections.
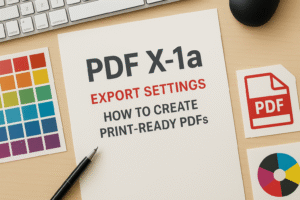
Save your PDF with these settings: PDF/X-1a or PDF/X-4 standard, all fonts embedded or outlined, trim marks included, and bleed areas extended. Check your file size stays under 100 MB for smooth upload to most printing websites.
Bleed, margins, and safe zones
Bleed refers to extending your background colours or images 0.125 inches (3 mm) beyond your trim line on all four edges. Printers cut multiple brochures at once using large guillotine cutters, and minor variations mean your cut might land 1-2 mm off the marked line. Without bleed, you risk white borders appearing along your edges. Keep all critical text and logos at least 0.25 inches (6 mm) inside your trim line to create a safe zone that protects important elements from accidental trimming.

For 8.5″ × 11″ brochures, create your document at 8.75″ × 11.25″ to include the 0.125″ bleed on each side. Your actual trim size remains 8.5″ × 11″, but you’re giving the printer extra image area to work with.
Design file checklist
Verify these items before uploading your files:
- Document size includes 0.125″ bleed on all edges
- All images are 300 DPI in CMYK colour mode
- Text sits at least 0.25″ from trim lines
- PDF includes crop marks and bleed marks
- All fonts are embedded or converted to outlines
- File is under 100 MB
Export a low-resolution proof to your desktop and print it on your home printer at actual size. This helps you catch text sizing problems, alignment issues, or colour concerns before spending money on full production. Mark any changes on your printed proof, fix them in your design software, then export your final PDF.
Step 4. Compare printers and place your order
Shopping for bi fold brochure printing requires more than picking the cheapest option. You need to compare actual quotes with identical specifications to see real price differences. Many printers advertise low starting prices but add charges for colour printing, design review, or faster turnaround. Request written quotes that include all costs before you commit to any printer. Canadian printers typically respond within 24 hours with detailed pricing based on your exact specifications.
Get quotes from multiple Canadian printers
Contact at least three different printers with your complete specifications: quantity, size (8.5″ × 11″), paper weight (80 lb gloss text or 100 lb cover), finish (gloss or matte), and required delivery date. Ask each printer to confirm their turnaround time and shipping costs to your location. Compare quotes side by side using a simple spreadsheet with columns for printer name, total cost, per-unit cost, turnaround days, and shipping fees. This reveals which printer offers genuine value versus hidden charges that inflate your final bill.
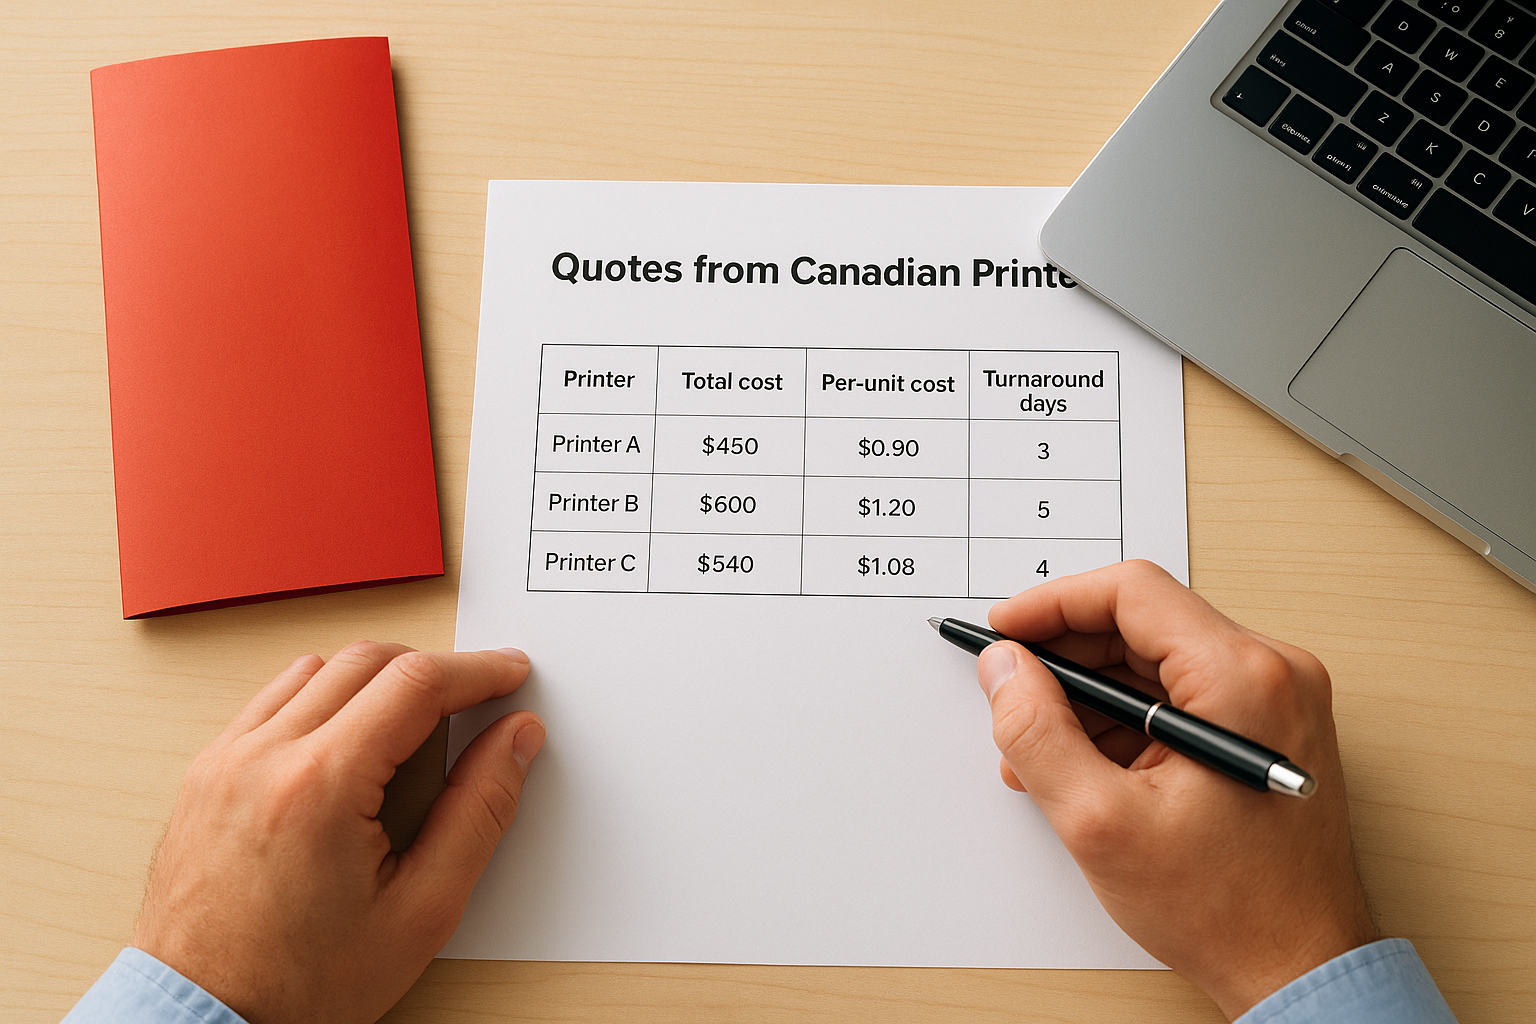
Comparing three quotes typically reveals price differences of 20-40% for identical specifications.
Check what’s included in your quote
Verify that each quote includes proofing before printing and any design assistance you need. Some printers charge extra for colour matching or reviewing your files for technical issues. Confirm whether shipping costs and taxes appear in the total or get added later. Ask about rush charges if you need faster delivery than standard 5-7 business days. Check their refund or reprint policy for quality problems. Legitimate printers guarantee their work and reprint at no charge if errors occur on their end.
Place your order correctly
Choose your printer based on total delivered cost and confirmed turnaround time, not just the lowest per-unit price. Upload your print-ready PDF through their website or email it to their production team. Include your order number and specifications in your file name: “CompanyName-Bifold-8.5×11-500qty.pdf” prevents confusion if they’re handling multiple jobs for you. Pay by credit card for purchase protection rather than e-transfer. Request email confirmation with your proof approval deadline and expected ship date. Save this confirmation email as proof of your order terms.
Next steps for your brochures
You now have everything you need to order bi fold brochure printing with confidence. You understand which size works for your distribution method, how paper weight and finish affect your brand perception, and what makes a design file print-ready. Your next move is to finalize your specifications (quantity, size, paper, finish) and gather quotes from Canadian printers who can deliver on your timeline.
Start by creating or reviewing your design to confirm it includes proper bleed, safe zones, and CMYK colours. Request quotes with your exact specifications from at least three printers. Compare their total delivered costs, turnaround times, and what’s included in their pricing. Once you choose your printer, upload your files and request a proof before production begins.
Need reliable bi fold brochure printing in Canada? Apex Workwear handles your print projects with fast turnaround and expert design support for brochures, business cards, and other marketing materials. Get your free quote within 24 hours and see how simple professional printing can be.