You want a cap with your logo on it, but you’re not sure how the process actually works or what to ask for when you request a quote. That’s where custom caps embroidery comes in, and getting the basics right before you order saves you money and stops you ending up with a design that looks nothing like what you pictured.
This article walks through exactly what custom cap embroidery is, how the stitching process works from digitised artwork to finished product, and what affects turnaround time and pricing along the way. If you’ve searched for custom hat embroidery Canada and found a maze of confusing terms like thread count, stitch density, or backing options, this breaks it down in plain language.
We’ll also cover why no minimum orders matter if you’re a small business or a solo contractor who just needs a handful of caps, not a few hundred. By the end, you’ll know exactly what to expect when you send your logo off for embroidery, and how a Canadian producer like Apex Workwear handles the job from proof to finished product.
Why custom cap embroidery matters for your brand
A cap sits above eye level, and that makes it one of the most noticed pieces of clothing a person wears. When someone meets a crew member on a job site or spots a staff member at a trade show, the logo on the cap often registers before anything else does. Custom cap embroidery turns a plain accessory into a walking advertisement that works every time it’s worn, at no extra cost to you beyond the initial order. Unlike a printed shirt that might sit folded in a drawer, a cap gets grabbed on the way out the door because it’s practical, and that daily use means your branding travels further than most marketing spend can buy.
Stitched logos last longer than printed ones
Thread doesn’t crack, peel, or fade the way screen print can after repeated washing and sun exposure. Embroidered logos hold their shape and colour through years of wear, which matters if your caps are going to contractors who wear the same one on site every day for months. Ask any print shop owner and they’ll tell you the same thing.
A stitched logo on a cap will outlast almost every other branded item you hand out.
Where embroidered caps actually get used
Small businesses reach for caps in situations where a t-shirt or brochure just doesn’t fit the moment. Some of the most common uses we see include:
- Job sites and trades: crews wearing branded caps look organised to clients and pass building security more easily when the logo is recognisable.
- Retail and hospitality staff: a consistent cap gives customers a quick visual cue of who to ask for help.
- Events and trade shows: caps double as giveaways that keep your logo visible long after the event ends.
- Sports teams and community groups: matching caps build a sense of belonging that printed handouts rarely achieve.
Perceived quality reflects on your business
Customers and clients read small signals about a company before they ever read a proposal or contract. A clean, well-stitched cap tells them you pay attention to detail, while a cheap-looking iron-on patch suggests the opposite. This is especially true for contractors and startups trying to look established against bigger competitors. Spending a bit more on proper hat embroidery custom work rather than a quick print pays off the first time a client notices the difference. Given how visible caps are compared to other branded items, they’re often the cheapest way to make your business look more polished than its size might suggest.
How custom cap embroidery works, step by step
Getting a logo onto a cap is a mechanical process with a few distinct stages, and knowing them helps you spot problems before they happen. Custom cap embroidery starts with your artwork and ends with a finished, wearable product, but the steps in between determine how sharp that final logo looks.
From artwork to stitches
Your logo first needs to be turned into a digitised file, a stitch-by-stitch map that tells the embroidery machine exactly where thread goes, in what colour, and at what density. This isn’t the same as a print file. A logo with fine text or gradients often needs simplifying, because tiny details that look fine on screen can turn into a blob of thread on fabric. A good producer flags this at the proof stage rather than after the caps are sewn.
The digitising step decides how clean your final logo looks more than any other part of the process.
The production stages
Once the digitised file is approved, the cap moves through these steps:
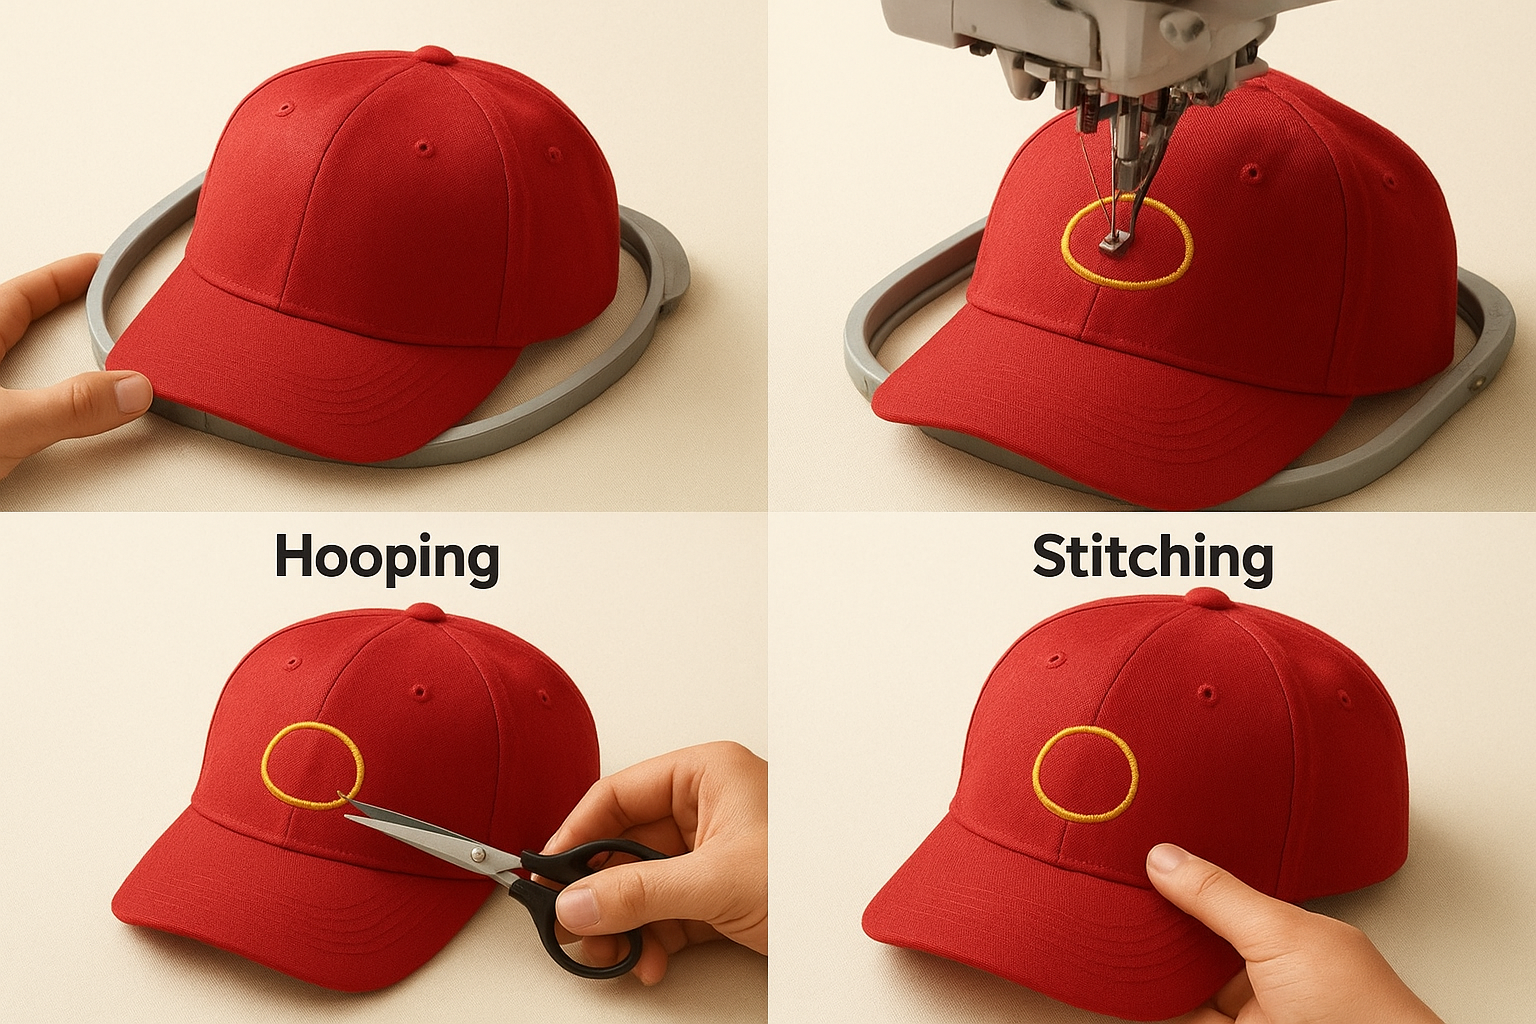
- Hooping: the cap panel is stretched tight in a frame so the fabric doesn’t shift during stitching.
- Stitching: the machine runs the digitised pattern, building up the logo thread by thread.
- Trimming: loose threads and backing material get cut away.
- Quality check: someone inspects stitch density, colour match, and placement before packing.
Speed varies by machine and design complexity, but a single-colour logo with simple shapes stitches faster than a detailed multi-colour crest. Once you’ve seen a digital proof and signed off, the rest of the run should look identical, cap after cap, which is exactly what you want when you’re ordering for a whole crew.
Embroidery styles and cap options to choose from
Not every logo suits the same stitch style, and not every cap holds embroidery the same way. Before you send off artwork, it helps to know the main choices available, because picking the wrong combination can leave a design looking flat or a cap looking cheap. Custom embroidery caps come in a few standard build types, and the embroidery technique you choose should match both your logo and the cap’s fabric.
Flat versus 3D puff embroidery
Flat embroidery sits close to the fabric and suits detailed logos, small text, and designs with several colours. Puff embroidery raises the stitching with a foam backing underneath, giving bold letters or simple shapes a raised, chunky look that reads well from a distance. Puff works best on thicker structured caps and struggles with fine detail, so a logo full of small text usually looks sharper flat than puffed.
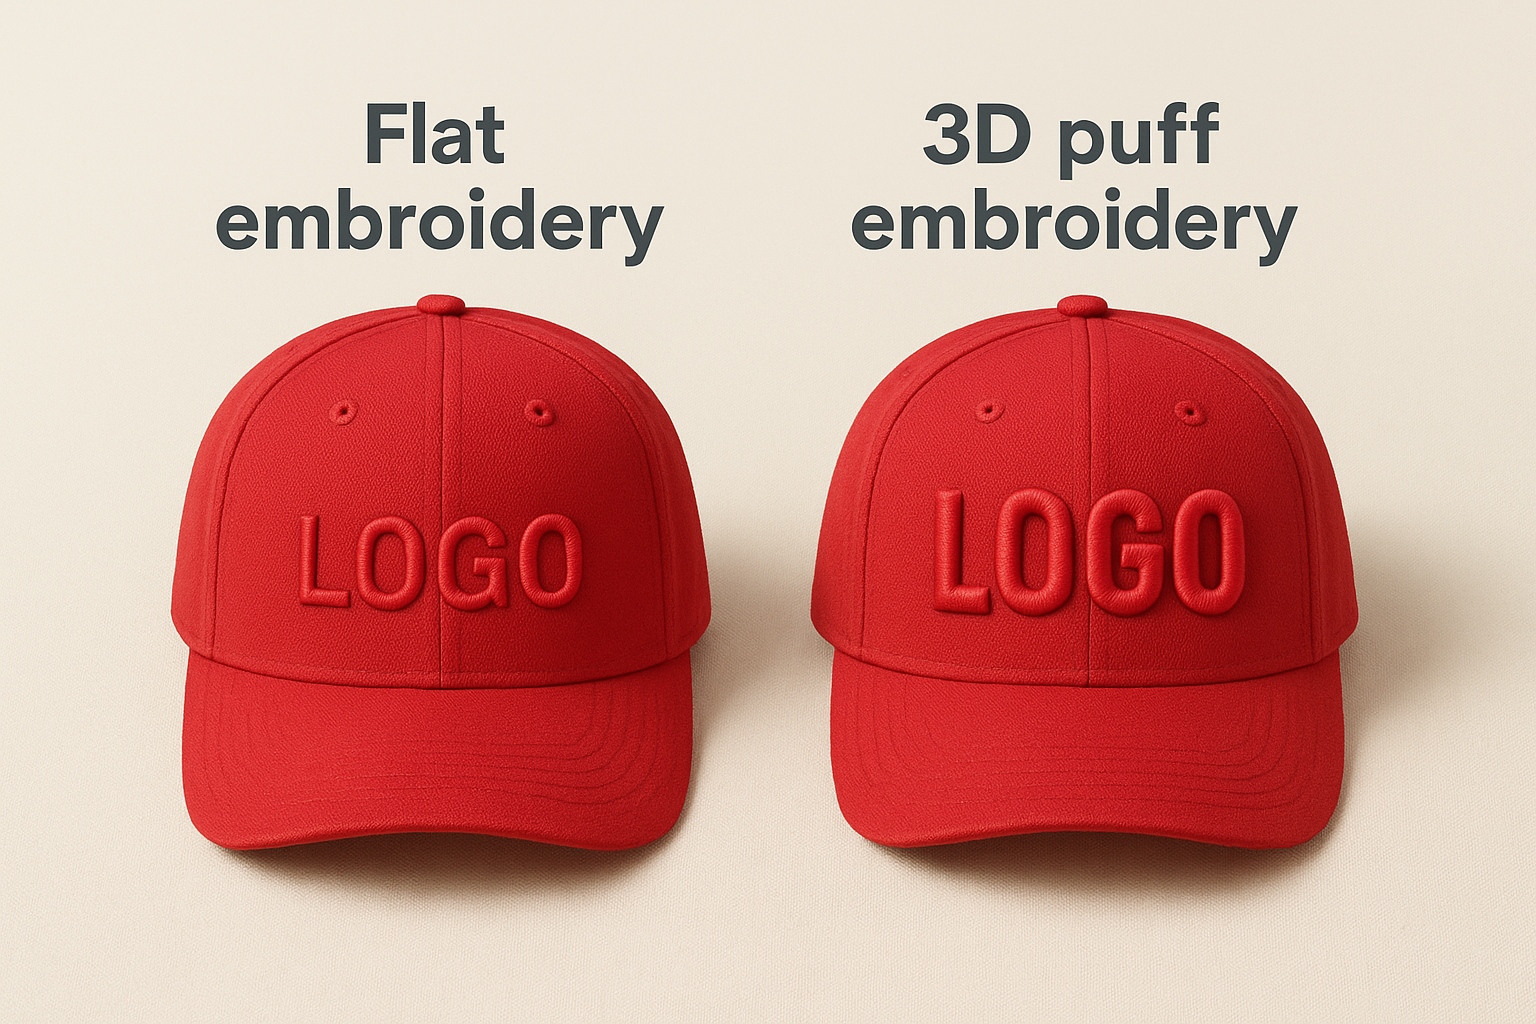
Match the embroidery style to the logo, not the other way round, or you’ll pay to redo it.
Cap styles that take embroidery well
Structured caps with a firmer front panel give embroidery a stable surface, while unstructured or dad-style caps offer a softer, more casual look that still holds stitching fine for smaller logos.
| Cap style | Best for | Embroidery notes |
|---|---|---|
| Structured 6-panel | Corporate logos, crews | Holds detail and puff well |
| Unstructured 5-panel | Casual branding, events | Best with flat, simple designs |
| Trucker/mesh back | Outdoor work, retail | Front panel only, keep design compact |
| Snapback flat brim | Younger audiences, sports teams | Works with bold, larger logos |
Whichever style you pick, embroidery custom hats need a front panel wide enough to fit your design without cramming it, so always check placement on a proof before approving the run.
Ordering custom embroidered caps with no minimums in Canada
Most embroidery shops want bulk orders because setup takes time regardless of quantity, but that leaves solo contractors and startups stuck if they only need five caps for a small crew. Custom embroidered hats no minimum ordering solves this, letting you order exactly what you need instead of paying for stock you’ll never hand out. Apex Workwear builds its process around this, so a single cap or a run of fifty gets the same attention at the proof stage.
Why minimums exist and why some shops drop them
Traditional print shops set minimums because digitising a logo and setting up a machine costs the same whether you order one cap or a hundred, so spreading that cost across a bigger order made sense for them. A shop that removes minimums has usually built efficient digitising and small-batch production into its workflow rather than treating every order like a mass run.
No minimum orders mean you pay for the caps you actually need, not the ones sitting in a closet.
What to check before you commit to an order
Before placing an order with any Canadian embroidery provider, confirm the following:
- Digitising fees: some shops charge a one-off fee to convert your logo, others waive it on repeat orders.
- Proof turnaround: ask how quickly you’ll see a digital proof, ideally within a day or two.
- Shipping coverage: check whether free local shipping applies if you’re ordering within the GTA.
- Reorder process: find out if your digitised file gets saved for faster reorders later.
Ordering custom embroidered hats Canada-wide should feel just as straightforward whether you’re a one-person operation or managing a team of thirty, and a provider without minimums makes that scaling painless as your business grows.
Costs and turnaround times to expect
Budgeting for custom cap embroidery gets easier once you know which factors actually move the price. Stitch count is the biggest driver, since a dense multi-colour crest takes far longer to sew than a simple single-colour logo, and machine time is what you’re paying for. Cap quality also plays a part, as structured caps with firmer panels tend to cost slightly more than basic unstructured styles before any embroidery goes on.
Stitch count, not cap price, is usually what pushes your quote up or down.
What affects the quote
Expect your final price per cap to depend on a mix of these variables:
| Factor | Effect on cost |
|---|---|
| Stitch count | Higher count means more machine time and higher price |
| Number of thread colours | Each colour change adds setup time |
| Cap base style | Structured caps cost more than basic styles |
| Order quantity | Bulk pricing lowers the per-cap cost |
| Digitising fee | One-time charge, often waived on reorders |
Getting a written quote before you commit means no surprises once the invoice lands, so always ask for a breakdown rather than a single flat number.
Standard versus rush turnaround
Suppliers vary, but a realistic turnaround time for standard orders in Canada runs five to seven business days from approved proof to shipped product. Rush service exists for tighter deadlines, though it usually adds a fee since it means bumping your job ahead of others already in the queue. Local buyers in the GTA benefit further when free local shipping is included, since that shaves both time and cost off the final delivery. Planning your order a week ahead of any event or launch date avoids the rush fee entirely and gives you room to review a proof properly before production starts.
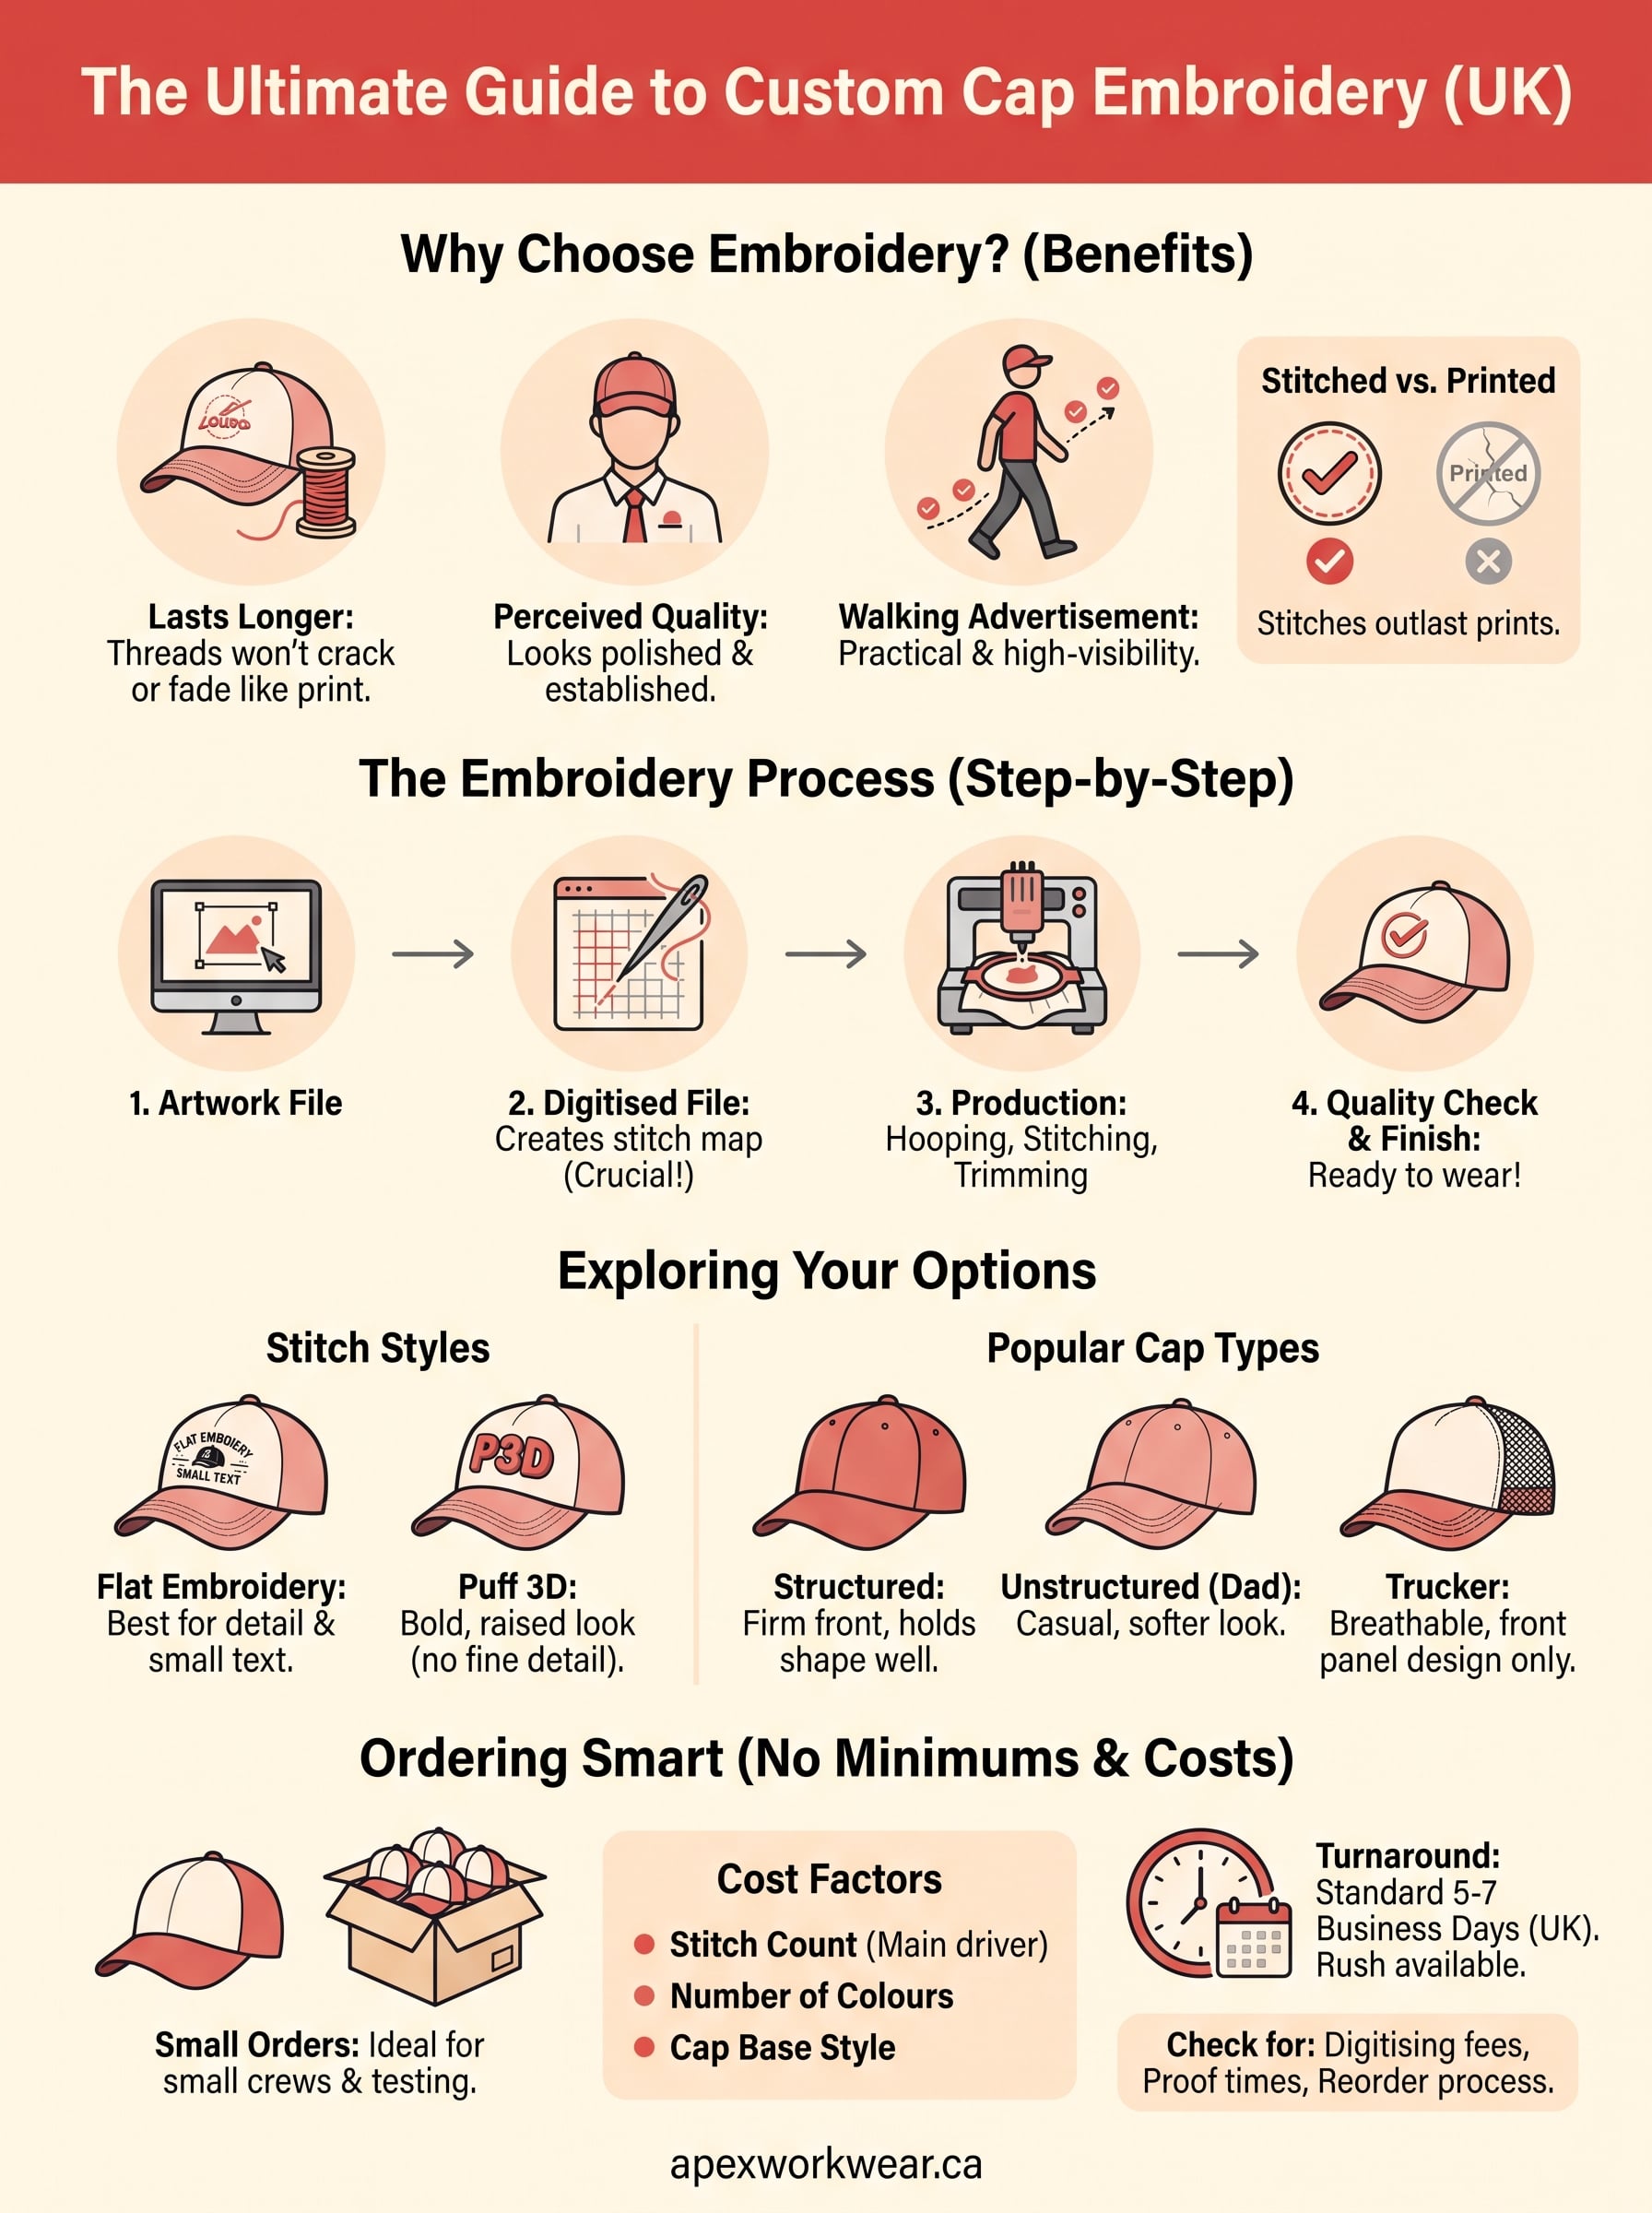
Getting your design onto a cap
Getting a logo stitched onto a cap isn’t complicated once you know the steps: digitise the artwork, approve a proof, choose a cap style that suits your design, and pick flat or puff embroidery depending on how much detail you’re working with. Custom caps embroidery rewards a bit of upfront planning, but the payoff is a branded item that holds up far longer than printed merchandise and makes your business look sharper the moment someone spots it.
Whether you need five caps for a small crew or fifty for an event, the process should stay simple, fast, and priced fairly, without minimums forcing you to order more than you need. If you’re ready to see what your logo looks like stitched onto a cap, get a free quote from Apex Workwear and have a digital proof in hand within a day.