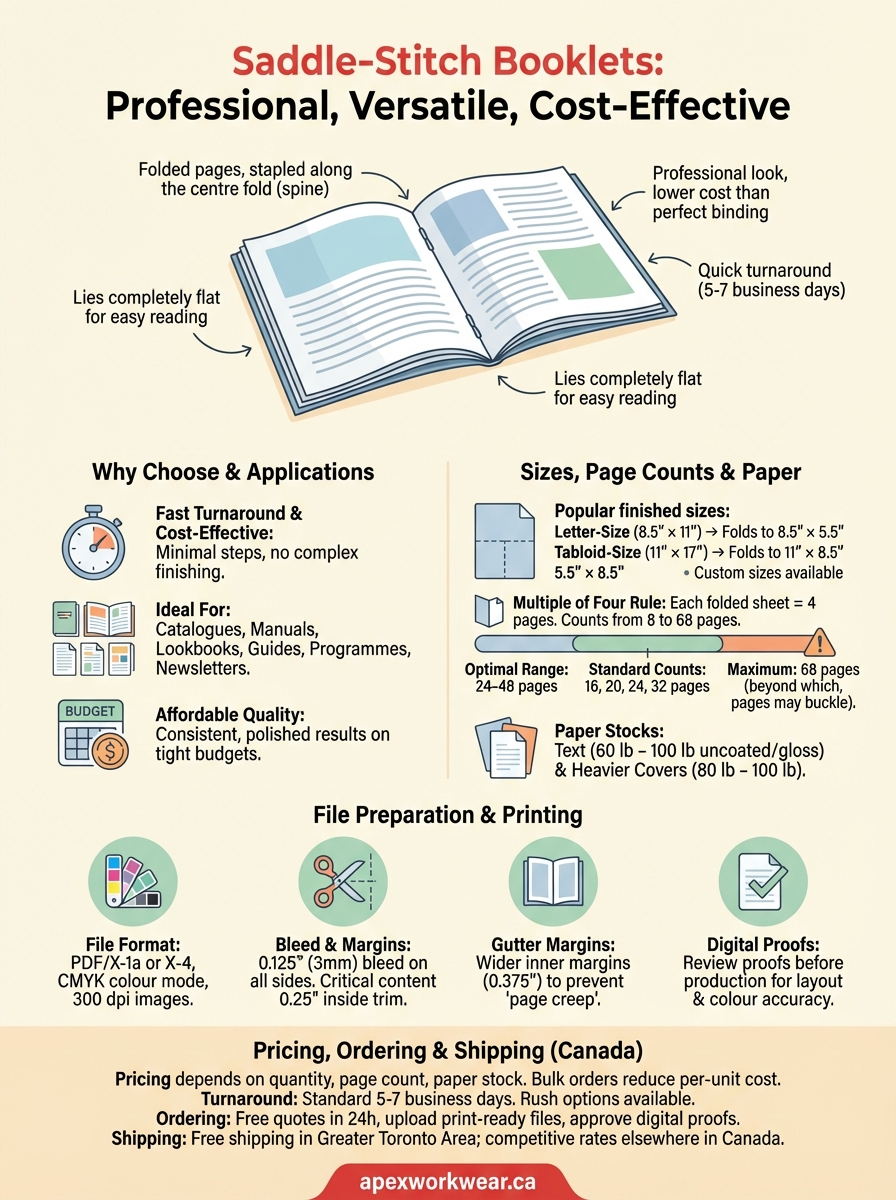
Whether you’re creating a product catalogue, event programme, or company lookbook, saddle-stitch booklets offer a clean, professional format that’s both cost-effective and versatile. This binding method, where folded pages are stapled along the spine, works brilliantly for marketing materials, manuals, and promotional guides that need to lie flat and look polished.
At Apex Workwear, we print saddle-stitch booklets right here in Canada, with no minimum order requirements and turnaround times of 5–7 business days. Our team reviews every file before production and provides digital proofs, so you’ll know exactly what you’re getting before we print a single page. Need help with layout adjustments? We handle basic design edits at no extra charge.
This guide covers everything you need to know about saddle-stitch booklets, available sizes, page count options, paper stocks, and how to prepare your files for printing. By the end, you’ll have a clear picture of which specifications suit your project and how to place your order with confidence.
Why saddle-stitch booklets work for many projects
Saddle-stitch booklets deliver professional results at a lower cost than perfect-bound alternatives, making them ideal when you need polished materials without the budget of a hardcover publication. The binding method uses two or three staples along the centre fold, which keeps production simple and turnaround times short. You can print as few or as many copies as you need, and because the pages lie completely flat when opened, readers can easily scan your content without fighting against a tight spine.
Saddle stitching works best when you need affordable, professional booklets that readers can handle comfortably.
Affordability without compromising quality
Your printing costs stay manageable because saddle stitching requires minimal binding equipment and fewer production steps than other binding methods. Most printers can produce these booklets quickly, and you won’t pay extra for complex finishing processes. This makes saddle-stitch booklets particularly valuable for time-sensitive projects like event programmes, seasonal catalogues, or conference materials where you need hundreds of copies printed and delivered within days. The straightforward production process also means fewer opportunities for errors during binding, which translates to more consistent quality across your entire print run.
Practical applications across industries
Businesses use saddle-stitch booklets for product catalogues, [training manuals](https://apexworkwear.ca/spiral-bound-books/), and lookbooks that showcase services or inventory in a compact format. Non-profits and community groups rely on them for newsletters, annual reports, and fundraising brochures that need to look professional on tight budgets. Educational institutions print course guides, orientation booklets, and workshop materials this way because the format works well for page counts between 8 and 68 pages. You’ll also see saddle-stitch binding in restaurant menus, property listings, and company profiles where the content changes frequently enough that perfect binding would be wasteful.
Saddle-stitch sizes and layout basics
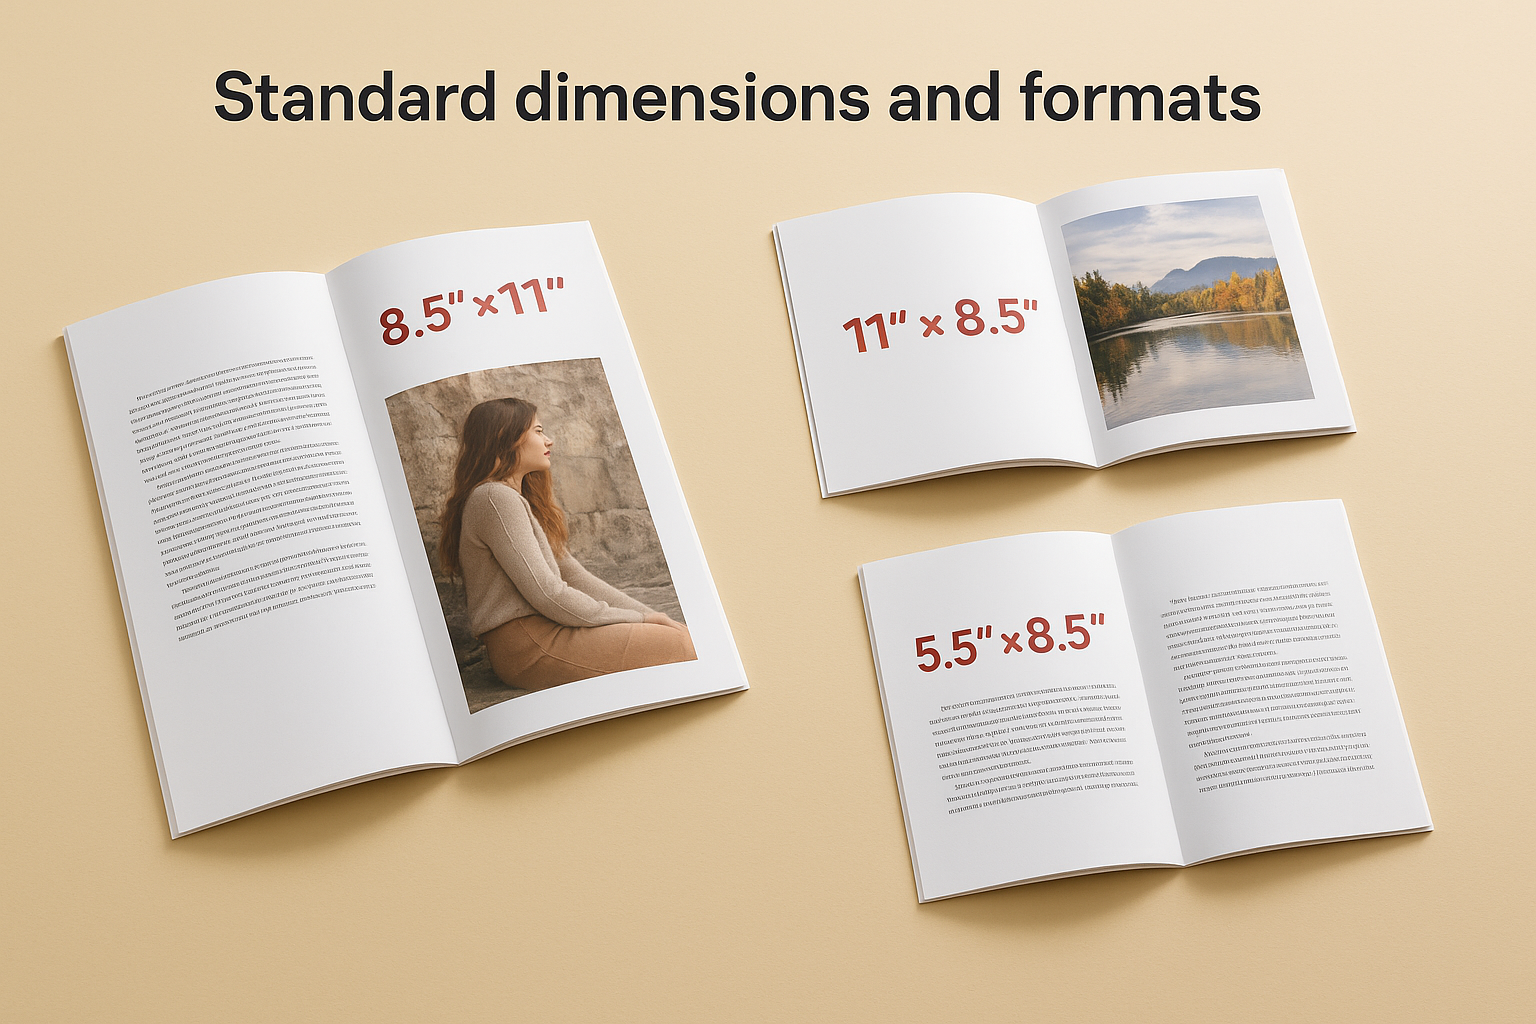
You can print saddle-stitch booklets in several standard sizes that match common paper dimensions and keep production costs reasonable. The most popular format is 8.5" × 11" (letter size), which folds down to a finished 8.5" × 5.5" booklet that fits comfortably in hands and bags. You’ll also see 11" × 17" booklets that fold to 11" × 8.5", perfect for catalogues and portfolios that need more visual space per page.
Standard dimensions and formats
Most printers stock 8.5" × 11", 11" × 8.5", and 5.5" × 8.5" as their core saddle-stitch options, with custom sizes available for specific projects. Your finished dimensions always equal half the flat sheet size after folding, so a 12" × 18" sheet becomes a 9" × 12" booklet once stapled. Square formats like 8" × 8" work well for creative lookbooks and art publications, though they may cost slightly more because they require trimming from standard paper stock.
Choose sizes that match your printer’s standard stocks to keep costs down and turnaround times fast.
Layout setup for proper binding
When designing your spreads, you need to account for page creep, where inner pages shift slightly outward as the booklet gets thicker. Set your gutter margins at least 0.25" wider than outer margins to prevent text from disappearing into the spine. Design software like Adobe InDesign lets you arrange pages as reader spreads for easier proofing, but your printer will need printer spreads (sequential two-page layouts) in the final PDF.
Page counts, paper choices, and binding limits
Your page count must be a multiple of four because each folded sheet creates four pages (two on each side). Most saddle-stitch booklets run between 8 and 68 pages, with 16, 20, 24, and 32 pages being the most common configurations. Once you exceed 68 pages, the booklet becomes too thick for staples to hold securely, and pages near the spine start to buckle.
Practical page count considerations
You’ll get the best results when you keep your booklet between 24 and 48 pages, where the spine stays flat and pages turn easily. Shorter booklets (8 to 12 pages) work well for promotional flyers and quick-reference guides, whilst longer runs (52 to 68 pages) suit product catalogues that need more content space. If your project requires more than 68 pages, you’ll need to switch to perfect binding or split your content into multiple volumes.
Stay within 24 to 48 pages for optimal handling and professional appearance.
Paper stocks and binding strength
Standard text paper ranges from 60 lb to 100 lb uncoated or gloss stock, with heavier covers (typically 80 lb or 100 lb) adding durability to the outside pages. Thicker paper reduces your maximum page count because the bulk affects how tightly you can fold and staple the sheets. Your printer will flag any combinations that exceed binding limits during the file review process.
Preparing print-ready files for saddle stitching
Your printer needs PDF files with proper bleeds, correct page sequences, and high-resolution images to produce clean booklets without delays. Most file rejections happen because designers submit RGB files instead of CMYK, forget to include bleeds, or send low-resolution images that look sharp on screen but print pixelated. You can avoid these issues by following basic prepress guidelines and checking your document settings before export.
File format and resolution requirements
Export your files as PDF/X-1a or PDF/X-4 format with all fonts embedded and images set to at least 300 dpi. Your colour mode must be CMYK rather than RGB, because monitors display colours differently than printed materials. Software like Adobe InDesign automatically handles most of these settings when you choose the correct PDF preset, but you should verify that all linked images meet resolution requirements before finalising your file.
Always convert your files to CMYK before exporting to ensure accurate colour reproduction on saddle-stitch booklets.
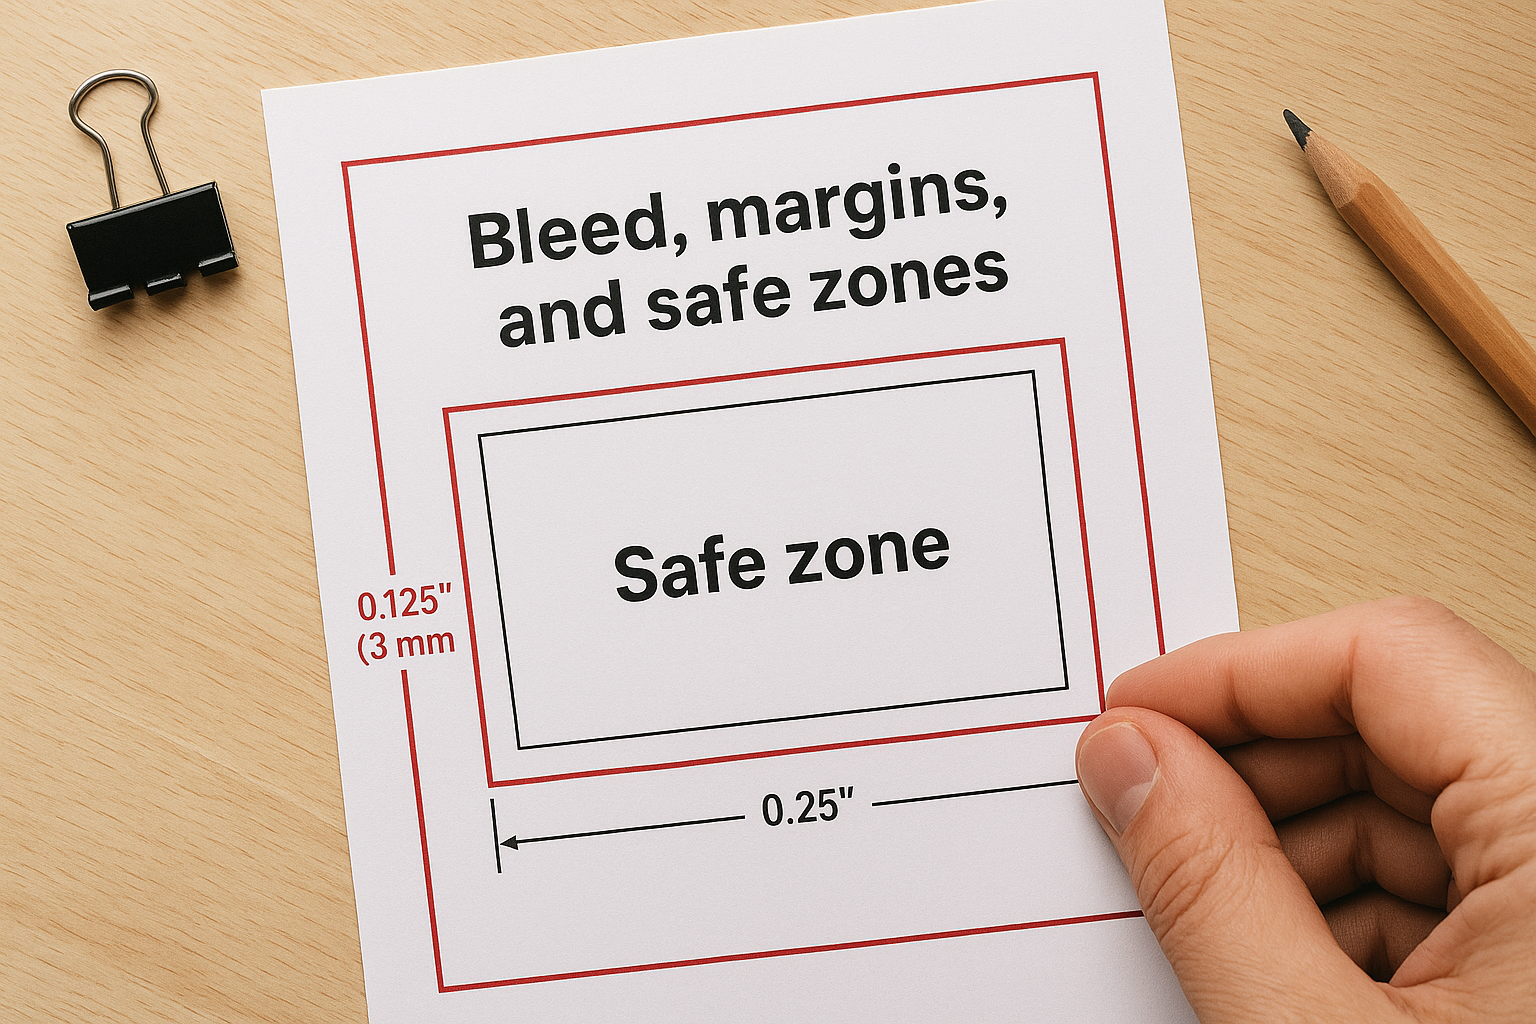
Bleed, margins, and safe zones
Add 0.125" (3 mm) bleed on all sides of your document to prevent white edges after trimming. Keep critical text and images at least 0.25" inside the trim line to avoid cutting off important content during production. Your binding edge needs extra clearance, so set gutters to 0.375" or wider on pages that face the spine to prevent text from disappearing into the fold.
Pricing, turnaround, and ordering in Canada
Your cost per booklet depends on quantity, page count, and paper stock, with bulk orders bringing per-unit prices down significantly. At Apex Workwear, you’ll pay less per piece when ordering 250 copies versus 50, and heavier cover stocks add a few pounds to your total. We provide free quotes within 24 hours, seven days a week, so you can budget accurately before committing to production.
Turnaround times and rush service
Standard production takes 5 to 7 business days from file approval to shipment, which gives our team time to print, bind, and quality-check your saddle-stitch booklets. You can request rush service for tight deadlines, though this option affects pricing based on how quickly you need your order. We offer free shipping within the Greater Toronto Area on eligible orders, whilst other Canadian locations receive competitive rates based on weight and destination.
Get your quote and timeline confirmed before placing your order to avoid surprises during production.
Placing your order
Contact us through our website with your specifications (size, page count, quantity, paper stock), and we’ll review your requirements to provide an accurate estimate. Once you approve the quote, upload your print-ready PDF files and we’ll send digital proofs for your final review before starting production.
Next steps for your booklet order
You now have the information you need to specify sizes, choose paper stocks, and prepare files that meet production requirements for saddle-stitch booklets. Your next move is to contact Apex Workwear with your project details so we can review your specifications and provide a detailed quote within 24 hours. We’ll confirm that your page count, dimensions, and paper choices work together, and we’ll flag any adjustments that might improve your finished booklets before production begins.
Upload your print-ready PDF files once you approve the quote, and we’ll send digital proofs for your review before starting production. This extra step ensures that colours, layout, and finishing match your expectations. Get your saddle-stitch booklet quote from Apex Workwear and you’ll receive expert guidance on specifications, pricing, and turnaround times that fit your project timeline. Our team handles the technical details whilst you focus on creating content that connects with your readers.