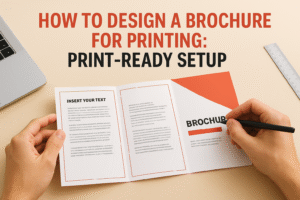
You’ve spent hours perfecting your business card design or flyer layout. The colours pop, the logo sits just right, and everything looks crisp on screen. Then the printed pieces arrive with an unwanted white edge running along one side. That frustrating sliver of unprinted paper is exactly why having bleed in printing explained matters before you send any file to production.
Bleed refers to the extra area of your design that extends beyond the final trim line. When the printer cuts your project to size, this buffer ensures colour reaches the very edge without gaps. Skip this step, and you risk wasted materials and reprints that cut into your budget.
At Apex Workwear, we produce custom print products for businesses across Canada, from business cards and flyers to banners and labels. We’ve seen firsthand how understanding bleed transforms print quality. This guide covers what bleed is, standard sizes you should use, and step-by-step setup instructions to get your files print-ready from the start.
Why bleed matters for professional print results
Print shops handle thousands of sheets in a single production run. Each piece goes through multiple stages of processing, from printing to cutting, and mechanical precision has limits. Paper shifts slightly as it moves through rollers, and cutting blades can vary by fractions of a millimetre across large stacks. When your design stops exactly at the trim line, these tiny variations expose the unprinted paper underneath, creating visible white borders that scream amateur.
The mechanics of printing and cutting
Commercial printers lay out multiple copies of your design on large sheets to maximise efficiency. After printing, industrial guillotines cut through entire stacks at once, separating individual pieces from the sheet. The cutting process itself generates slight paper movement from blade pressure and friction. Your business card might shift a tenth of a millimetre during the cut, but that small movement is enough to reveal white edges if your design lacks proper bleed.
Adding bleed to your file protects against the natural limitations of mechanical cutting, ensuring your design reaches the edge even when slight variations occur.
Printers don’t manually align each individual piece before cutting. They rely on registration marks printed on the sheet to guide blade placement, and those marks reference your design’s trim line. When your artwork extends beyond that line into the bleed area, the inevitable micro-shifts become invisible because colour already sits where the blade will land.
Professional reputation and client perception
Receiving printed materials with white borders immediately signals poor quality to anyone who handles them. Business cards with inconsistent edges look unfinished. Flyers with visible trim issues suggest you cut corners elsewhere in your business. Clients form lasting impressions within seconds of touching your materials, and production errors create doubt about your attention to detail. Having bleed in printing explained before you order prevents these reputation risks entirely. Professional designers and printers build this buffer into every file because they understand that proper setup avoids costly reprints and maintains the polished appearance your brand deserves.
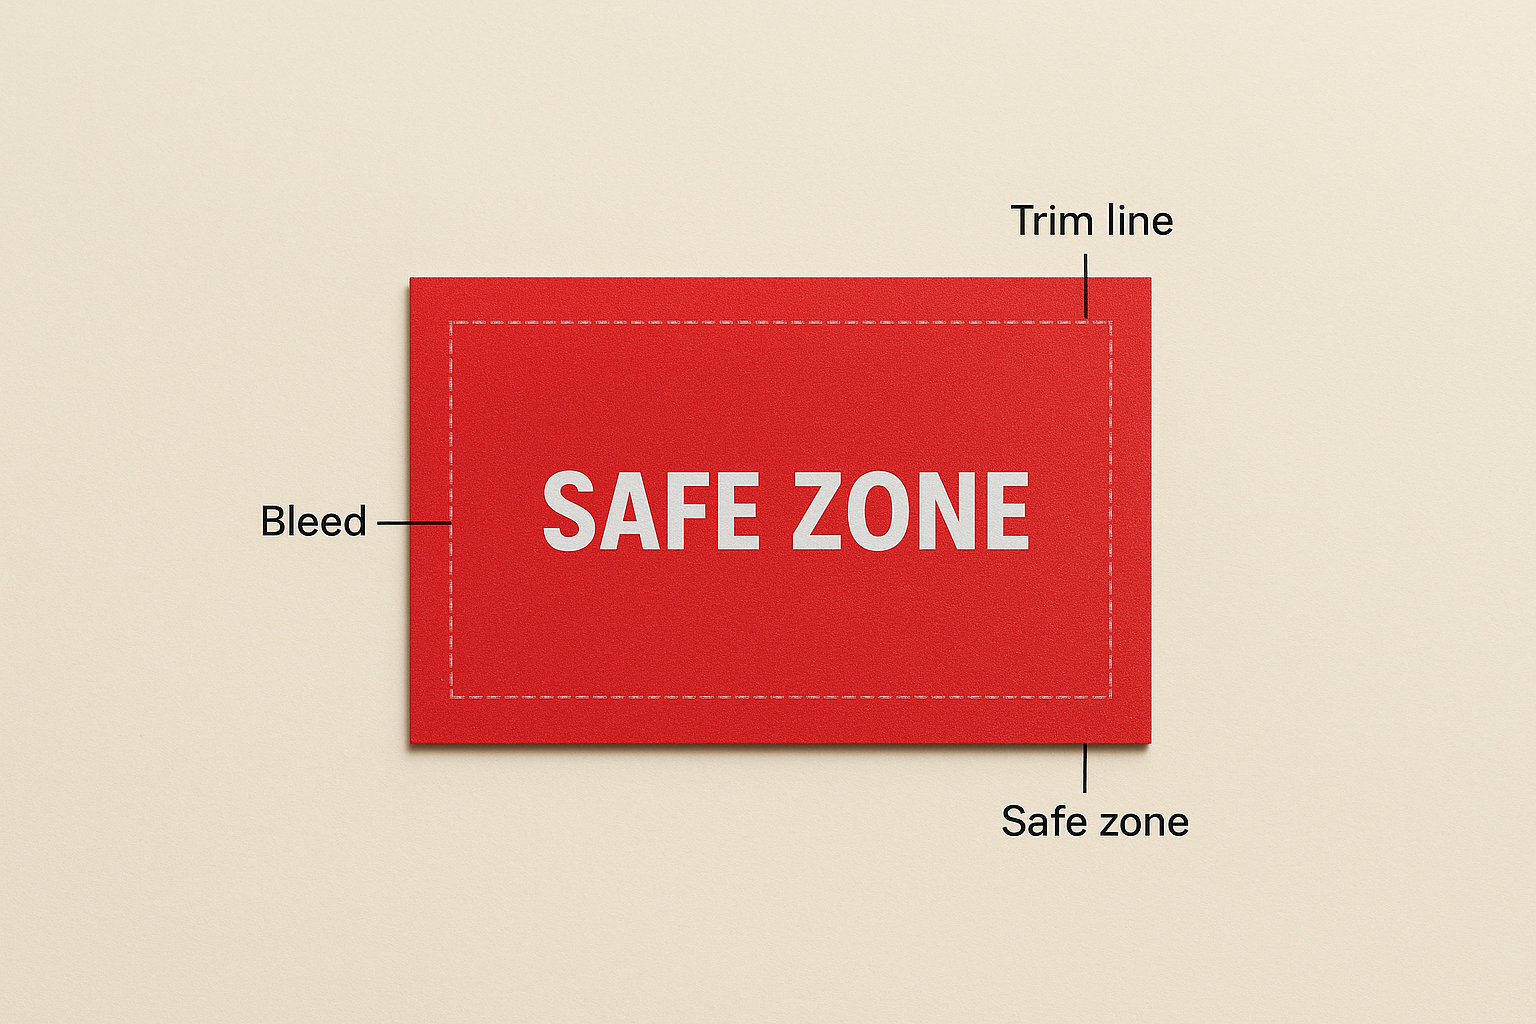
Bleed, trim, crop marks, and safe zones
Understanding the complete print workflow requires knowing four essential zones that work together in your design file. Each plays a distinct role in transforming your digital layout into physical materials. When these elements align correctly, your printed pieces emerge with sharp edges, properly positioned content, and professional finishing that matches your expectations.
Bleed and trim lines
The bleed area extends beyond your final size by a small margin, typically 3mm. Your design’s background colours and images fill this space completely. The trim line sits inside the bleed and marks where the blade will cut your finished piece. For a standard business card measuring 89mm × 51mm, your file would include the card size plus 3mm of bleed on all sides, creating a total canvas of 95mm × 57mm. Everything inside the trim line appears in your final product, while the bleed gets removed during cutting.
Crop marks and their purpose
Printers add small corner marks outside your bleed to guide the cutting process. These marks indicate precise blade placement and ensure your design centres properly on the sheet. Most design software generates these automatically when you export a print-ready PDF. You should never incorporate crop marks into your actual design, as they serve purely as production guides that the printer’s equipment reads to align cuts across multiple sheets.
Crop marks ensure your printer cuts exactly where intended, preventing the guesswork that leads to uneven edges or misaligned pieces.
Safe zones for text and logos
The safe zone sits 3mm to 5mm inside your trim line, creating a buffer for important content. Text, logos, and critical information belong in this area because mechanical variations can shift cut placement slightly. Placing your tagline 2mm from the edge risks losing part of it entirely. Professional designers keep all essential elements within the safe zone, ensuring nothing vital gets trimmed even when slight cutting variances occur.
Standard bleed sizes and file dimensions
Most print shops across Canada follow industry-standard bleed specifications that ensure consistency regardless of where you produce your materials. Knowing these measurements before you start designing saves time and eliminates the back-and-forth revisions that delay your project. Your files should match these dimensions from the outset, preventing reformatting work later.
Industry-standard bleed measurements
The standard bleed measurement is 3mm (0.125 inches) on all sides of your design. This specification applies across nearly every print product, from business cards to large-format banners. You add this measurement to each edge of your trim size, expanding your canvas by 6mm in both height and width. A postcard trimmed to 152mm × 102mm requires a file size of 158mm × 108mm when you account for bleed on all four sides.
Adding 3mm bleed to each edge ensures your design survives the cutting process without exposing white paper at the trim line.
Common product dimensions with bleed
Different print products start with specific trim sizes based on standard formats. You calculate your file dimensions by adding the bleed to these base measurements:
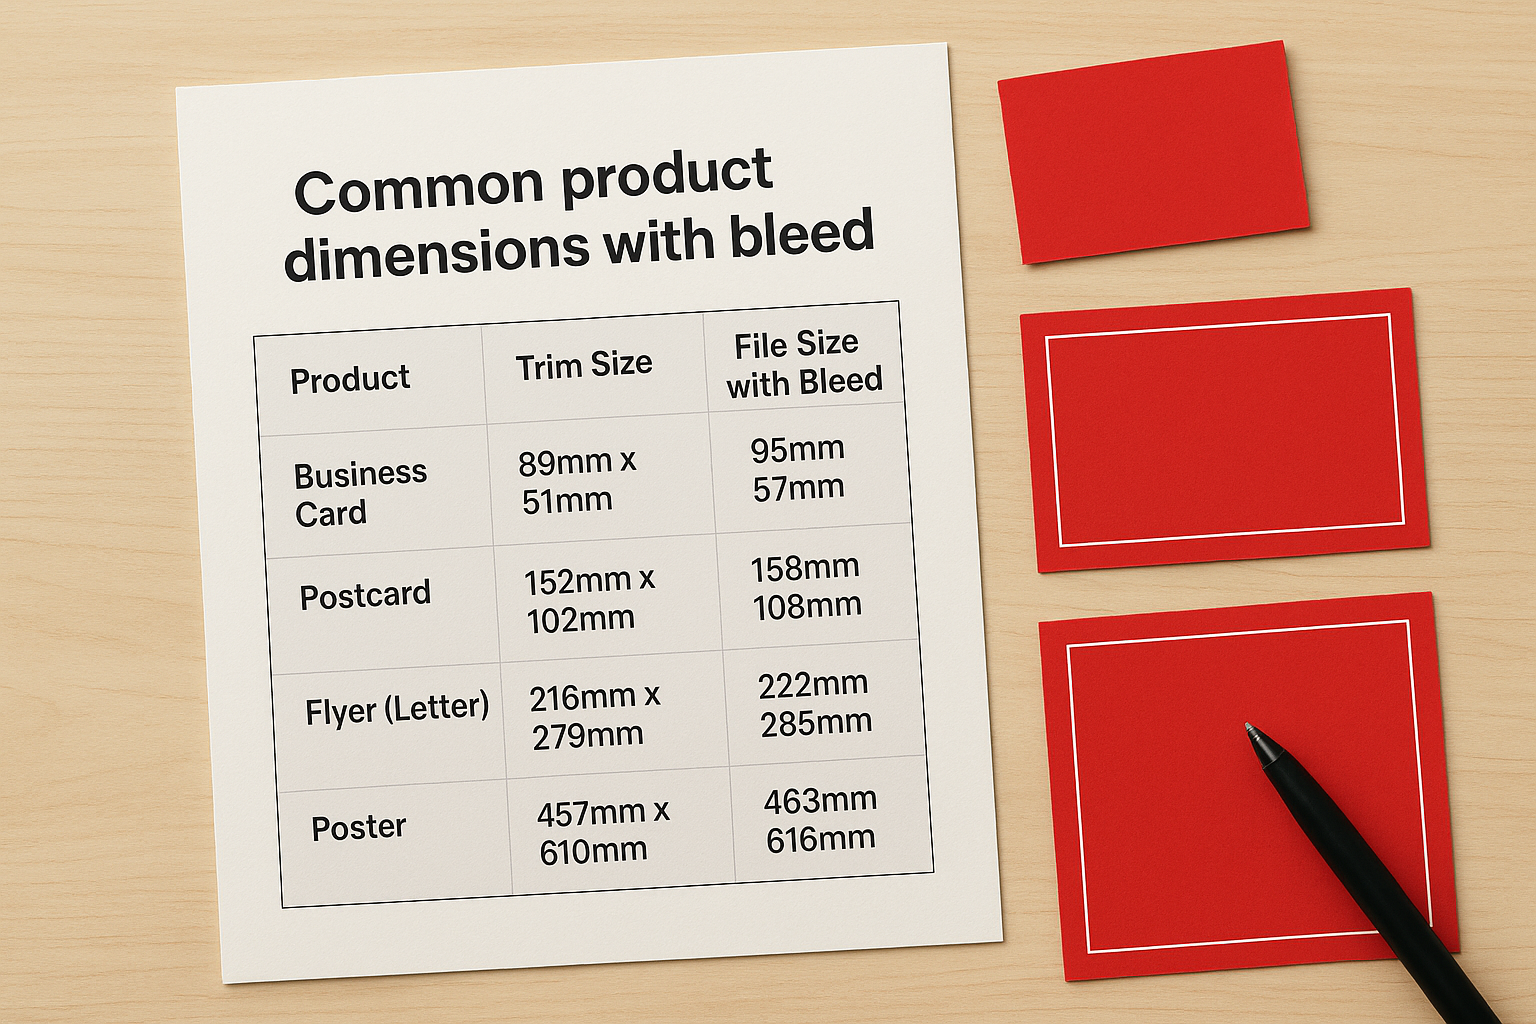
| Product | Trim Size | File Size with Bleed |
|---|---|---|
| Business Card | 89mm × 51mm | 95mm × 57mm |
| Postcard | 152mm × 102mm | 158mm × 108mm |
| Flyer (Letter) | 216mm × 279mm | 222mm × 285mm |
| Poster | 457mm × 610mm | 463mm × 616mm |
These dimensions apply when you set up your document in design software. Your printer might specify different requirements for speciality products or unique sizes, but standard items follow these measurements. When bleed in printing explained properly includes actual dimensions, you avoid the technical confusion that leads to rejected files and production delays.
How to add bleed in common design tools
Setting up bleed correctly from the start prevents file rejection and production delays. Each design programme handles bleed differently, but the process follows similar steps. You configure your document settings before placing any content, ensuring your canvas includes the extra area needed for safe trimming.
Adobe InDesign
InDesign offers the most straightforward bleed setup through document creation settings. When you create a new document, click "More Options" to reveal bleed controls. Enter 3mm in all four bleed fields (top, bottom, left, right), and InDesign expands your canvas automatically. Your design elements can now extend into the red bleed guides visible around your page edges.
Configure bleed during document setup rather than adjusting it later, as this prevents the need to reposition design elements that extend to the edge.
Export your file as a PDF with bleed included by selecting "Use Document Bleed Settings" in the export dialogue. This ensures the printer receives the full file dimensions needed for production.
Adobe Illustrator
Illustrator requires you to manually calculate your canvas size including bleed. For a business card, you create an artboard measuring 95mm × 57mm rather than the final 89mm × 51mm size. Set up ruler guides 3mm from each edge to mark your trim line, keeping critical content inside these boundaries. Your background colours and images fill the entire artboard, extending to all edges.
Canva and online tools
Canva adds bleed through custom dimension settings when you create your design. Select "Custom size" and enter dimensions that include bleed on all sides. Most online tools require you to export as PDF and verify the file contains the correct dimensions before sending to your printer. Having bleed in printing explained through your specific software prevents technical errors that compromise your final product.
Common bleed mistakes and how to avoid them
Even designers who understand bleed principles make setup errors that compromise print quality. These mistakes often stem from rushing through file preparation or misunderstanding how the trim process affects final appearance. Recognising these common pitfalls helps you create print-ready files that produce professional results every time.
Forgetting to extend backgrounds to bleed edge
Your background colour or image must reach every edge of your canvas, not just the trim line. Stopping backgrounds at the trim creates the exact problem bleed prevents: white borders when cutting variations occur. Design software shows you the bleed area as red guides or extended canvas space. Fill this entire area with your background elements, checking that no gaps exist between your design and the file edges before export.
Backgrounds must extend through the entire bleed zone, ensuring colour reaches beyond where the blade cuts your finished piece.
Placing critical content too close to trim
Text and logos require proper spacing from cut lines to survive production variations. Position all essential elements at least 3mm inside your trim line within the safe zone. Your phone number sitting 1mm from the edge risks partial removal during cutting. Review your layout with guides visible, confirming that every important element sits safely inside the designated area. Having bleed in printing explained through actual mistakes shows you exactly what to check before sending files to production.

Next steps
You now understand how bleed prevents white edges on your printed materials. Setting up 3mm bleed on all sides and keeping text within safe zones ensures your designs survive the cutting process without quality issues. These specifications apply whether you’re ordering business cards, flyers, or banners.
Before you send files to production, verify your dimensions include bleed and check that backgrounds extend to all canvas edges. Review your content placement to confirm nothing critical sits too close to trim lines. Having bleed in printing explained through actual specifications removes the guesswork that leads to rejected files.
Get a free quote from Apex Workwear for your next print project. Our team reviews every file before production, catching setup errors that compromise results. We produce custom business cards, flyers, banners, and labels with fast turnaround times and free shipping across the Greater Toronto Area.