Nothing ruins a print job faster than a white strip along the edge of your booklet or text that gets chopped off at the spine. These problems almost always trace back to one thing: incorrect booklet printing file setup (bleed + margins). Getting these settings right before you send your files to print is the difference between a polished, professional result and an expensive do-over.
Bleed and margin settings aren’t complicated, but they do require specific measurements and deliberate placement in your design file. Most printing issues we see at Apex Workwear, where we produce booklets, brochures, and a full range of print products right here in Canada, come down to files that weren’t set up properly from the start. A few minutes of preparation saves real time and money.
This guide walks you through the exact steps to configure your bleeds and margins correctly, whether you’re working in Adobe InDesign, Illustrator, or another design tool. We’ll cover standard measurements, common mistakes, and practical tips pulled from real production experience so your booklet files are print-ready the first time.
What bleed and margins mean for booklets
Before diving into the setup process, you need a clear picture of what bleed and margins actually do in a print file, and why booklets require both settings configured deliberately. These two settings work in opposite directions: bleed extends your artwork beyond the trim line, while margins pull your critical content away from it. Together, they account for the mechanical reality that trimming a booklet to its final size introduces small variations that no press eliminates entirely.
What bleed does (and why it matters)
Bleed is the extra artwork you add around the outside of your page so that colour, images, or backgrounds extend past the intended cut line. When a press trims your booklet to its final size, a shift of a millimetre or two in cut position is completely normal. Without bleed, that slight shift produces a thin white strip along the edge of the page. Standard bleed for booklets is 3 mm (0.125 in) on all four sides, which is what most Canadian print shops, including Apex Workwear, require by default.
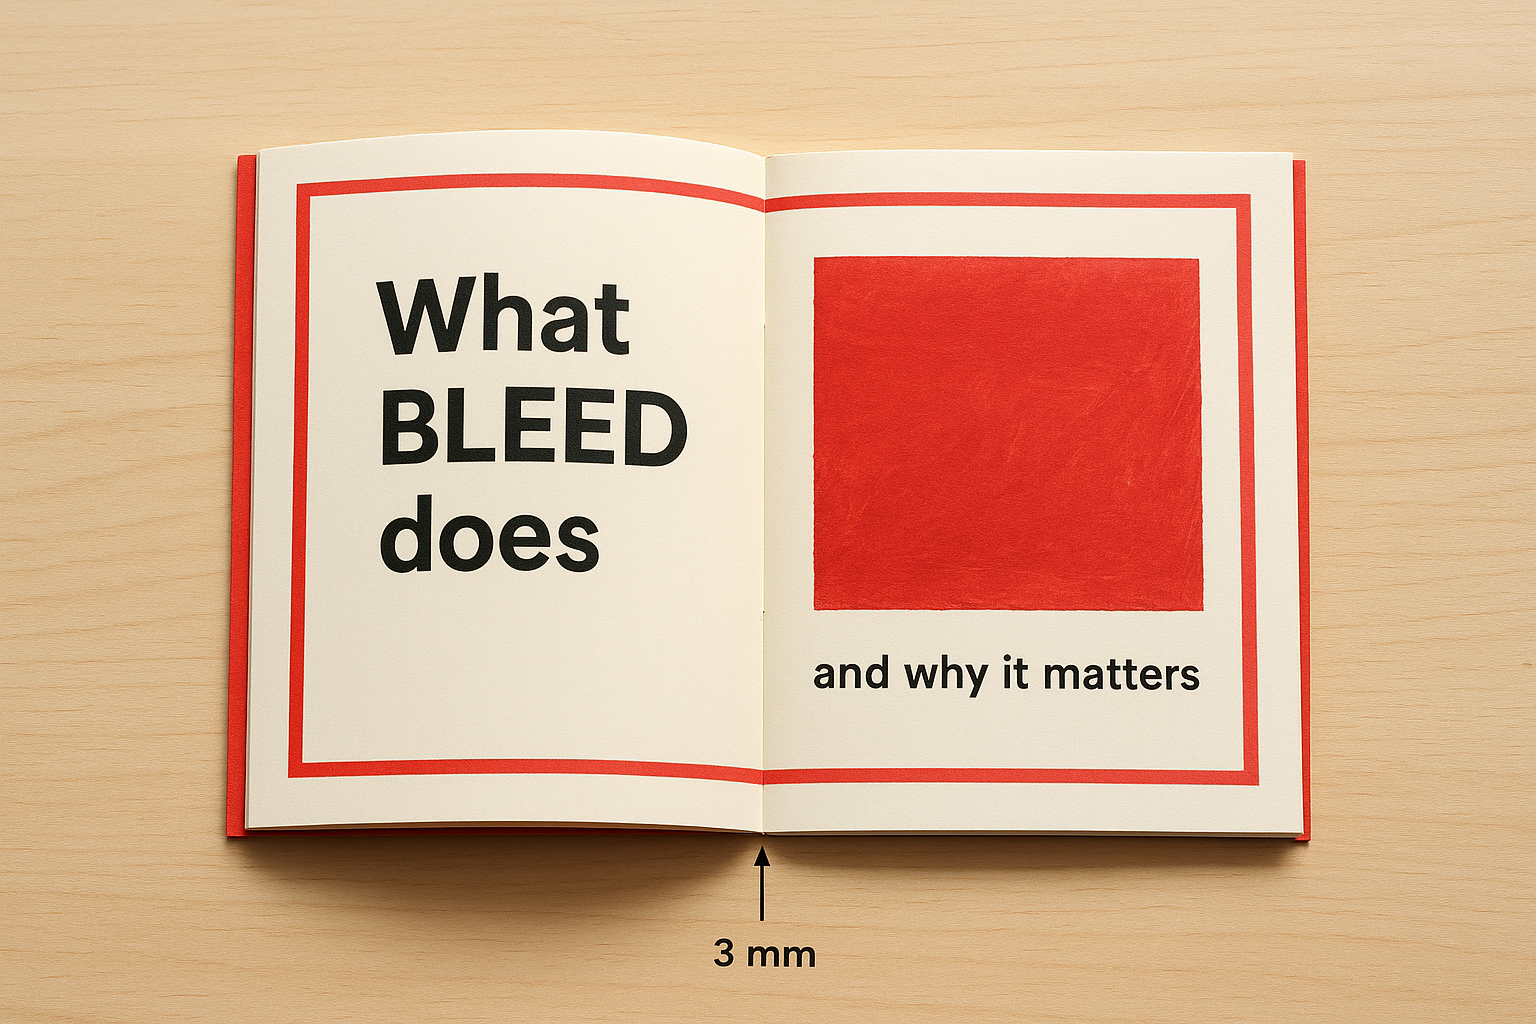
If your design has a solid background or a photo that reaches the edge of the page, bleed is not optional. Skipping it guarantees a visible white border on at least some copies.
Use this table as a quick reference for common bleed values:
| Document Size | Standard Bleed | Common Use |
|---|---|---|
| A5 booklet (148 x 210 mm) | 3 mm all sides | Product booklets, programmes |
| Letter booklet (5.5 x 8.5 in) | 0.125 in all sides | North American standard |
| A4 booklet (210 x 297 mm) | 3 mm all sides | Catalogues, reports |
| Custom sizes | 3 mm / 0.125 in | Always confirm with your printer |
What margins protect
Margins (also called the "safe zone") define the inner boundary inside which all critical content, including text, logos, and key graphics, must stay. Even though bleed adds coverage on the outside, the inside of your page also carries risk. A minimum safe margin of 5 mm (0.2 in) from the trim edge is the standard starting point for most booklet formats, and some printers recommend up to 6 mm for extra security.
For saddle-stitched booklets specifically, you also need to account for the gutter, the area near the spine where facing pages meet. Content placed too close to the gutter can shift inward during binding and become difficult to read or look visually unbalanced. Add at least 4 to 6 mm of additional clearance on the inner edge to keep text fully visible once the booklet is bound.
Solid booklet printing file setup (bleed + margins) treats these two measurements as one connected system. The bleed handles what happens at the outer cut edge; the margin and gutter protect what stays inside. Both settings work together, and missing either one creates a different but equally frustrating print problem.
Step 1. Confirm specs with your printer
Every print shop sets its own production requirements, and assuming standard values without checking is one of the most common reasons files get rejected or need rebuilding. Before you open your design software, contact your printer directly and ask for their booklet spec sheet. This single step eliminates guesswork and ensures your booklet printing file setup (bleed + margins) matches exactly what the press expects.
What to ask your print shop
Getting the right information upfront means asking specific questions rather than general ones. Here is a checklist of what to request from your printer before you start building your file:
- Bleed requirement: Is it 3 mm, 0.125 in, or something different?
- Safe margin/safe zone: What is the minimum distance from the trim edge for text and logos?
- Gutter clearance: How much inner margin do they recommend for saddle-stitched or perfect-bound booklets?
- Accepted file formats: Do they want a PDF/X-1a, PDF/X-4, or another format?
- Colour mode: Is CMYK required, or do they accept RGB files?
- Resolution: Is 300 DPI the minimum, or do they specify higher for certain paper stocks?
- Page setup: Do they want single pages or printer spreads in the exported file?
Asking for a spec sheet in writing gives you a reference document to check against before you export, which removes any ambiguity at the approval stage.
Why specs vary between printers
Not every printer uses the same equipment or binding method, so their technical requirements differ. Saddle-stitched booklets (stapled at the spine) often require different gutter allowances than perfect-bound booklets (glued square spine). A digital press may also handle registration differently than an offset press, which can affect how much bleed the operator requests.
Confirming these details before you build a single page keeps you from dismantling finished work mid-project. Binding method, paper stock, and press type all influence the spec values, so treat the printer’s document as your ground truth rather than relying on assumed defaults.
Step 2. Set trim size and page count
Once you have the printer’s specs in hand, open your design application and create a new document using the exact trim size your printer confirmed. The trim size is the finished dimension of your booklet after cutting, so it does not include the bleed you will add in the next step. Setting this correctly from the start keeps every element of your booklet printing file setup (bleed + margins) aligned with what the press expects.
Choose your trim size
Common booklet formats follow a standard set of trim dimensions. Use the table below to identify the right one for your project, and confirm that your measurement unit matches what your printer specified:
| Booklet Format | Trim Size (mm) | Trim Size (in) |
|---|---|---|
| A5 | 148 x 210 mm | 5.83 x 8.27 in |
| Half-letter | 139.7 x 215.9 mm | 5.5 x 8.5 in |
| A4 | 210 x 297 mm | 8.27 x 11.69 in |
| Square (small) | 152 x 152 mm | 6 x 6 in |
In Adobe InDesign, go to File > Document Setup and enter the width and height at the confirmed trim size. In Illustrator, match the artboard dimensions exactly to the trim values. Do not include bleed in this document size; you add bleed as a separate value in Step 3.
Set your page count correctly
Your booklet must have a page count divisible by four because each folded sheet of paper creates four printed sides. An 8-page booklet uses two sheets; a 16-page booklet uses four.
Plan your page count before building any pages; changing it mid-project forces you to reflow content across the entire document.
If your content fills only 10 pages, add two blank pages to reach 12. Your printer needs that total to match the press sheet configuration, so treat it as a firm production requirement rather than an optional adjustment.
Step 3. Add bleed and safe margins
With your trim size and page count locked in, you can now add the bleed and safe margin values your printer confirmed in Step 1. This is where your booklet printing file setup (bleed + margins) becomes production-ready, so enter the values precisely rather than estimating.
Setting bleed in InDesign and Illustrator
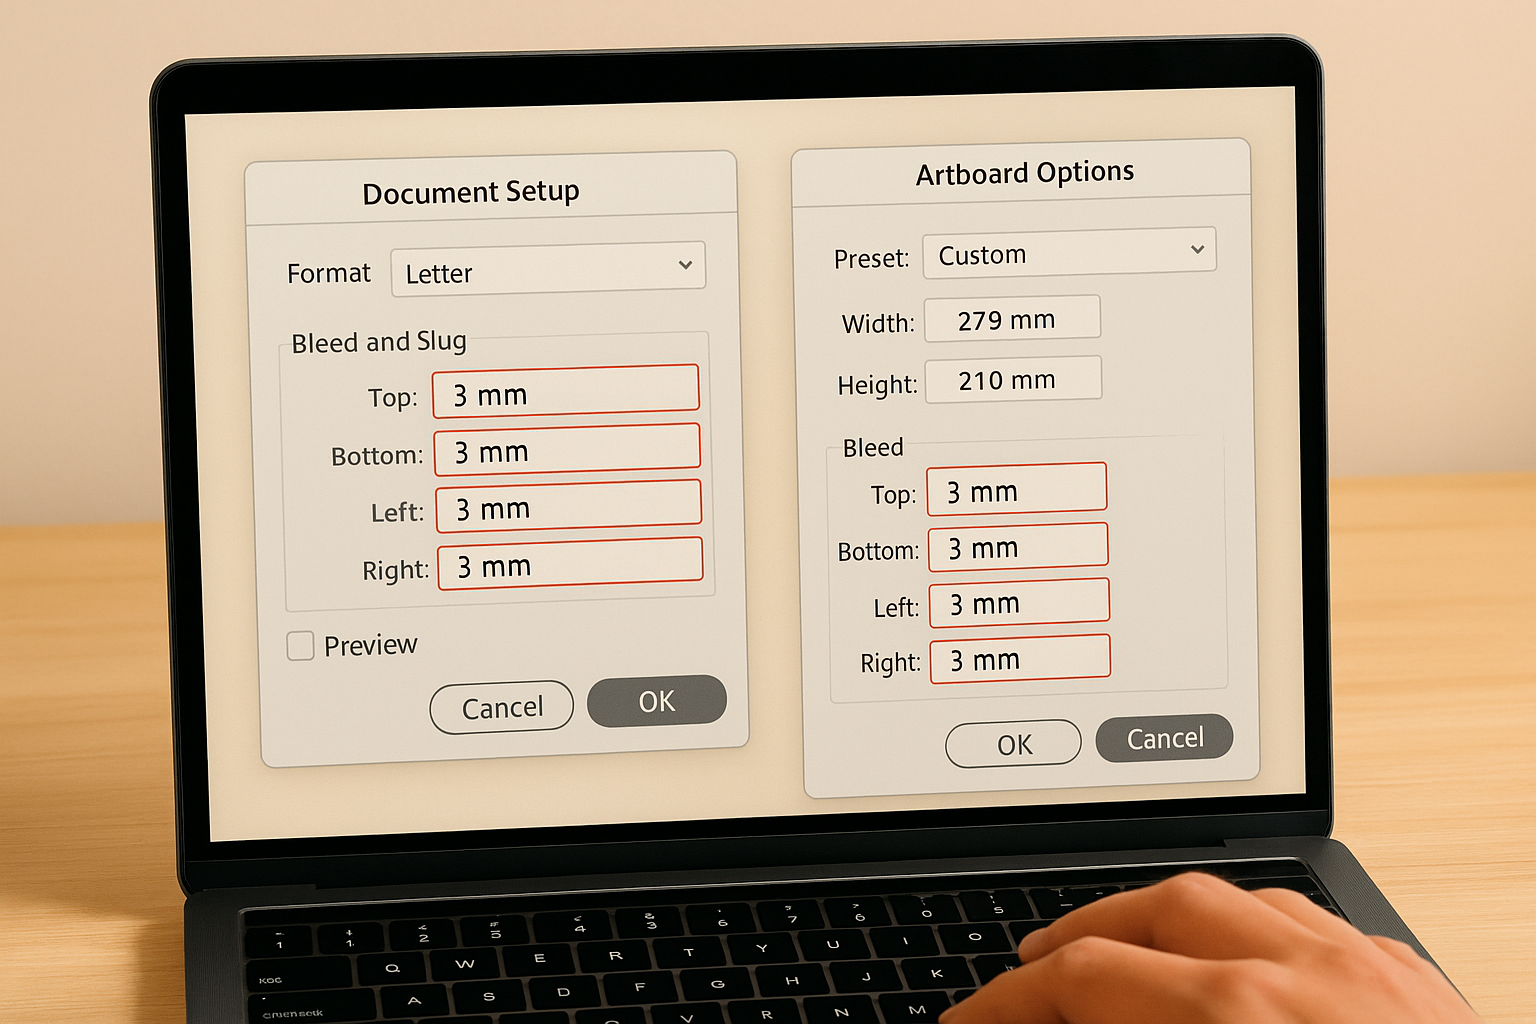
In Adobe InDesign, go to File > Document Setup, click "More Options," and enter your bleed values in the Bleed and Slug section. For standard booklets, type 3 mm (or 0.125 in) into all four bleed fields. In Adobe Illustrator, open the Artboard Options panel, locate the Bleed fields, and enter the same value on each side. Both applications display a red guide line around your artboard once bleed is set, which shows you exactly where your background artwork must extend to.
Never stretch a low-resolution image to fill the bleed area. If your image cannot extend cleanly to 3 mm past the trim edge at 300 DPI, replace it or reframe the design.
Use this settings template as a direct reference when filling in both applications:
| Setting | InDesign Path | Illustrator Path | Value |
|---|---|---|---|
| Bleed (all sides) | File > Document Setup > Bleed | Artboard Options > Bleed | 3 mm / 0.125 in |
| Safe margin guides | Layout > Margins and Columns | View > Guides (manual) | 5 mm / 0.2 in |
| Gutter (inner edge) | Layout > Margins and Columns | Manual guide placement | 4-6 mm additional |
Placing safe margins and gutter clearance
Once bleed is set, add margin guides at a minimum of 5 mm from each trim edge to create your safe zone. In InDesign, go to Layout > Margins and Columns and enter the safe zone value. For the inner gutter, increase the inside margin by an additional 4 to 6 mm beyond your standard safe zone, so all body text, logos, and key graphics sit well clear of the spine after binding.
Step 4. Export a print-ready PDF
Your design file is only useful to a press once it becomes a print-ready PDF with all fonts embedded, colours converted to CMYK, and your bleed values baked into the exported document. Exporting incorrectly at this stage can undo all the careful work you completed during your booklet printing file setup (bleed + margins), so treat the export dialogue with the same attention you gave the document setup at the start.
Choose the right PDF preset
In Adobe InDesign, go to File > Adobe PDF Presets and select "PDF/X-1a:2001" as your starting point. This preset embeds all fonts, converts colours to CMYK, and flattens transparency automatically, which is exactly what most commercial print shops need. If your printer confirmed PDF/X-4 in Step 1, use that format instead, as it handles live transparency differently and suits a number of modern digital presses. Either way, never export using the default screen or web PDF presets, as these compress images and strip out the colour data a press requires.
Always confirm which PDF standard your printer accepts before you export, because sending the wrong format can hold up your job by a full business day or more.
Set bleed and marks in the export dialogue
When the export window opens, navigate to the Marks and Bleeds tab. Tick "Use Document Bleed Settings" to pull in the 3 mm bleed you configured earlier, and enable "Crop Marks" so the finishing team can see exactly where the trim line falls. Use this checklist as your direct export reference:
| Export Setting | Recommended Value |
|---|---|
| PDF Standard | PDF/X-1a or PDF/X-4 (confirm with printer) |
| Colour Space | CMYK |
| Image Resolution | 300 DPI minimum |
| Bleed | 3 mm / 0.125 in all sides |
| Crop Marks | On |
| Embed Fonts | On (all fonts fully embedded) |
| Page Order | All pages, single pages (not spreads) |
Check your output file size before submitting. A booklet PDF under 20 pages should rarely exceed 100 MB. If yours runs larger, look for unconverted RGB images or unflattened transparency layers that bloated the file, and re-export after correcting those elements.

Final checks before you hit order
Before you submit, run through one last review of your exported file. Open the PDF and confirm that the red bleed guides extend fully to the edge on every page and that no critical text or logos sit inside the safe zone boundary. Zoom into the spine area and check that your gutter clearance holds on both facing pages.
Your booklet printing file setup (bleed + margins) is only complete when the file matches the printer’s spec sheet on every point. Verify your colour mode is CMYK, your images hold at 300 DPI minimum, and your fonts are fully embedded. Check the total page count one final time to confirm it divides by four.
Getting these details right before you order is far simpler than correcting a misprint after delivery. If you need a reliable Canadian print partner to review your files and produce your next booklet, get a free quote from Apex Workwear before you place your order.