Getting a clean, lasting heat transfer on a garment comes down to three variables: time, temperature, and pressure. Miss the mark on any one of them, and you’re looking at vinyl that peels, cracks, or never fully adheres. Knowing exactly how long to press heat transfer vinyl matters just as much as the vinyl brand you choose or the blank you’re pressing onto, and the answer changes depending on the material and the type of HTV you’re working with.
At Apex Workwear, we produce custom apparel daily across a wide range of fabrics, so we’ve learned firsthand what works and what doesn’t on the heat press. Incorrect settings are the number one reason DIYers and small shops end up with failed transfers. The good news? Once you dial in the right combination, the process is straightforward and repeatable.
This guide breaks down the recommended time, temperature, and pressure settings for every common HTV type and fabric pairing. Whether you’re pressing your first batch of custom tees or troubleshooting adhesion issues on polyester, you’ll find the specific numbers you need along with practical tips to get a professional-quality result every time.
Understand what changes press time
Press time isn’t a fixed number you can pull from a single chart. Three core variables determine how long to press heat transfer vinyl correctly: the vinyl type, the fabric underneath, and the heat source you’re using. Change any one of these, and your optimal window shifts. Understanding why these variables matter gives you a framework for adapting to any combination rather than guessing each time you set up a press.
The type of HTV you’re using
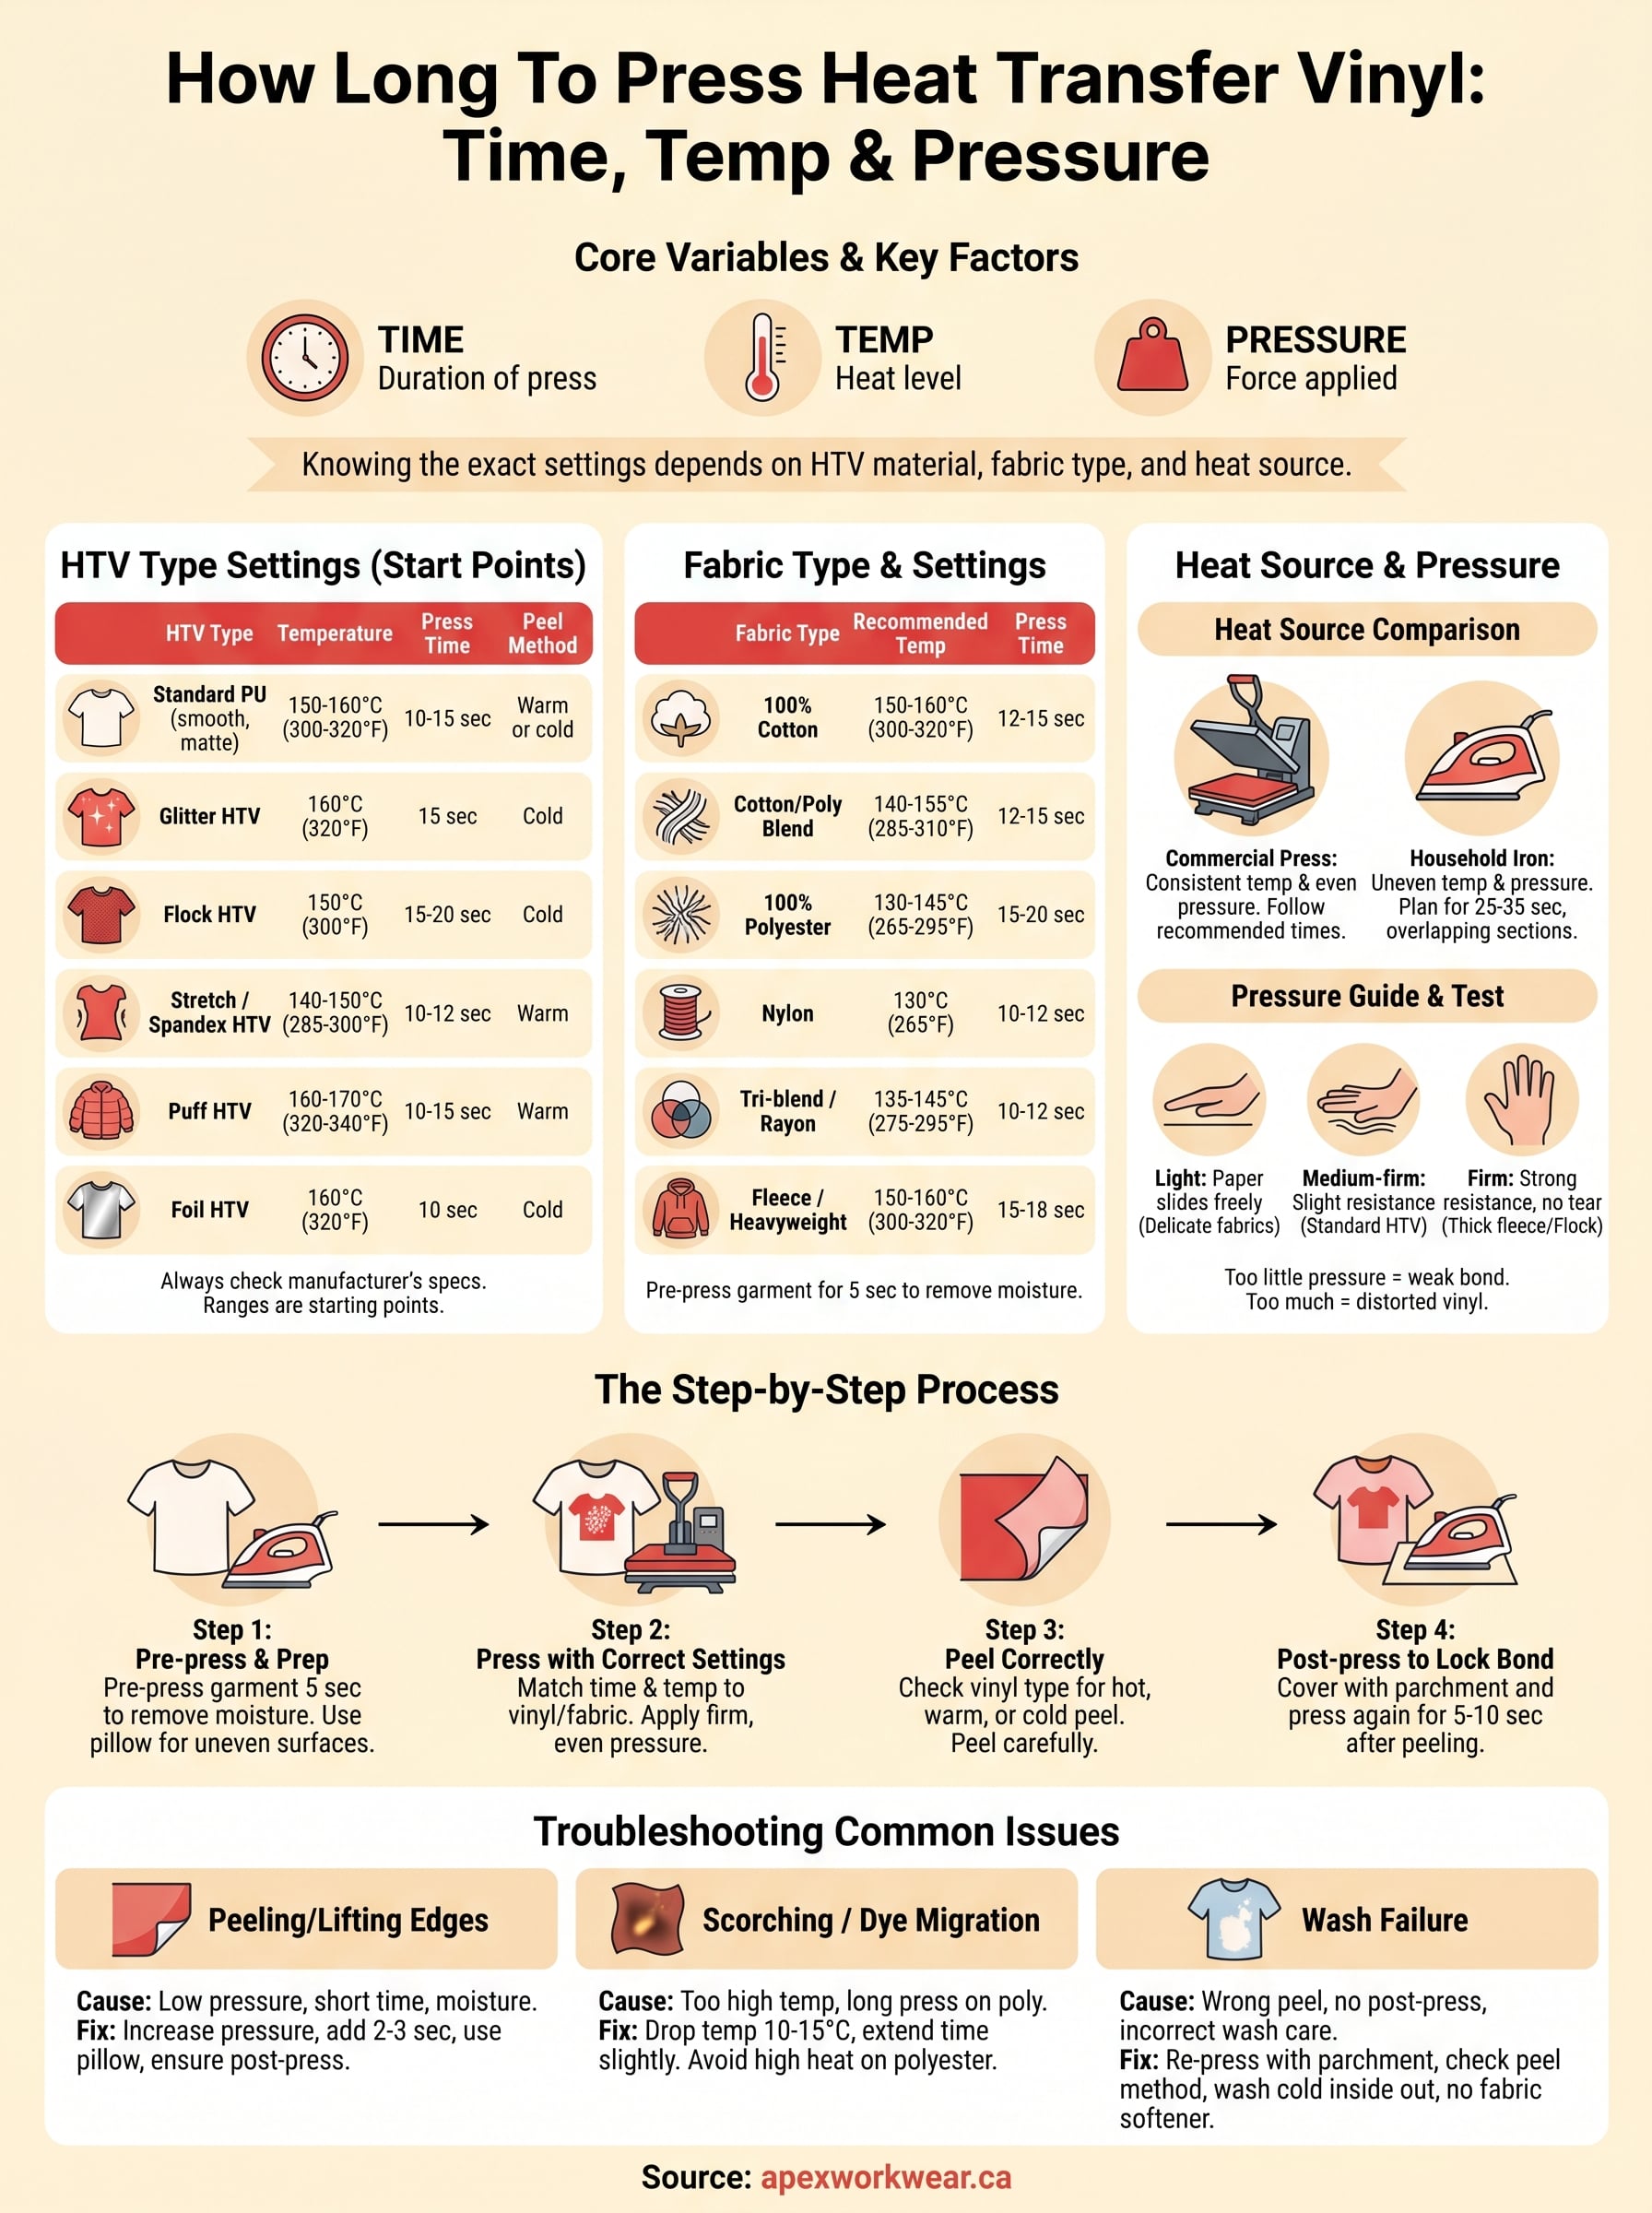
Not all heat transfer vinyl behaves the same way because the adhesive layers and base materials differ between product types. Standard PU films such as smooth, matte, or satin HTV typically press at 150-160°C for 10-15 seconds. Specialty HTV types such as flock, stretch, foil, and puff vinyl each have their own activation requirements, and pressing them at the wrong temperature or time will either under-activate the adhesive or damage the surface finish.
| HTV Type | Temperature | Press Time | Peel Method |
|---|---|---|---|
| Standard PU (smooth, matte) | 150-160°C (300-320°F) | 10-15 sec | Warm or cold |
| Glitter HTV | 160°C (320°F) | 15 sec | Cold |
| Flock HTV | 150°C (300°F) | 15-20 sec | Cold |
| Stretch / Spandex HTV | 140-150°C (285-300°F) | 10-12 sec | Warm |
| Puff HTV | 160-170°C (320-340°F) | 10-15 sec | Warm |
| Foil HTV | 160°C (320°F) | 10 sec | Cold |
| Printable HTV | 160°C (320°F) | 10-15 sec | Cold |
Always check the manufacturer’s specification sheet for the specific brand you’re using, because these ranges are solid starting points, not universal rules every brand follows exactly.
Following the manufacturer’s recommended settings is the most reliable starting point, especially when you’re pressing a vinyl type for the first time.
The fabric underneath
Cotton and cotton blends handle higher temperatures well, which is why they pair reliably with standard HTV settings around 150-160°C. Synthetic fabrics like polyester and nylon are heat-sensitive, so you need to drop the temperature to around 130-150°C and sometimes extend press time slightly to compensate. Pressing polyester too hot causes the fibres to scorch, and it can trigger dye migration, where the fabric’s dye bleeds into your vinyl and leaves a faded, discoloured result.
Fabric thickness adds another layer to the equation. A thick fleece hoodie holds and distributes heat differently than a thin performance tee, so you may need to add 2-5 seconds on heavier materials to make sure the adhesive reaches full activation temperature at the base layer. Pre-pressing the garment for 5 seconds before applying your vinyl removes moisture and pre-warms the fibres, which leads to more consistent results across fabric weights.
Your heat press vs. a household iron
A commercial or hobby heat press gives you consistent, even pressure across the full platen and accurate temperature readings you can rely on. A household iron, by contrast, has hotspots and uneven pressure distribution, plus temperature dials that rarely reflect what the surface is actually delivering. If you’re pressing with an iron, plan for 25-35 seconds rather than 10-15, and work in firm, overlapping sections to cover the full design evenly.
Pressure consistency is what separates a lasting bond from one that lifts at the edges after a few washes. Whether you’re using a clamshell press, a swing-away, or an iron, firm and even contact across the entire transfer area for the full duration is non-negotiable.
Step 1. Match time and temp to vinyl and fabric
Before you touch the heat press, identify your fabric and your vinyl type. These two pieces of information set the baseline settings for how long to press heat transfer vinyl on that specific combination. Working from the wrong starting point wastes material and ruins garments, so treat this step as your foundation before you think about pressure or peel method. Most transfer failures trace back to skipping this step and applying a generic setting across every job.
Use the fabric type as your starting point
Cotton handles heat well and gives you the most flexibility, so 150-160°C works as a reliable starting point for standard applications on cotton tees or hoodies. Polyester and synthetic blends are far less forgiving. Drop the temperature to 130-145°C on polyester to avoid scorching and dye migration, and add 3-5 seconds to your press time to compensate for the reduced heat. The table below gives you a practical reference for the most common fabric types:
| Fabric Type | Recommended Temp | Press Time |
|---|---|---|
| 100% Cotton | 150-160°C (300-320°F) | 12-15 sec |
| Cotton/Poly Blend | 140-155°C (285-310°F) | 12-15 sec |
| 100% Polyester | 130-145°C (265-295°F) | 15-20 sec |
| Nylon | 130°C (265°F) | 10-12 sec |
| Tri-blend / Rayon | 135-145°C (275-295°F) | 10-12 sec |
| Fleece / Heavyweight | 150-160°C (300-320°F) | 15-18 sec |
Always pre-press your garment for 5 seconds at your target temperature before you position the vinyl. This removes moisture from the fabric and flattens seams, which creates a more even contact surface and improves adhesion across the full transfer area.
Pre-pressing is one of the most skipped steps in DIY HTV application, and skipping it is a direct cause of edges that lift after the first wash.
Cross-reference the vinyl type to fine-tune your settings
Once you know the fabric, check the vinyl category against the reference table from the previous section and find the overlap between both ranges. For example, pressing stretch HTV onto polyester puts you at the lower end of both ranges, so 130-140°C for 12-15 seconds is a safe and consistent target. Pressing standard PU vinyl onto 100% cotton gives you more room to work, and 155°C for 13 seconds is a solid middle ground that activates the adhesive without over-pressing.
When the fabric and vinyl ranges conflict, always default to the lower temperature to protect the material and avoid over-activating the adhesive layer. A slightly longer press time at a safer temperature is a much better approach than pushing the heat up and risking a scorched or distorted finish.
Step 2. Dial in pressure and prep the garment
Pressure is the variable most people overlook when they’re working out how long to press heat transfer vinyl, but it has a direct impact on whether the adhesive bonds fully across the entire design. Too little pressure leaves air pockets and weak edges; too much pressure can distort the vinyl surface, flatten textured finishes like flock or puff, and leave unwanted impressions on the fabric. Getting pressure right, alongside proper garment prep, is what separates a transfer that survives 50 washes from one that starts lifting after five.
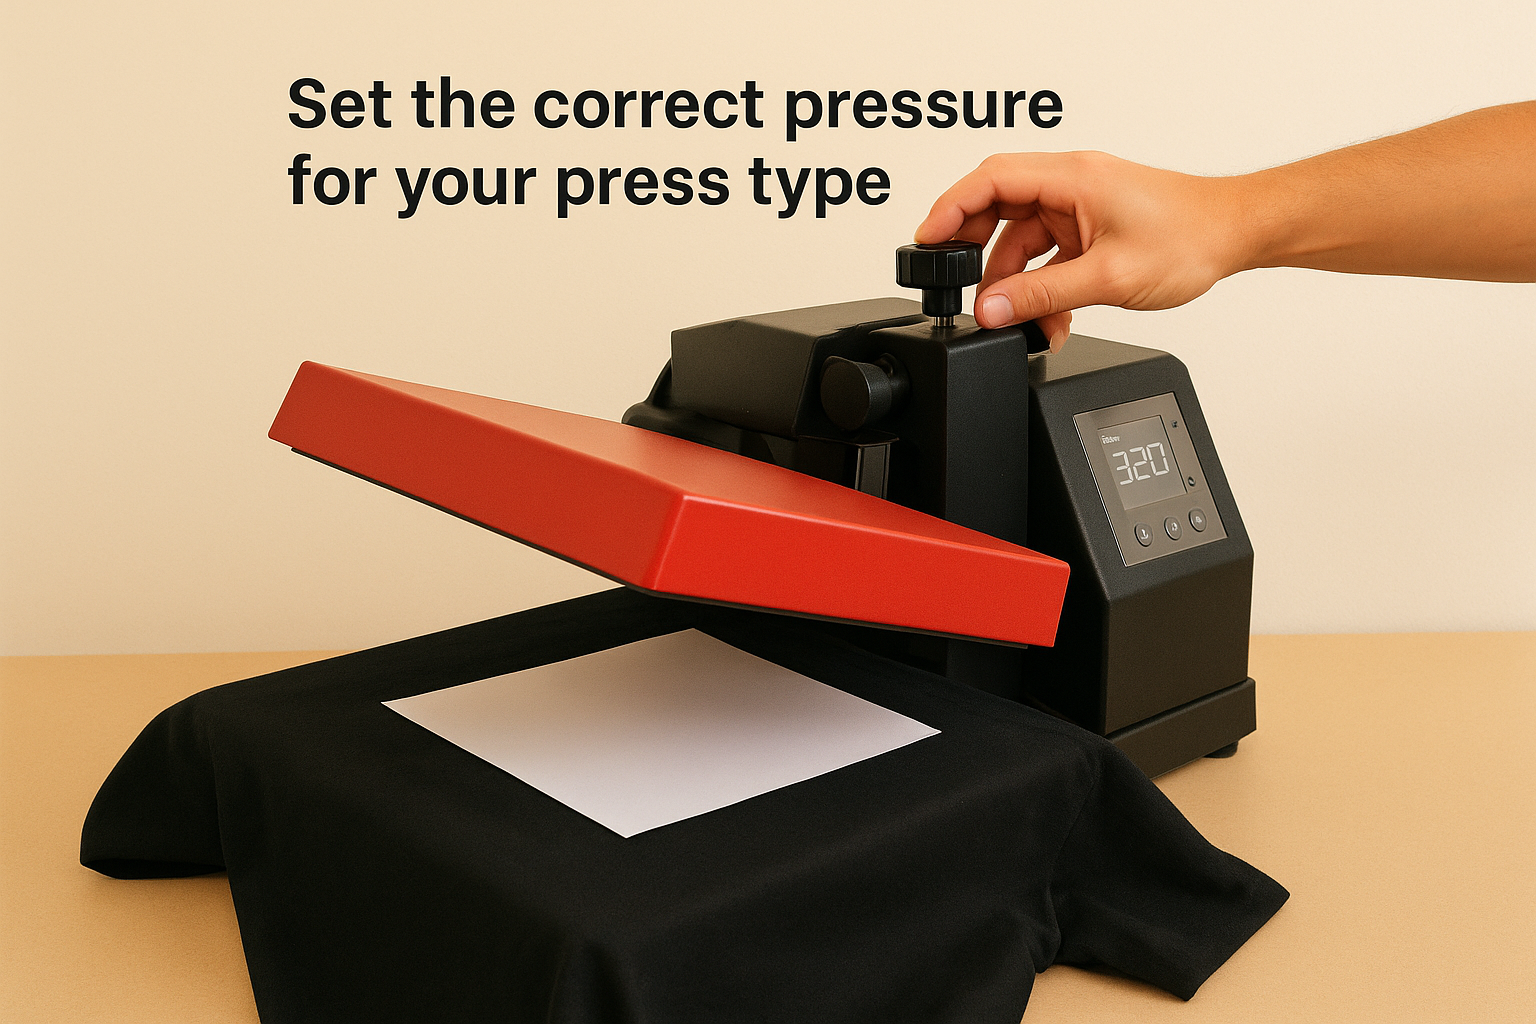
Set the correct pressure for your press type
Most heat presses use a knob or screw adjustment to control how much force the platen applies when closed. Medium-firm pressure is the correct starting point for the majority of HTV applications on standard fabrics. A practical test: close the press on a piece of folded copy paper and pull it out. Slight resistance with no tearing tells you the pressure is in the right range. If the paper slides out freely, increase the pressure. If it tears, back off.
| Press Pressure Level | Paper Test Result | Typical Use Case |
|---|---|---|
| Light | Slides freely | Delicate or heat-sensitive fabrics |
| Medium-firm | Slight resistance | Standard HTV on cotton, poly blends |
| Firm | Strong resistance, no tear | Thick fleece, flock HTV |
| Too heavy | Paper tears | Avoid – distorts material and vinyl surface |
Puff and flock vinyl require lighter pressure than standard smooth HTV, because excess force crushes the surface texture before it fully activates.
Prep the garment before you apply heat
Pre-pressing your garment for 5 seconds at your target temperature removes residual moisture and wrinkles that would otherwise create uneven contact between the vinyl and fabric. Moisture trapped under the transfer causes bubbling and edge lift, so this single step has an outsized effect on adhesion quality. Position your blank flat on the lower platen, smooth out any folds, and press without vinyl before you place your design.
For garments with thick seams, zippers, or buttons, place a heat press pillow or folded pressing cloth underneath the target area to level the surface. An uneven surface produces uneven pressure, which leads to patchy adhesion along the edges of your design regardless of how accurate your time and temperature settings are.
Step 3. Press, peel, and post-press correctly
With your settings dialled in and your garment prepped, the actual pressing step is straightforward, but the actions you take during and immediately after the press are just as important as the settings you chose. This is where knowing how long to press heat transfer vinyl pays off, because respecting the full duration and handling the peel correctly determines whether the adhesive bonds for the long term.
Press the full duration without lifting
When you close the platen, start a timer and keep the press closed for the entire recommended duration. Opening early, even by a few seconds, interrupts the adhesive activation and creates a weak bond that looks fine immediately but fails after washing. Keep firm, steady contact throughout, and do not shift or reposition the press mid-cycle, as movement breaks the seal between the adhesive and the fabric fibres before it fully cures.
If your design covers a large area that extends beyond the platen, press in overlapping sections and use the same time and temperature for each segment. Overlap each section by about 2cm to avoid gaps in adhesion along the seams between press positions.
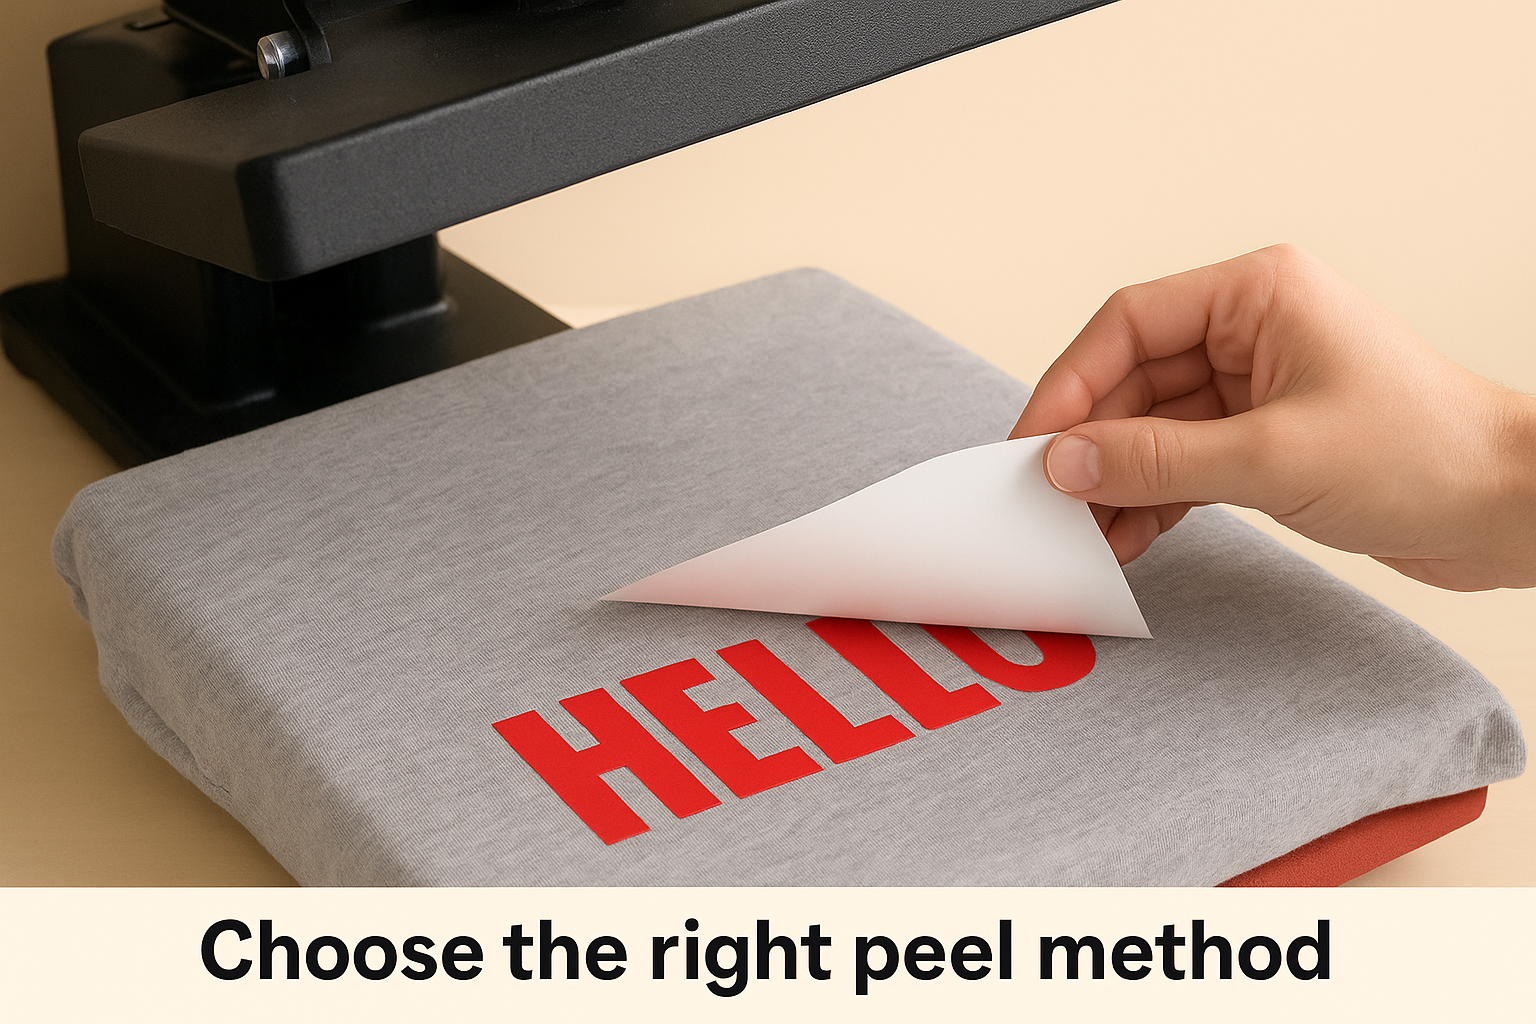
Choose the right peel method
Peel temperature makes a significant difference to the final finish and adhesion strength. Some vinyl types require a cold peel to allow the adhesive to set before you remove the carrier sheet, while others peel best while still warm. Peeling at the wrong temperature causes the vinyl to lift off the fabric or leaves the carrier sheet stuck to the surface.
| Peel Method | When to Peel | Common HTV Types |
|---|---|---|
| Hot peel | Immediately after pressing | Some standard PU, printable HTV |
| Warm peel | After 5-10 seconds of cooling | Stretch, puff HTV |
| Cold peel | Fully cooled (30-60 seconds) | Glitter, flock, foil HTV |
Always check the manufacturer’s data sheet for the correct peel method, as using the wrong one is one of the most common causes of adhesion failure.
Post-press to lock in the bond
Once you’ve removed the carrier sheet, place a sheet of parchment paper or a Teflon cover sheet over the design and press again for 5-10 seconds. This final press flattens any edges that lifted during peeling and improves the overall bond strength. After the second press, lay the garment flat to cool completely before folding or stacking it, as heat and pressure from other garments can distort the vinyl surface while it’s still warm.
Follow these care instructions to protect the transfer through washing:
- Turn the garment inside out before washing
- Wash in cold water on a gentle cycle
- Avoid tumble drying on high heat; air dry or use a low heat setting
- Do not iron directly on the vinyl surface without a cover sheet
Troubleshoot peeling, scorching, and wash failure
Most HTV problems fall into three categories: edges that lift, fabric that scorches, and transfers that survive the press but fail in the wash. Each one has a specific root cause you can trace back to your settings or technique, which means you can fix it systematically rather than just pressing again and hoping for a different result. Understanding how long to press heat transfer vinyl correctly is part of the solution, but pressure, peel method, and post-care all play an equal role in each of these failure modes.
Vinyl peeling or lifting at the edges
Edge lifting almost always means the adhesive did not fully activate across the entire transfer area. The most common causes are insufficient pressure, a press time that was too short, or moisture in the fabric that was not removed during pre-press. Uneven platens and thick seams running under part of the design produce the same result because the pressure drops wherever the surface is not flat.
| Symptom | Likely Cause | Fix |
|---|---|---|
| Edges lift after peeling | Pressure too low or time too short | Increase pressure; add 2-3 sec |
| Centre adheres but edges don’t | Uneven platen or surface | Use a heat press pillow |
| Vinyl lifts during peel | Peeled too hot or too fast | Wait for correct peel temperature |
| Design lifts on first wash | No post-press applied | Re-press under parchment for 5-10 sec |
A post-press step after peeling resolves the majority of edge-lift issues, particularly on designs with fine lettering or thin cut lines.
Scorching or dye migration on fabric
Scorching appears as a shiny, flattened patch on the fabric surface around the design, and it tells you the temperature was too high for that specific material. Polyester is the most vulnerable fabric. Drop the temperature by 10-15°C and extend press time by 3-5 seconds to compensate, rather than pushing heat up to speed the process. Dye migration shows as a faded or discoloured tint within the vinyl itself, which happens when polyester dyes activate under heat and bleed upward through the adhesive layer.
Transfer failing after washing
Wash failure on a transfer that looked fine off the press usually points to one of three problems: the wrong peel method, no post-press step, or incorrect care after pressing. Check that the peel temperature matched the vinyl type, then confirm the garment was washed inside out in cold water on a gentle cycle. If transfers consistently fail after washing, re-examine your press time first, as under-pressed vinyl bonds weakly enough to survive handling but not repeated wash cycles.
- Re-press failed transfers for 10 seconds under parchment before writing off the garment
- Increase press time by 3 seconds and run a test piece through a full wash before committing to a full batch
- Check that the carrier sheet was removed correctly and at the right temperature for that vinyl type
- Avoid fabric softener, as it coats fibres and weakens adhesion over time
Wrap up and what to do next
Knowing how long to press heat transfer vinyl comes down to matching your vinyl type and fabric to the right combination of time, temperature, and pressure. The settings in this guide give you a reliable starting point for every common pairing, and the troubleshooting steps cover the fixes for the most frequent failure modes. Pre-pressing your garment, using the correct peel method, and post-pressing after peeling are the three habits that separate transfers that last from ones that fail after a single wash.
If you want professional results without managing the press yourself, Apex Workwear handles custom apparel production in Canada with the right settings dialled in from the start. Whether you need a single item or a full team order, the process is straightforward and the quality is consistent. Get a quote and see what we can produce for you at Apex Workwear.