You’ve booked the booth, paid the fees, and committed your team to a full day (or three) on the show floor. Now comes the part that actually determines whether any of it pays off: how you set up that space. The right trade show booth layout ideas can turn a 10×10 square into a magnet for foot traffic, while the wrong setup leaves your staff standing behind a table, watching attendees walk past. It’s a design problem with real revenue stakes.
Most exhibitors focus on graphics and giveaways but overlook the layout itself, how visitors move through the space, where conversations happen, and what they see first. These details shape every interaction at your booth. Get them right, and you’ll have lineups. Get them wrong, and you’ve got an expensive wallflower.
At Apex Workwear, we help businesses across Canada prepare for trade shows with custom banners, signage, and branded apparel, so we see firsthand what works on the show floor and what doesn’t. This article breaks down 12 practical booth layout ideas you can adapt to your space, your budget, and your goals, whether you’re a first-time exhibitor or a seasoned veteran looking to refresh your setup.
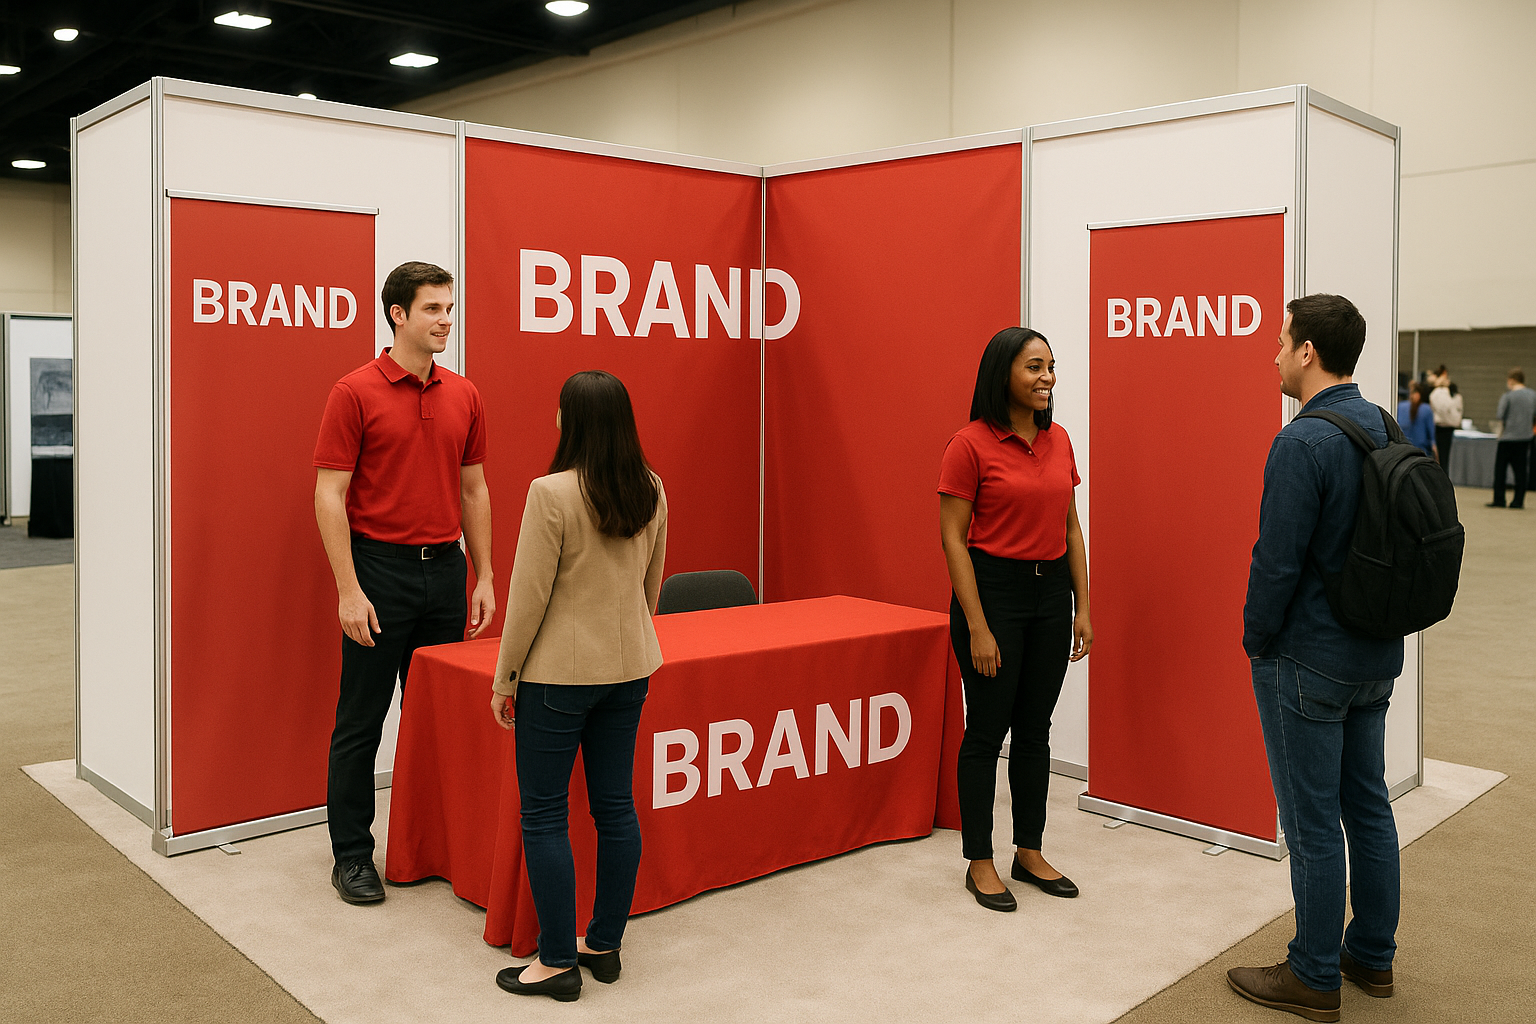
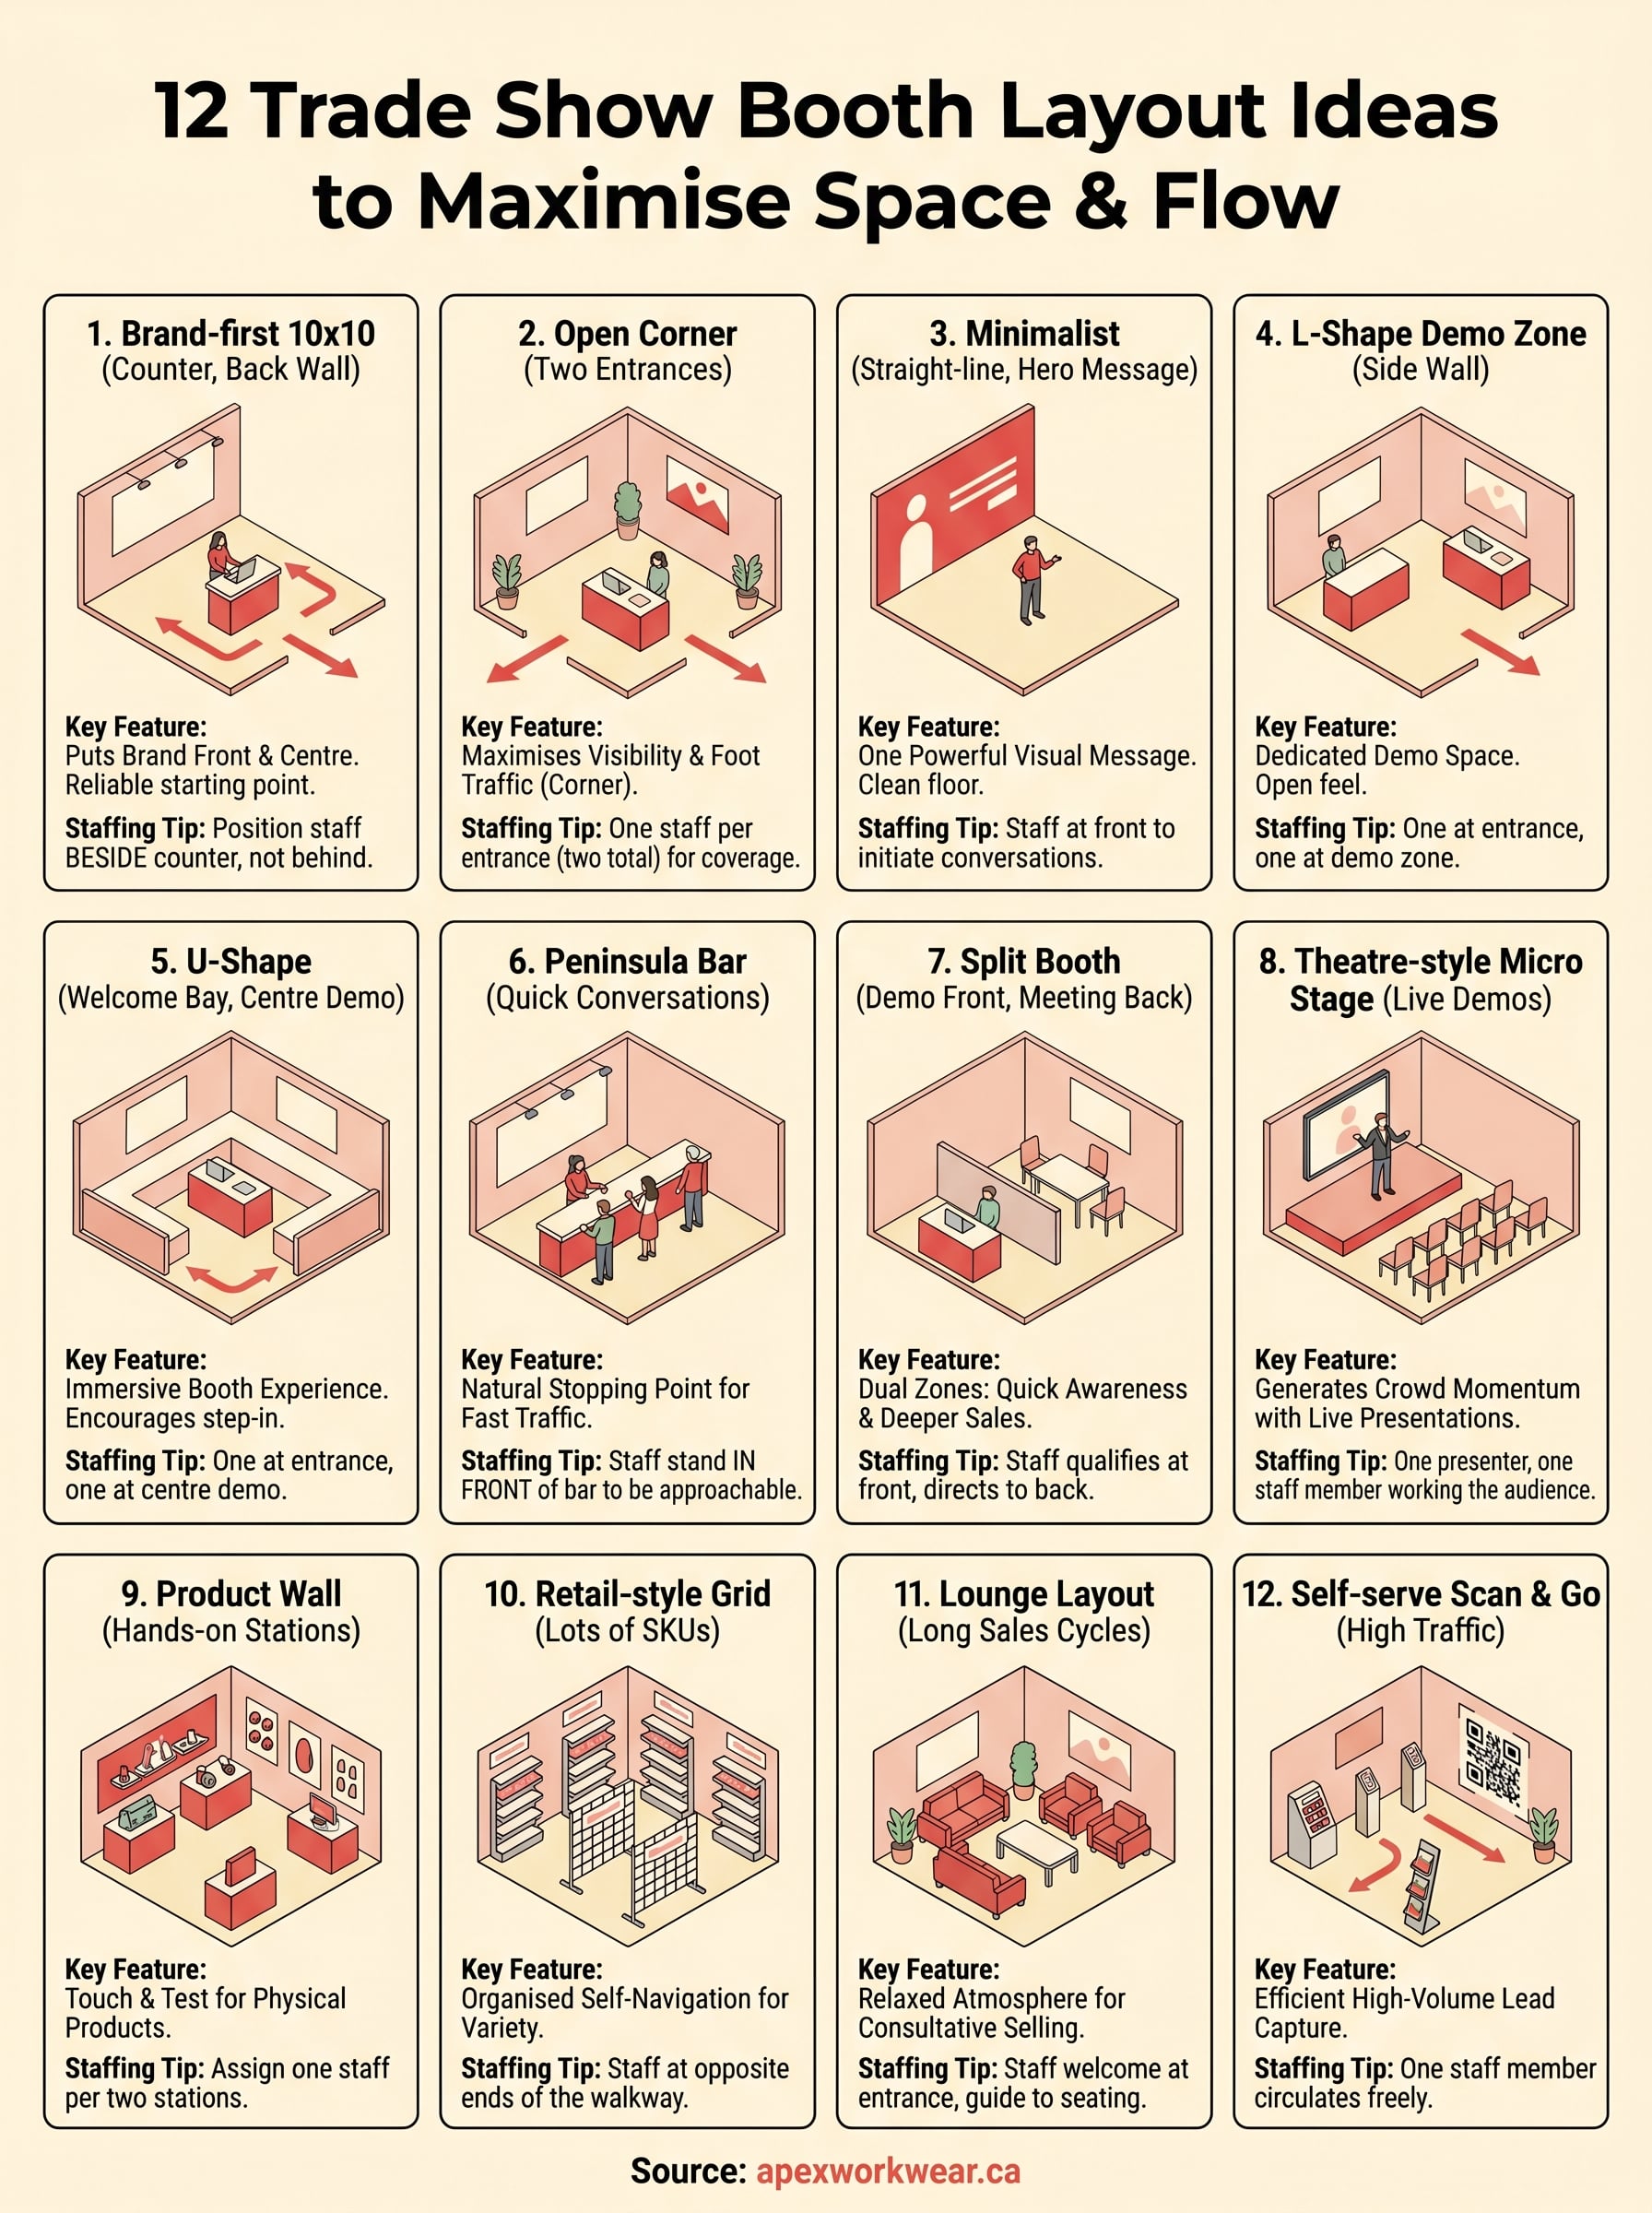
1. Brand-first 10×10 with back wall and counter
The 10×10 is the most common booth size at trade shows across Canada, and this layout is the most reliable starting point for first-time exhibitors. It puts your brand identity front and centre while giving you a clear functional zone for conversations and lead capture.
Ideal booth size and show type
This setup works best in a standard 10×10 inline booth, meaning you have one open side facing the aisle and three walls (or adjacent booths) behind and beside you. It suits B2B trade shows, local business expos, and industry conferences where attendees walk up, scan the space quickly, and decide in seconds whether to stop.
Step-by-step floor plan
Start with a full back wall display spanning the entire 10-foot width. Place a counter or high-top table roughly 3 to 4 feet in front of it, slightly off-centre to leave open floor space on one side. That gap creates a natural entry point. Put a branded tablecloth or counter graphic on your table and keep the surface clear except for one focused item, your key product, a demo device, or a sign-up sheet.
The back wall is the first thing attendees see from 20 feet away, so it needs to carry your brand name, core message, and a single visual that stops people mid-stride.
What to print and bring
Your back wall banner is the anchor piece and should display your logo, tagline, and one clear value statement. Add a counter display or retractable banner beside the table for a secondary message or offer. Bring a stack of brochures or postcards for visitors who want to take something away, plus branded merchandise like pens or tote bags if budget allows. Staff in matching branded apparel (custom T-shirts or embroidered polos) make the booth look cohesive and professional without extra effort.
Flow and staffing tips
One staff member can run this layout comfortably, with two being ideal during peak hours. Position your staff beside the counter, not behind it; standing in front of the table removes the barrier and invites conversation. Keep the entry side completely clear so visitors can step in without feeling cornered, and rotate your team every 90 minutes to keep energy levels high.
2. Open corner booth with two entrances
A corner booth gives you two open sides facing foot traffic instead of one. This makes it one of the most effective trade show booth layout ideas for maximising visibility, since visitors approaching from two different aisles can step in without waiting for an ongoing conversation to wrap up.
Ideal booth size and show type
This layout works best in a 10×20 or larger corner position, where the show assigns you end-of-row placement. It suits high-traffic consumer shows, franchise expos, and multi-day events where you need to handle a steady flow of visitors without creating a bottleneck at a single entrance.
Step-by-step floor plan
Place your back wall display in the corner where your two solid walls meet. Position a demo table toward the centre of your booth, leaving both aisle-facing sides fully open. Keep the middle clear of chairs or bulky furniture so visitors can move through without feeling blocked.
Two open sides only help if both entrances feel genuinely welcoming, so avoid placing a table or counter across either opening.
What to print and bring
Bring two retractable banners, one near each entrance, so visitors approaching from either direction see your brand name immediately. Add a corner back wall banner as the centrepiece and use matching branded tablecloths on any surfaces. Custom apparel on your staff keeps the booth looking cohesive from both angles.
Flow and staffing tips
Two staff members work best here, one covering each entrance. Position your team at opposite sides of the booth so they can greet visitors from either aisle without crowding the centre or cutting across each other.
3. Minimalist straight-line with hero message
Not every booth needs to be packed with displays and product demos. The minimalist straight-line layout strips everything back to one powerful visual message and a clean, open floor plan. This is one of the most underused trade show booth layout ideas, and it consistently outperforms cluttered setups when your brand story is clear and compelling.
Ideal booth size and show type
This layout fits a 10×10 or 10×20 inline booth and works particularly well at design-led events, tech conferences, and professional services expos where a sophisticated, uncluttered presence signals confidence. Avoid it if your product requires physical interaction or if you’re selling multiple product lines that need equal visibility.
Step-by-step floor plan
Run a single large-format back wall graphic across the full width of the booth. Leave the floor completely open in front of it, with no counter or table blocking the view. Position one tall display or branded podium off to one side if you need a surface. Keep everything else off the floor.
A clean floor and one strong image create more visual impact than a booth stuffed with displays competing for attention.
What to print and bring
Your hero back wall graphic carries the entire layout, so invest in high-resolution print with bold typography and a single clear headline. Bring a small supply of premium business cards or folded brochures to hand out personally rather than leaving in a pile.
Flow and staffing tips
One confident staff member works well here. Position them at the front of the booth, never hiding behind a podium. Their job is to initiate conversations, not wait for visitors to walk over.
4. L-shape demo zone with side wall
The L-shape layout uses two walls at a right angle to create a dedicated demo zone that feels purposeful without closing off the booth. It’s one of the more flexible trade show booth layout ideas because it separates your display area from your active demo space while keeping the front open and accessible.
Ideal booth size and show type
This layout suits a 10×20 inline or corner booth where you have at least one full side wall to work with. It performs well at tech product expos, home improvement shows, and trades-focused events where you need room to demonstrate something physical, whether that’s a tool, software, or a service process.
Step-by-step floor plan
Place your back wall display along the full rear of the booth and extend a side panel or tall banner down one side wall to form the L. Position your demo table or station in the open corner created by those two walls, facing outward toward the aisle. Leave the opposite side completely open to act as your primary entrance.
Keeping one full side open prevents the booth from feeling like a closed room, which is a common mistake with L-shape configurations.
What to print and bring
Bring a large-format back wall banner plus a matching side wall graphic to complete the L. A branded table cover on your demo station ties the two zones together visually.
Flow and staffing tips
Two staff members work best here: one near the entrance to welcome visitors and one running the demo station. Rotate roles every hour to keep both positions energised.
5. U-shape welcome bay with centre demo
The U-shape layout wraps three walls of display material around a central open demo area, creating a booth that feels immersive without being claustrophobic. It’s one of the more ambitious trade show booth layout ideas for exhibitors who want visitors to step fully inside the space rather than just glance from the aisle.
Ideal booth size and show type
This configuration needs room to breathe, so it works best in a 10×20 or larger inline booth. It suits multi-product brands, professional services firms, and tech companies that need dedicated space for both visual storytelling and hands-on engagement in the same footprint.
Step-by-step floor plan
Place back wall and side wall displays along all three enclosed sides to form the U. Position your demo table or interactive station at the centre of the open floor, angled toward the aisle entrance. Keep a clear pathway on both sides of the demo table so visitors can move around it naturally without getting stuck behind someone else’s conversation.
The centre demo station only works if visitors can circulate freely around it, so leave at least three feet of clearance on each side.
What to print and bring
Bring matching graphics for all three wall panels to create a consistent visual wrap across the interior. Add a branded table cover and a retractable banner near the entrance to pull people in before they see the full setup inside.
Flow and staffing tips
Two to three staff members keep this layout running well. Position one near the entrance to invite people in and at least one at the centre demo station to run the presentation and answer questions.
6. Peninsula bar for quick conversations
The peninsula bar layout centres your booth around a long counter or bar-height table that runs parallel to the aisle, creating a natural surface for quick standing conversations. Among practical trade show booth layout ideas, this one excels at turning fast-moving foot traffic into actual contact moments.
Ideal booth size and show type
This setup works well in a 10×10 or 10×20 inline booth and fits naturally at networking events, food and beverage expos, and professional services shows where attendees move quickly and your pitch is concise. It’s less effective when your product needs an extended hands-on demo or a private conversation.
Step-by-step floor plan
Place a bar-height counter or tall table running horizontally across the front third of your booth, parallel to the aisle. Position your back wall banner behind it to anchor the space visually and push your brand messaging toward approaching visitors. Keep the counter surface uncluttered with just one or two key items on it.
A bar-height surface creates natural stopping behaviour because people instinctively lean against it, which buys you the 60 seconds you need to start a conversation.
What to print and bring
Bring a branded counter graphic or table wrap for the bar surface plus a full-width back wall banner. Postcards or folded brochures sitting on the counter give visitors something to pick up on their own without needing a direct handoff.
Flow and staffing tips
One to two staff members standing on the aisle side of the counter keep the energy visible and approachable. Your team should stay in front of the bar, not behind it, so they can initiate conversations without a physical barrier getting in the way.
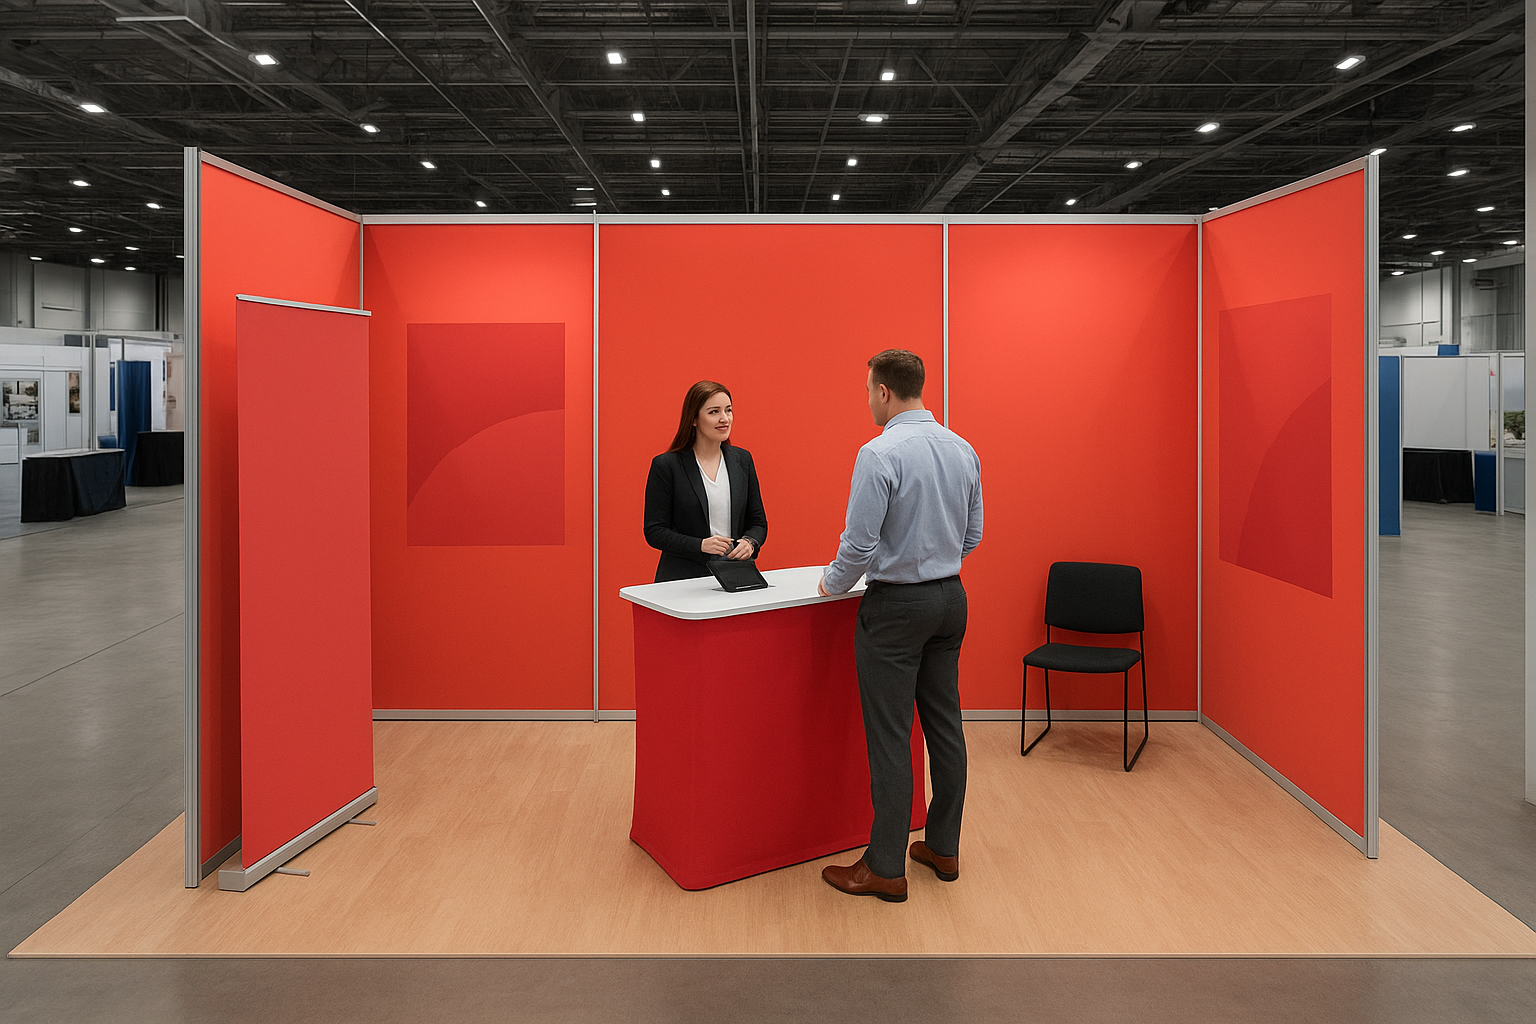
7. Split booth with demo front and meeting back
The split booth layout divides your space into two distinct zones: a public-facing demo area at the front and a semi-private meeting area at the back. This is one of the more conversion-focused trade show booth layout ideas because it lets you run both a broad awareness play and a deeper sales conversation at the same time.
Ideal booth size and show type
This layout requires a 10×20 or larger inline booth to give both zones enough room to function without feeling cramped. It suits B2B-heavy events, enterprise software shows, and professional services expos where some visitors need a quick product snapshot while others are ready for a longer sales conversation.
Step-by-step floor plan
Place your back wall display and demo table in the front half of the booth to catch attention from the aisle. Use a low partition, shelf unit, or branded screen to separate the back half, where you set up two chairs and a small table for private conversations. Keep the divider low enough that the back area stays visible from outside.
A visible but distinct back zone signals to serious prospects that deeper conversations are available, without making the booth feel closed off to casual visitors.
What to print and bring
Bring a full back wall banner for the front zone and a smaller branded pull-up banner inside the meeting area to reinforce your message at close range. A branded tablecloth on the demo table and matching staff apparel tie both zones together visually.
Flow and staffing tips
Two staff members work best here, one running the front demo zone and one hosting the back meeting area. Your front staff member qualifies visitors quickly and directs warmer leads to the back for a focused conversation.
8. Theatre-style micro stage for live demos
The theatre-style micro stage layout dedicates a portion of your booth to scheduled live presentations, pulling in a small audience at set intervals throughout the day. Among high-energy trade show booth layout ideas, this one generates consistent crowd momentum because a group of people watching something signals to passing attendees that something worth seeing is happening.
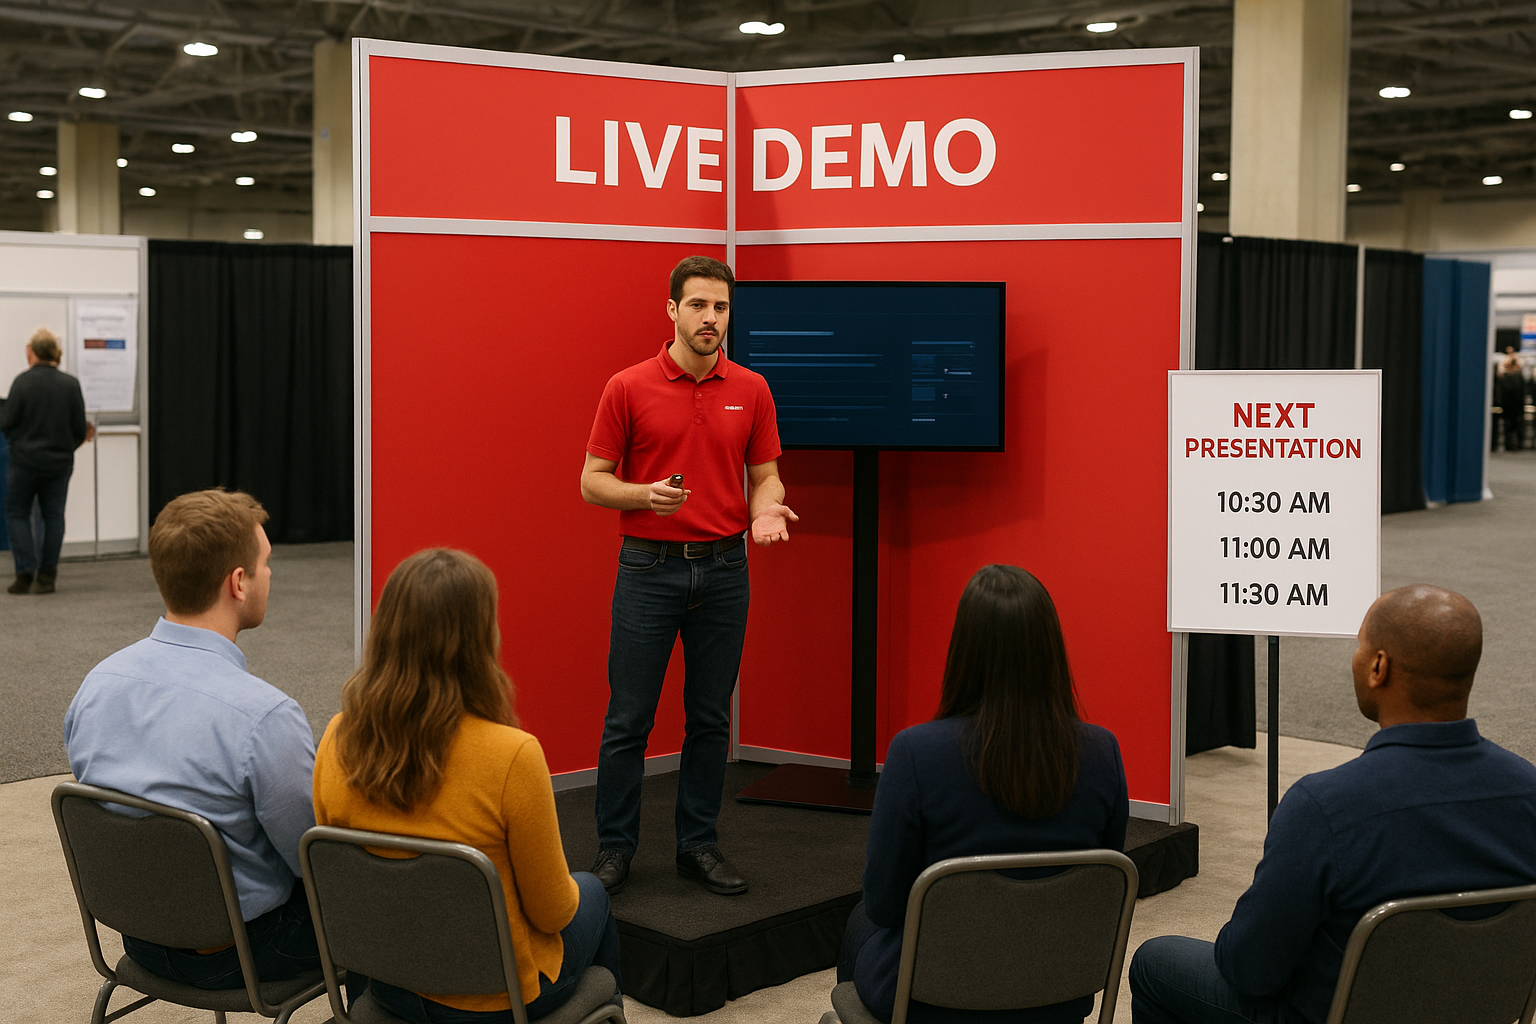
Ideal booth size and show type
This layout requires at least a 10×20 booth to fit a raised platform or designated presentation area without crowding your staff or visitors. It works best at tech product launches, software demos, and training-focused industry events where your product genuinely benefits from a live walkthrough rather than a one-on-one conversation.
Step-by-step floor plan
Position a small raised platform or clearly marked stage area at the back of your booth, facing outward toward the aisle. Place a monitor or display screen behind the presenter and arrange four to six chairs in a shallow arc in front of it. Leave open standing room at both sides so walk-up visitors can watch without blocking the entrance.
Scheduling your presentations every 30 minutes and posting the times on a visible sign near the aisle gives people a reason to come back, which keeps your booth active between sessions.
What to print and bring
Bring a back wall banner behind the stage area and a schedule sign mounted near the aisle entrance listing your presentation times. Branded apparel on your presenter ties the stage to your overall booth identity.
Flow and staffing tips
One dedicated presenter runs each session while a second staff member works the edges of the audience, handing out brochures and capturing contact details from interested attendees during the presentation.
9. Product wall with hands-on stations
The product wall layout lines your back and side walls with physical product displays and pairs them with dedicated hands-on stations where visitors can touch, test, or interact directly with what you offer. This is one of the most conversion-friendly trade show booth layout ideas for brands with a physical product range that sells better through experience than explanation.
Ideal booth size and show type
This layout suits a 10×20 or larger inline booth where you have enough wall space to display multiple products without cramming them together. It performs well at consumer goods expos, hardware shows, and gift trade fairs where buyers expect to handle products before placing an order.
Step-by-step floor plan
Mount your products directly on back wall panels or shelving at eye level across the full rear of the booth. Position two or three small hands-on tables in front of the wall, each dedicated to a specific product or category. Leave clear walking lanes between each station so visitors can browse without crowding.
Labelling each station with a clear product name and price point lets visitors self-navigate without needing a staff member to explain the basics first.
What to print and bring
Bring shelf talkers or product cards for every item on the wall, printed with key specs and pricing. A branded back wall header panel ties the whole display together visually.
Flow and staffing tips
Assign one staff member per two stations so visitors at each hands-on point get timely attention without feeling rushed or ignored.
10. Retail-style grid for lots of SKUs
The retail-style grid layout organises your booth like a well-planned shop floor, with clear product zones, consistent signage, and defined browsing paths that let visitors self-navigate through a wide range of offerings. Among all the trade show booth layout ideas in this list, this one handles the most product variety without overwhelming visitors.
Ideal booth size and show type
This layout works best in a 10×20 or larger inline booth where you have enough floor space to create distinct product zones without forcing visitors to squeeze past each other. It performs well at wholesale trade fairs, gift shows, and consumer product expos where buyers arrive with a checklist and want to evaluate multiple SKUs efficiently rather than sit through a pitch.
Step-by-step floor plan
Line your back wall with shelving or panel displays organised by product category, with each section clearly labelled. Place freestanding grid panels or display fixtures in two rows running toward the aisle, creating a central walkway between them. Keep the aisle entrance fully open so visitors can step in and start browsing without prompting.
Treating your booth like a retail store gives buyers the autonomy to self-select, which reduces pressure and often leads to more genuine purchasing conversations.
What to print and bring
Bring shelf talkers and category header signs for every product zone, printed with names, variants, and pricing. A branded back wall header running across the full top of the display ties the whole grid together visually.
Flow and staffing tips
Two staff members work well here, positioned at opposite ends of the central walkway so they can assist visitors across the full booth without clustering in one spot.
11. Lounge layout for long sales cycles
Some products and services take more than a two-minute conversation to sell. The lounge layout replaces the standard counter-and-banner setup with comfortable seating and a relaxed atmosphere that encourages visitors to sit down, slow down, and have a genuine conversation. Among all the trade show booth layout ideas in this list, this one is built specifically for deals that need time to develop.
Ideal booth size and show type
This layout needs a 10×20 or larger booth to fit seating without crowding the entrance or blocking natural movement through the space. It suits B2B events, financial services expos, and high-value professional services shows where your average deal requires consultative selling rather than a quick product handoff.
Step-by-step floor plan
Place a back wall display along the rear of the booth to carry your brand messaging and give visitors something to look at while they settle in. Arrange two to four lounge chairs or a small sofa with a low coffee table in the open floor area, angled slightly inward so seated visitors face each other naturally without feeling like they’re in an interview.
Removing standing barriers like counters signals to visitors that your booth is a place to stay, not just to pass through.
What to print and bring
Bring a full back wall banner and a small branded side table card with your contact details. A neatly printed one-page capability sheet gives seated visitors something to hold and reference during the conversation without turning it into a formal presentation.
Flow and staffing tips
One to two staff members work well here. Keep your team standing near the entrance to welcome visitors and guide them into the seating area, rather than sitting and waiting passively at the back of the booth.
12. Self-serve scan and go for high traffic
This layout is designed for shows where foot traffic is relentless and your staff cannot hold individual conversations with every person who passes. Instead of relying on personal interaction to deliver your message, this setup uses clear signage, QR codes, and self-serve materials to do the work so visitors can grab what they need and move on without waiting for a staff member to become available.
Ideal booth size and show type
This is one of those trade show booth layout ideas that fits neatly into a 10×10 inline booth, though it scales easily to larger spaces. It works best at consumer expos, large trade fairs, and high-attendance industry events where hundreds of visitors pass your booth each hour and you cannot realistically engage each one in a conversation.
Step-by-step floor plan
Position your back wall banner at the rear carrying your core message and a large, readable QR code. Place a self-serve stand or display rack toward the front with printed materials organised and easy to grab without staff assistance. Keep the floor completely open so visitors can step in, collect what they need, and leave without interrupting an ongoing conversation.
Your QR code should link directly to a landing page that captures visitor details, turning a quick scan into a trackable lead.
What to print and bring
Bring well-stocked brochure racks or postcard displays plus a clear branded sign explaining what visitors receive when they scan your code. Print large-format QR code posters readable from at least three feet away.
Flow and staffing tips
One staff member works well here, moving freely through the front of the booth to spark brief conversations rather than staying anchored behind a counter.
Quick wrap-up
Every one of these trade show booth layout ideas starts with the same principle: your space should guide visitors naturally toward a conversation, not leave them guessing where to look or what to do. Whether you’re working with a tight 10×10 budget setup or a larger footprint with multiple zones, the layout you choose shapes every interaction you have on the show floor.
Pick the configuration that matches your product type, your show format, and how your team operates best. Then invest in quality printed materials that make the space look deliberate and professional from the moment someone spots you from across the aisle. Cohesive signage, branded apparel, and clean display graphics do a significant portion of the selling before your staff says a single word.
If you need custom banners, signs, or branded apparel for your next event, Apex Workwear can help you get show-ready fast.