If you’ve ever run your fingers over a textured logo on a hoodie or cap, there’s a good chance you were feeling embroidery, and one of the oldest techniques behind that look is chain stitch embroidery. It’s a method that’s been used for centuries to create bold, decorative lines and filled designs on fabric, and it still plays a role in custom apparel and branding today.
At Apex Workwear, we work with embroidery daily to produce custom hats, hoodies, and apparel for businesses across Canada. That hands-on experience means we understand how different stitch types affect the look and durability of a finished product. Chain stitch has a character all its own, a looped, slightly raised texture that sets it apart from the flat satin or fill stitches most people are used to seeing on corporate wear.
This guide breaks down exactly what chain stitch embroidery is, where it’s commonly used, and how to do it by hand step by step. Whether you’re exploring embroidery as a craft, choosing a stitch style for your brand’s apparel, or just curious about the technique behind the texture, you’ll walk away with a clear, practical understanding of this classic stitch and how it fits into modern custom work.
What chain stitch embroidery is
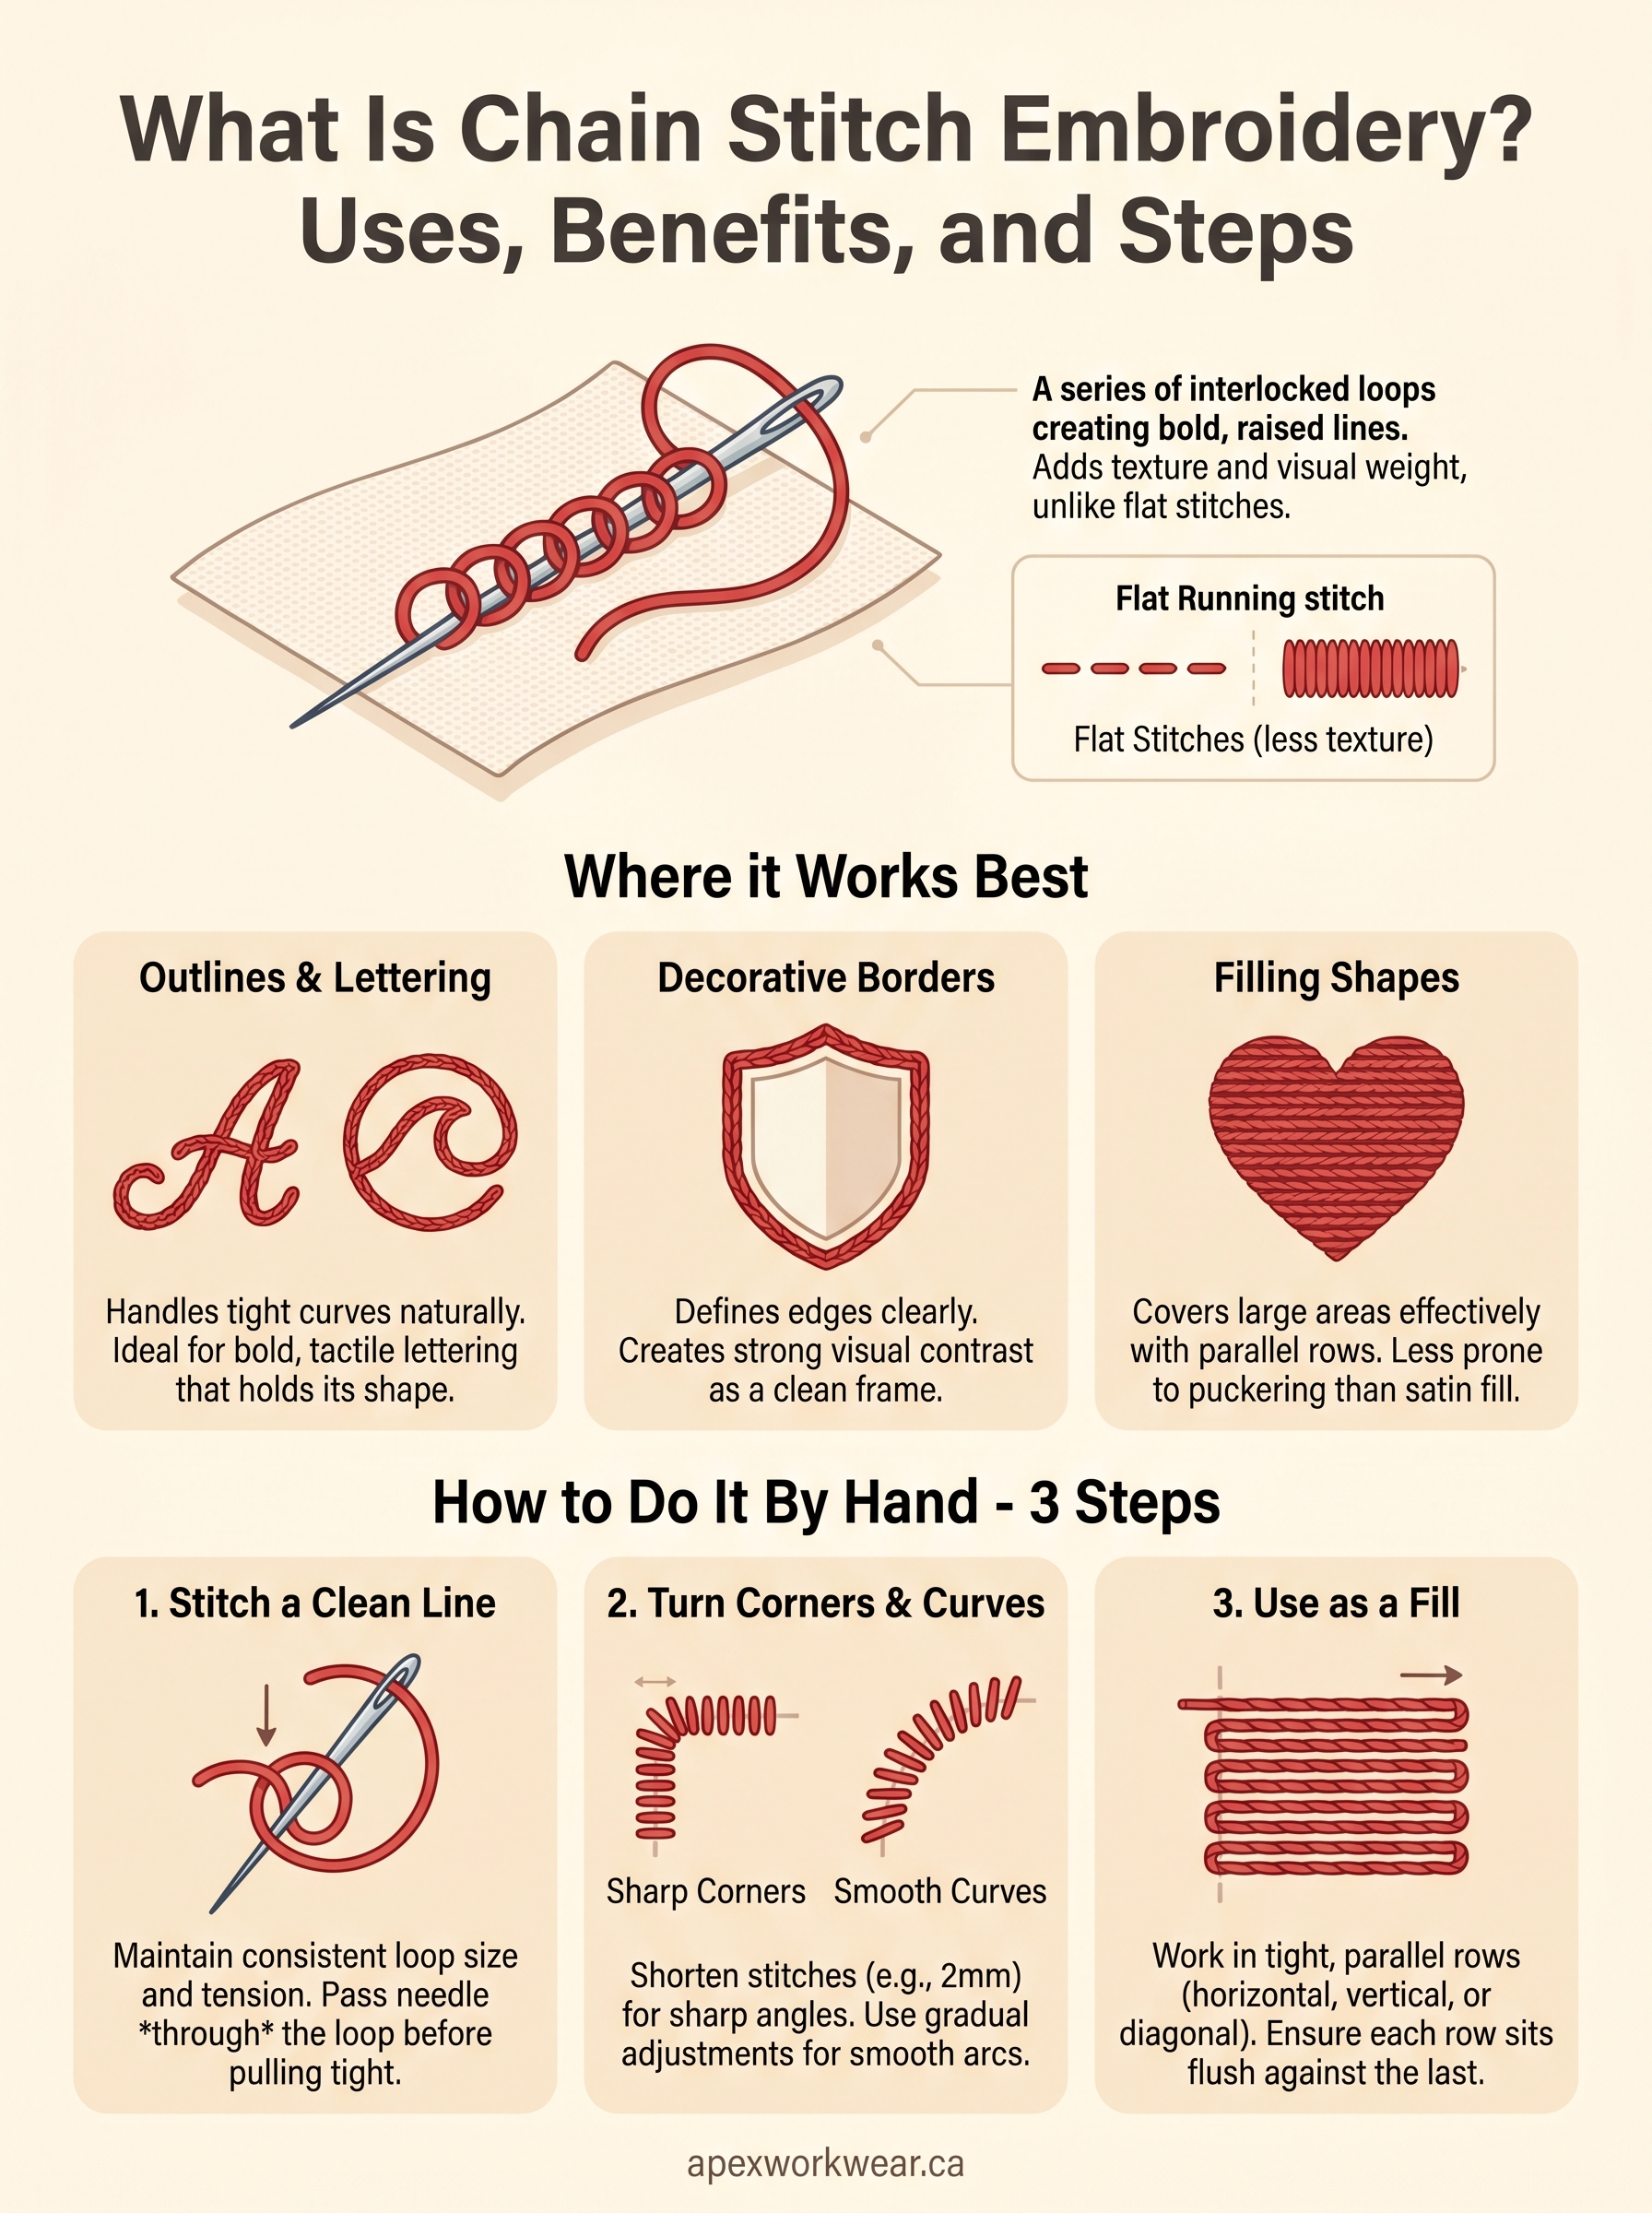
Chain stitch embroidery is a technique, used both by hand and on specialised machines, where each stitch forms a small loop that anchors to the next, creating a linked chain across the fabric’s surface. If you’ve ever wondered what is chain stitch embroidery in practical terms, the clearest answer is this: it’s a series of interlocked loops pulled through cloth with a needle and thread, advancing from one point to the next in a continuous line. The result is a raised, textured trail that carries more visual weight than a running stitch and more flexibility than a rigid satin stitch. That combination of weight and flexibility is exactly what makes it so useful for outlines, lettering, and decorative borders on custom apparel.
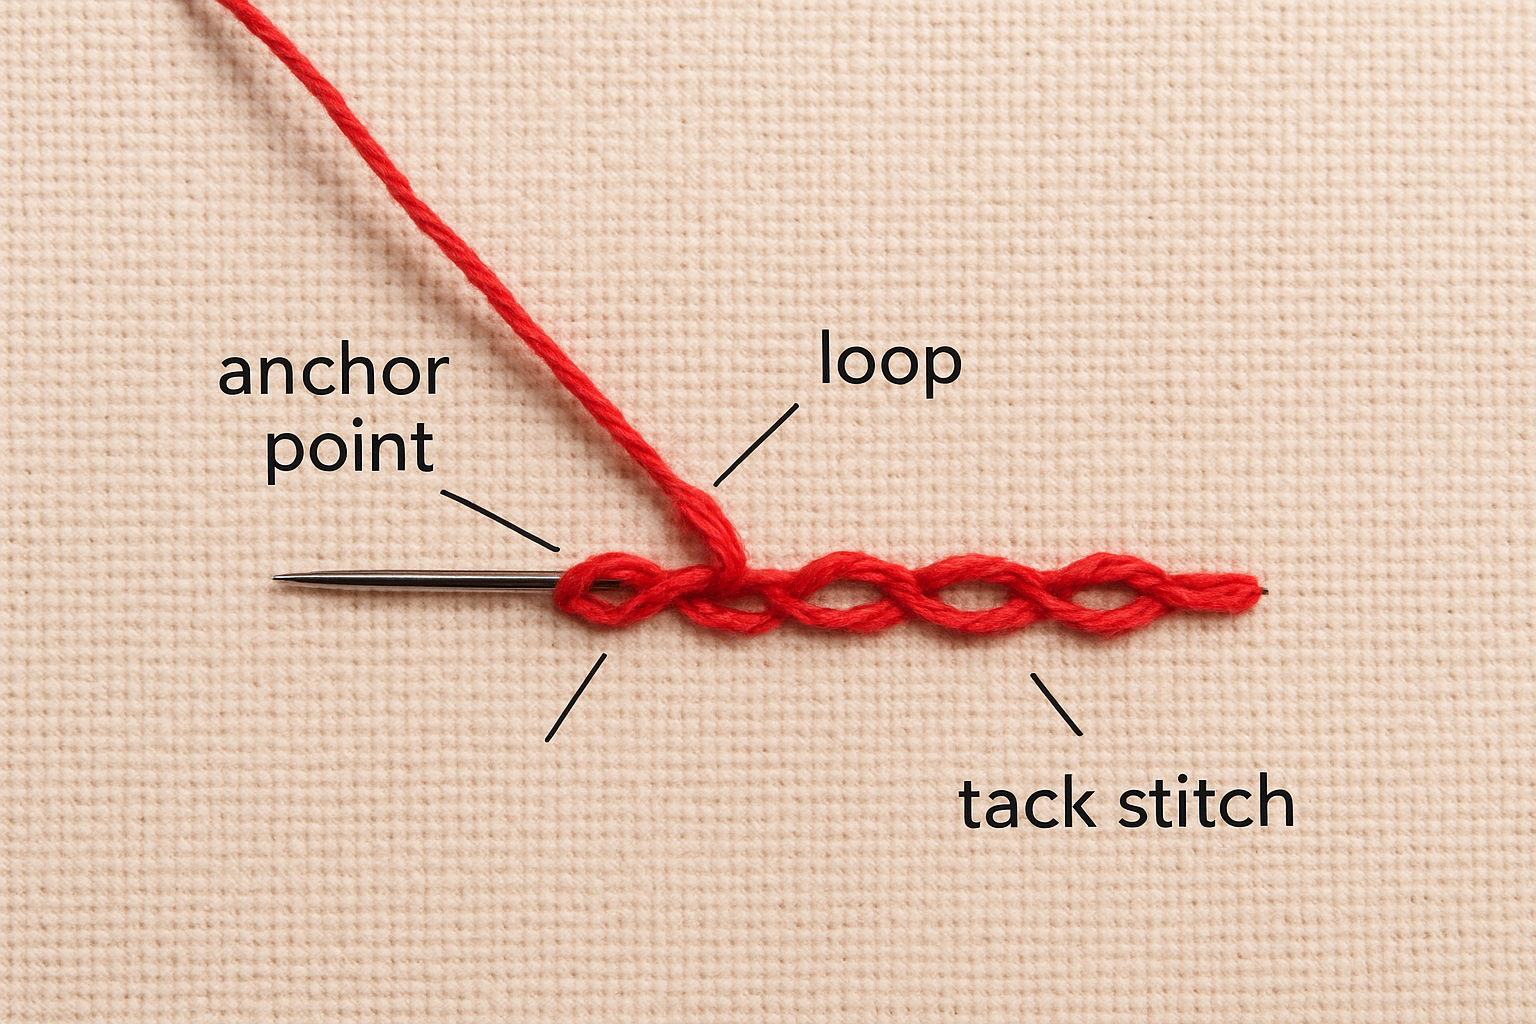
The anatomy of a single chain loop
To understand how the stitch works, it helps to slow down and look at what happens during a single loop. You bring the thread up through the fabric, loop the working thread back under the needle tip, and push the needle down into the same hole or just beside it, trapping the slack as it tightens. The next stitch repeats this action, anchoring the previous loop in place, and that’s why the finished line looks like a series of connected links running across the cloth. That looped construction is also what gives chain stitch its characteristic raised profile on the surface.
The raised profile of chain stitch is not a side effect, it’s the point. That slight elevation catches light differently from flat stitches, which is why it reads so well on logos, lettering, and decorative borders.
Every chain stitch line is made up of three functional parts:
- The anchor point: where the thread exits the fabric and the new loop begins
- The loop: the slack length of thread held under the needle before the stitch is pulled closed
- The tack stitch: a small finishing stitch at the end of any line that locks the final loop in place and stops it unravelling
How chain stitch compares to other common stitches
Most beginners start with a running stitch or backstitch, both of which lie flat against the fabric surface. Chain stitch behaves differently because the looped structure gives it a three-dimensional quality. You can draw your fingertip across a chain-stitched line and feel each individual loop, whereas a backstitch line sits nearly flush with the cloth. This textural difference makes chain stitch a natural choice for decorative outlines, bold lettering, and any design where depth adds to the overall look.
When you place chain stitch beside satin stitch, the contrast becomes even clearer. Satin stitch layers parallel threads side by side to produce a smooth, flat, shiny fill, and it works well for compact solid shapes. Chain stitch builds lines and fills larger areas using its interlocked loops, giving the finished piece a visible texture that reads clearly even from a distance. For thick outlines, curved text, and logos with strong graphic character, that texture is a genuine advantage rather than a compromise.
Where chain stitch works best
Chain stitch works well in specific situations rather than across every application. Its raised, looped profile makes it a strong choice for designs that need visual weight and clear definition, but it’s not the right tool for every project. Knowing exactly where to use it saves you time and produces better results on your finished piece, whether you’re working on a personal craft project or deciding on a stitch style for custom branded apparel.
Outlines and lettering
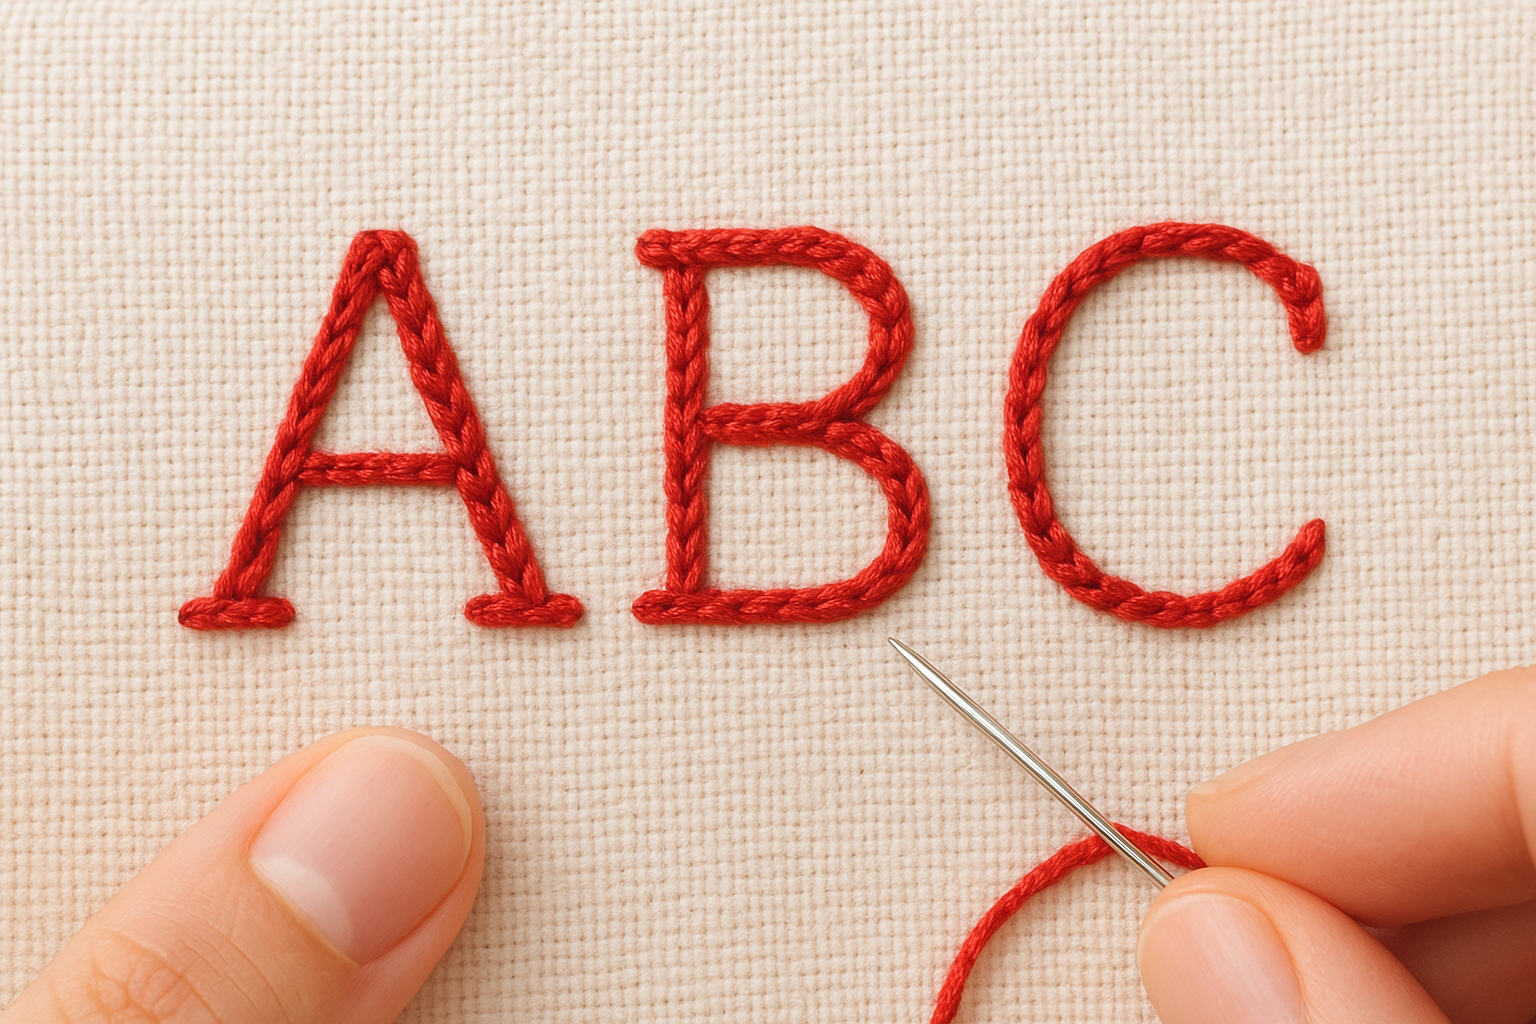
The continuous looped line of chain stitch follows curves and corners more naturally than most other stitches, which makes it well suited for outlines and lettering. When you stitch a brand name or logo text, the slightly raised line reads clearly from a distance and holds its shape through repeated washing. For bold, graphic lettering on custom hoodies, caps, and workwear, chain stitch gives the text a tactile quality that flat stitches simply can’t match.
Understanding what is chain stitch embroidery in a practical context often comes down to seeing how it handles letterforms. A tight cursive word or a logo with curved strokes is where this stitch proves its value, because the looped construction bends through tight curves without pulling the fabric out of shape the way a rigid stitch sometimes does.
Chain stitch handles tight curves in letterforms better than satin stitch because the looped structure bends without puckering the fabric beneath it.
Decorative borders and graphic outlines
Use chain stitch to define the edges of a design before filling the interior with a different technique. A chain-stitched border around a logo or badge adds a clean, deliberate outline that anchors the whole composition. This combination approach, outline in chain stitch and fill with satin or split stitch, is common in professional custom apparel work because it creates strong visual contrast between the border and the fill area.
Filling larger shapes
When you need to fill a broader area rather than just its edges, chain stitch is one of the more reliable options. You work in tight parallel rows, each row sitting flush against the previous one until the shape is covered. For logos with solid areas that are too large for satin stitch, filled chain stitch holds up well and keeps the fabric flat without the thread tension problems that satin stitch can develop at scale.
Tools and setup before you start
Getting your tools right before you make a single stitch will save you a lot of frustration later. Part of understanding what is chain stitch embroidery in a hands-on sense is recognising that the quality of your materials directly affects the quality of your loops. A sharp needle and stable fabric give you consistent tension from the first stitch to the last, and inconsistent tension is the most common reason chain lines look uneven on a finished piece.
Thread and needle selection
For hand chain stitch, six-strand cotton embroidery floss is the most practical starting point. You can separate the strands to adjust the weight of your line: three strands produce a bold, visible loop that suits outlines and lettering, while two strands give you a finer line for detail work. Silk thread is another option if you want a slightly glossy finish, but it’s less forgiving for beginners because it slips more easily under the needle.
Use a size 7 or size 8 embroidery needle for three-strand floss. A needle that’s too fine will shred the thread, and one that’s too wide will leave visible holes in the fabric.
Your needle eye needs to be large enough to thread without fraying the floss, but narrow enough to pull through the fabric cleanly. A blunt-tipped tapestry needle is the wrong choice here; you need a sharp embroidery needle that pierces the weave rather than pushing threads aside.
Fabric and hoop setup
Tightly woven cotton or linen gives you the most reliable surface for chain stitch. Loose weaves shift under tension and make it hard to keep your loops uniform. Stretch fabric is possible but requires stabiliser underneath to stop the cloth from distorting as you work through each loop.
Mount your fabric in an embroidery hoop before you start, pulling the surface taut but not so tight that the weave distorts. A 15 cm hoop covers most small to medium designs without requiring you to reposition mid-stitch. Tighten the outer ring until the fabric holds its position when you press lightly on the centre, and you’re ready to begin.
Step 1. Stitch a clean chain line
A clean chain line depends on consistent loop size and even thread tension from the very first stitch. This is the foundation of understanding what is chain stitch embroidery in practice: each loop you form sets the rhythm for every stitch that follows. Before you pull a single loop, take a moment to check that your hoop is taut, your floss is separated to the right strand count, and your needle is threaded without any twists in the working length.
Starting your thread and first anchor
Knot the tail end of your floss with a simple waste knot, bringing the needle up through the front of the fabric at your starting point. The waste knot sits on the top surface temporarily and gets trimmed once the first few stitches lock the thread in place beneath them. Bring your needle up at point A, where you want your chain line to begin, and hold the working thread flat against the fabric surface with your non-dominant thumb.
Your starting point sets the direction for the entire line, so mark it lightly with a water-soluble pen before you push the needle through.
To form the first loop, push the needle back down into the same hole at point A, leaving a small, relaxed loop of thread on the surface. Bring the needle back up at point B, approximately 4 to 6 mm ahead along your line, passing the needle tip through the loop before you pull the thread tight. Pull gently until the loop sits snug against the fabric without puckering it.
Maintaining rhythm and loop size
Consistent spacing between points A and B is what keeps your chain line looking even. A practical way to control this is to use a ruler or a lightly marked guideline on your fabric before you begin. Each stitch should travel the same distance forward, and the loop should be just wide enough to sit flat without bunching or pulling thin.
Work at a steady pace rather than rushing through stitches. When you pull each loop closed, stop as soon as you feel slight resistance, which signals the stitch is secure without distorting the cloth beneath it.
Step 2. Turn corners, curves, and letters
Straight lines are the easy part. Corners, curves, and letterforms are where most beginners lose control of their chain line, and fixing the problem is mostly a matter of adjusting your stitch length and angle rather than changing the technique itself. Once you understand how the looped construction responds to direction changes, navigating complex shapes becomes straightforward.
Turning sharp corners
At a sharp corner, the key is to shorten your stitch length as you approach the turning point. Reduce your step from the standard 4 to 6 mm down to roughly 2 mm for the last two stitches before the corner. This keeps the loops tight at the bend so the corner looks clean and deliberate rather than rounded. After the corner, return to your normal stitch length and continue along the new direction. Trying to turn a sharp angle with full-length stitches will pull the loop out of alignment and leave a visible gap at the point.
Shortening your stitch length before a sharp corner is the single most reliable way to keep chain lines crisp at direction changes.
Following curves
Curves require gradual, consistent adjustments to the angle of each stitch. Rather than forcing the needle straight ahead, redirect it slightly with every loop so the chain line arcs smoothly instead of stepping. Tighter curves need shorter stitches; a small circle works best with stitches no longer than 2 to 3 mm. Longer stitches on a tight curve will cause the chain to straighten out and cut across the arc rather than follow it faithfully.
Stitching letterforms
When you apply what is chain stitch embroidery to lettering, you are essentially combining corners and curves in a single pass. Work each letter as a continuous chain line wherever possible, lifting the thread only when a stroke cannot connect to the next. Use the shortened-stitch corner technique for angles in letters such as V, W, and K, and the gradual-redirect technique for rounded letters such as C, G, O, and S. The table below gives you a quick reference for stitch length by letter type:
| Letter type | Suggested stitch length |
|---|---|
| Straight strokes (I, L, T) | 4 to 6 mm |
| Angled corners (V, W, K) | 2 mm at corner, 4 mm elsewhere |
| Rounded letters (C, O, S) | 2 to 3 mm throughout |
Step 3. Use chain stitch as a fill
Filling a solid shape with chain stitch is one of the most practical applications of what is chain stitch embroidery, and it requires a different mindset than stitching a single outline. Instead of following one continuous path, you’re covering an area by laying rows side by side until the fabric beneath is fully hidden. The approach is methodical: start at one edge of the shape, complete a full row across the interior, then turn and work the next row parallel and flush against the first.
Planning your rows before you stitch
Before you make the first loop, mark the fill area clearly on your fabric with a water-soluble pen. Decide whether your rows will run horizontally, vertically, or at a diagonal across the shape. Horizontal rows suit wide, flat shapes; diagonal rows at 45 degrees work well for compact or irregular outlines because they reduce the risk of the fabric pulling in one direction as the stitches accumulate.
Diagonal rows at 45 degrees reduce fabric pull in filled areas, which keeps the finished shape flat and avoids puckering at the edges.
A simple reference before you start:
| Row direction | Best suited for |
|---|---|
| Horizontal | Wide, rectangular shapes |
| Vertical | Tall, narrow shapes |
| 45-degree diagonal | Irregular or compact shapes |
Managing row direction and tension
Each new row should begin directly beside the last loop of the previous row, leaving no visible gap between them. Keep your thread tension consistent as you turn at the end of each row: pull too tight and the fabric bunches, pull too loose and the loops sit unevenly. A practical way to check your tension is to hold the hoop up to light after every three or four rows. Any gaps or puckering will show up immediately, and you can adjust before the problem compounds across the whole filled area.
Once you reach the outer edge of your shape, finish with a small tack stitch to lock the final loop and trim the thread close. This keeps the boundary of the filled area clean and prevents the edge from lifting with wear.
Next steps
You now have a complete picture of what is chain stitch embroidery: how each looped stitch forms a linked line, where the technique works best, and how to handle outlines, corners, curves, and filled shapes by hand. The three steps in this guide give you everything you need to start practising on scrap fabric and build consistent results before moving to your actual project.
From here, put the techniques to work on a small test piece before committing to a final design. Focus first on achieving even loop size across a straight line, then progress to curves and lettering once that baseline feels steady. Give yourself a few sessions to build muscle memory before attempting a complex filled shape.
If you want a professionally embroidered result on branded hoodies, caps, or workwear, get a custom embroidery quote from Apex Workwear and see how your logo or brand mark looks in a durable, textured stitch.