You’ve probably seen it on snapback caps, team jackets, and branded workwear, that raised, textured lettering that looks and feels noticeably different from standard stitching. That’s 3D puff embroidery, and it’s one of the most effective ways to make a logo or design stand out on custom apparel.
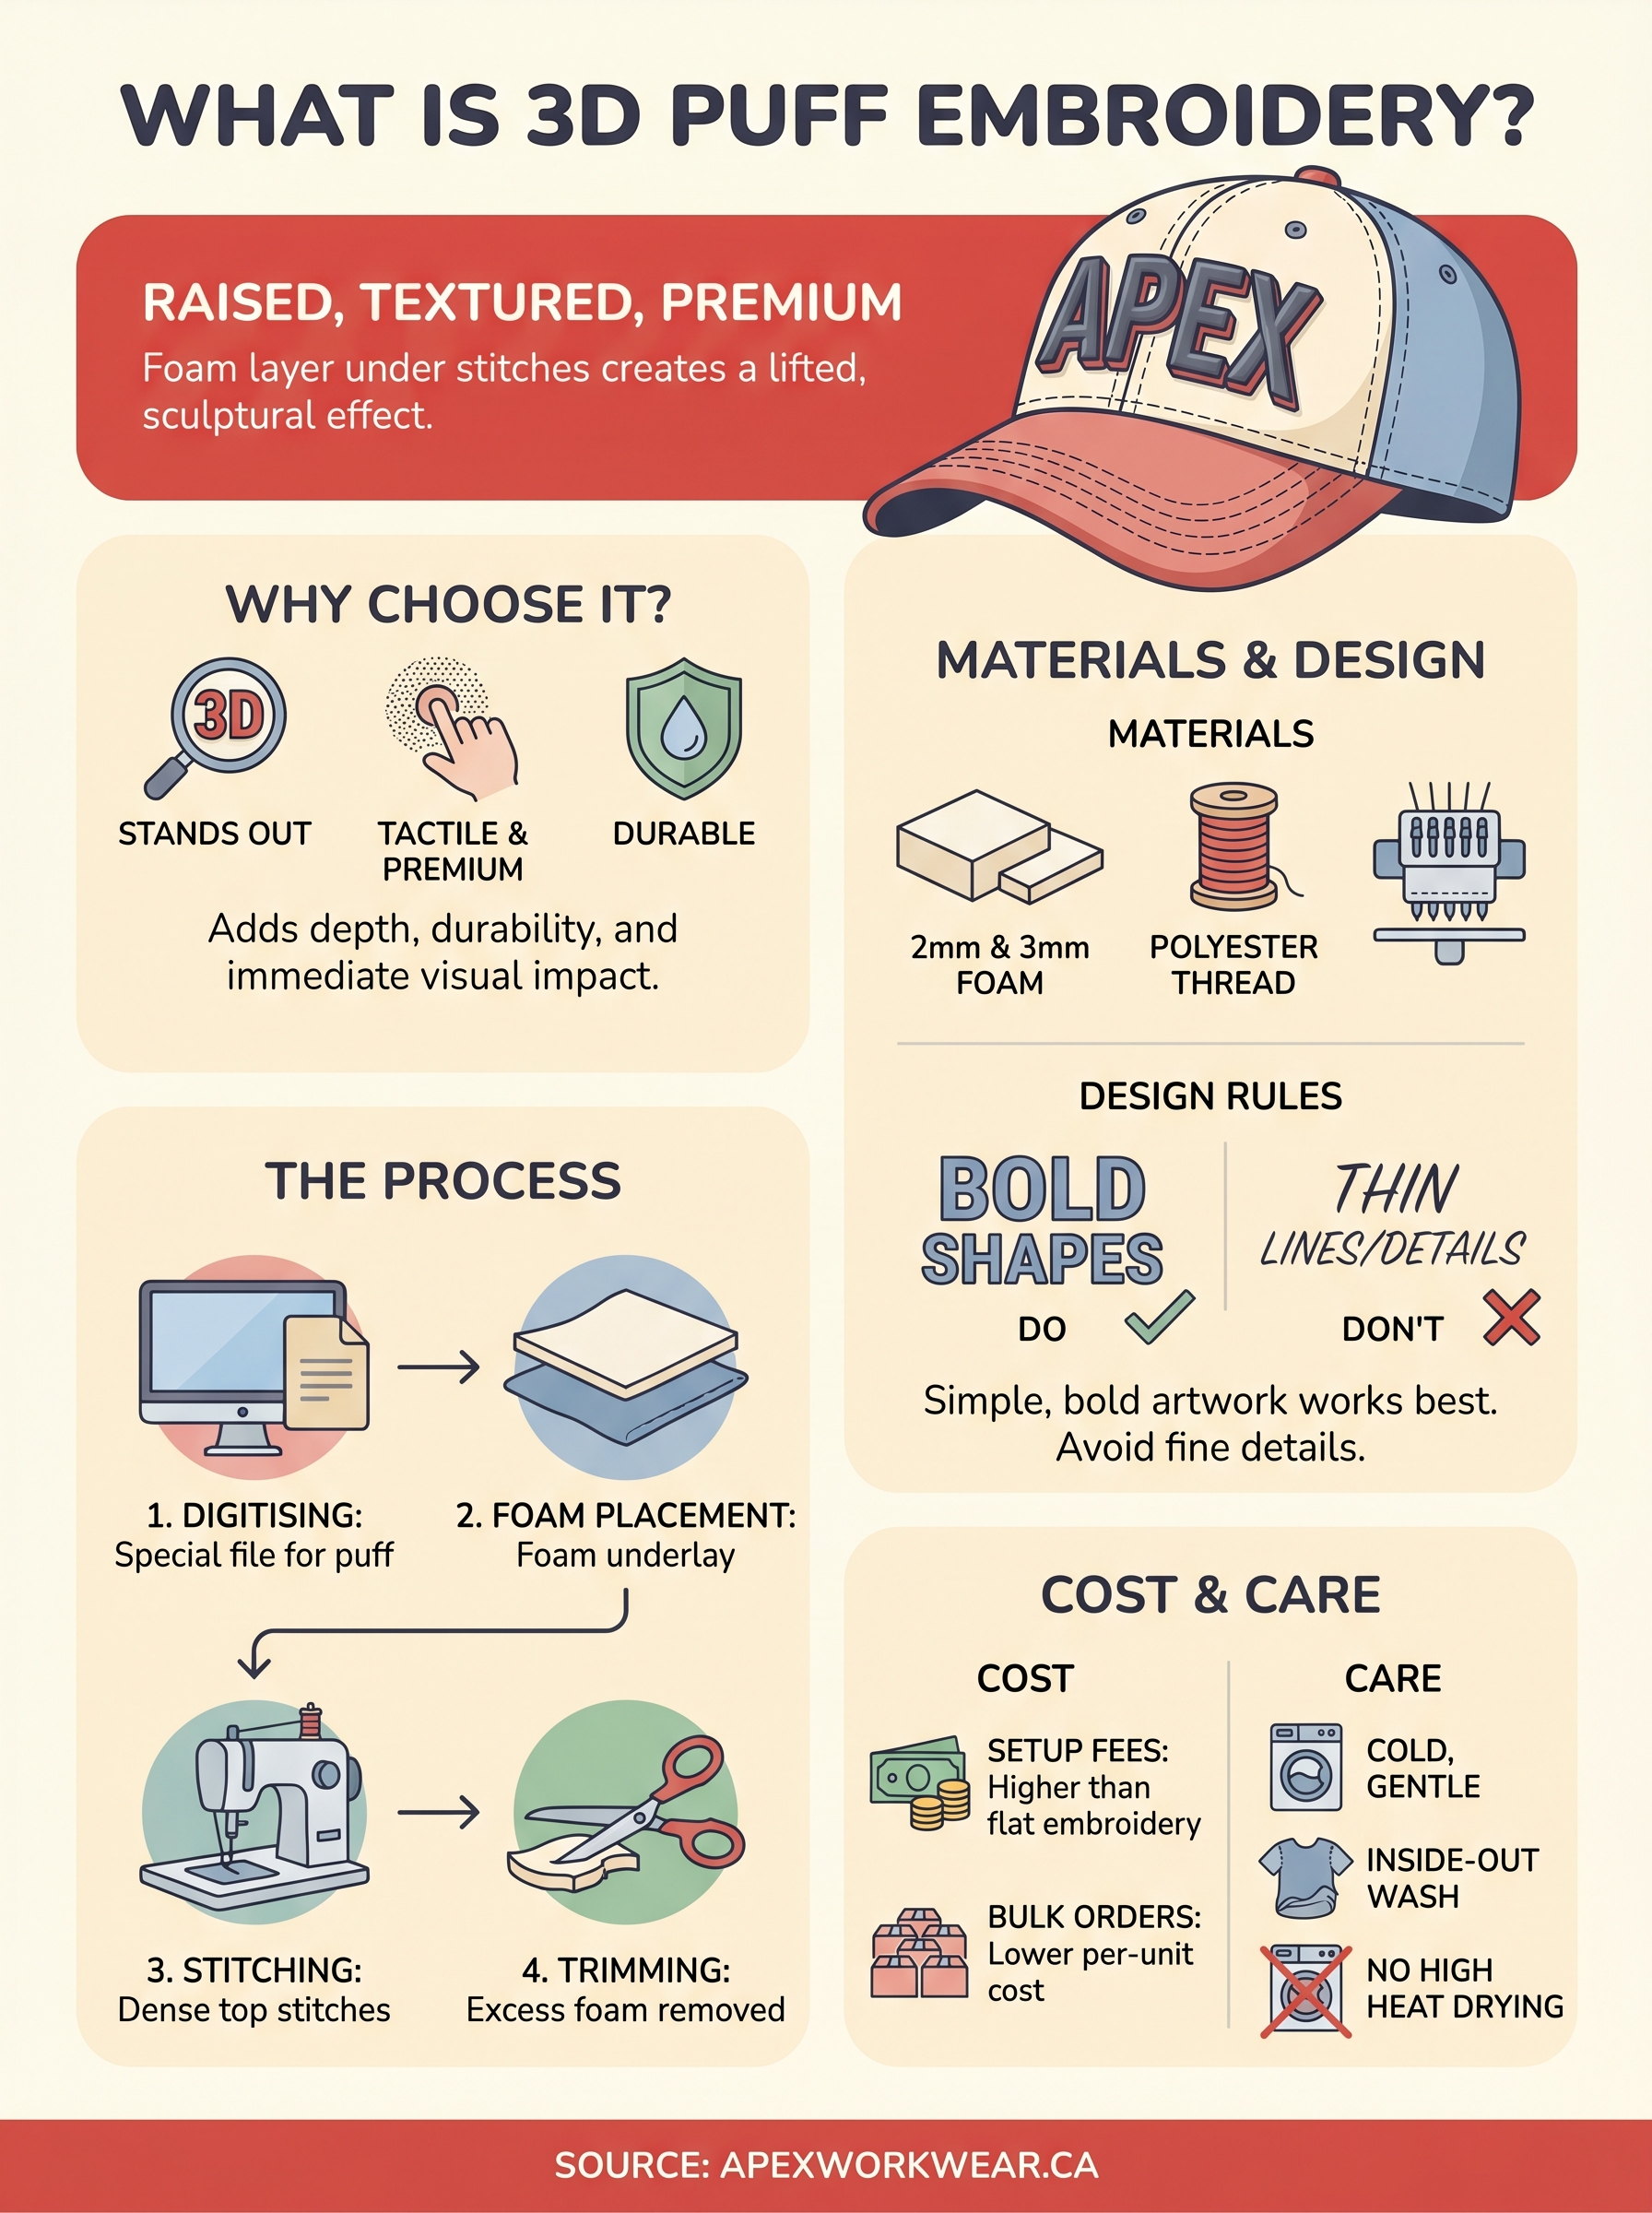
The technique uses a layer of foam beneath the stitches to create a lifted, three-dimensional effect. It’s popular for a reason: it adds depth, durability, and a premium feel that flat embroidery simply can’t match. But it also comes with its own set of requirements, limitations, and costs that are worth understanding before you place an order.
At Apex Workwear, we produce custom embroidered apparel right here in Canada, including 3D puff work on hats, hoodies, and more. This article breaks down how the process works, what materials are involved, how it compares to flat embroidery, and what you can expect to pay.
Why 3D puff embroidery stands out
3D puff embroidery creates a raised, sculptural effect that grabs attention in a way flat stitching simply cannot. When someone picks up a hat or jacket with puff embroidery, the tactile difference is immediate: the design has actual height and dimension. That physical quality is what makes it a popular choice for brands that want their logo to feel as premium as it looks.
The visual impact on branded apparel
Understanding what is 3D puff embroidery means understanding why depth matters in design. Bold lettering and clean geometric shapes gain an entirely new level of presence when they sit raised above the fabric. The contrast between the foam-lifted stitches and the surrounding material creates a strong visual hierarchy that pulls the eye directly to the design. This is why you see it on premium headwear, team uniforms, and corporate workwear where first impressions count.
A well-executed 3D puff logo on a cap can communicate brand quality before a single word is read.
Where it outperforms flat embroidery
Flat embroidery works well across a wide range of applications, but 3D puff has a clear advantage when your design needs to stand out from a distance. For any business comparing the two, here are the situations where puff embroidery consistently delivers better results:
- Structured caps and snapbacks, where the raised effect holds its shape without distortion
- Bomber jackets and heavy hoodies, where flat stitching can look too subtle against thick fabric
- Team and corporate apparel that will be photographed for marketing materials or social profiles
On top of that, a properly digitised puff design stays raised and defined after repeated washing, which matters for workwear that takes daily use. If your goal is a logo that carries real visual weight, puff embroidery gives you something flat stitching simply cannot replicate.
How 3D puff embroidery works step by step
The process behind what is 3D puff embroidery is more involved than standard flat work, but the core idea is straightforward. A thin piece of foam is placed on top of the fabric before the machine runs, and the embroidery machine then stitches directly over it. The stitches wrap around and compress the foam edges, holding it firmly in place and producing that raised, dimensional look you see on premium caps and branded jackets.
The quality of the digitising file determines whether the foam sits clean and tight or shows exposed edges around the design.
From digitising to finished stitch
Before the machine runs a single stitch, your design goes through specialist digitising where the file is programmed specifically for puff work. The digitiser increases stitch density and sets wider border stitches to fully cover and lock down the foam. This step is critical because a standard embroidery file will not produce a clean or durable puff result. Once the file is approved, the production sequence follows a clear order:
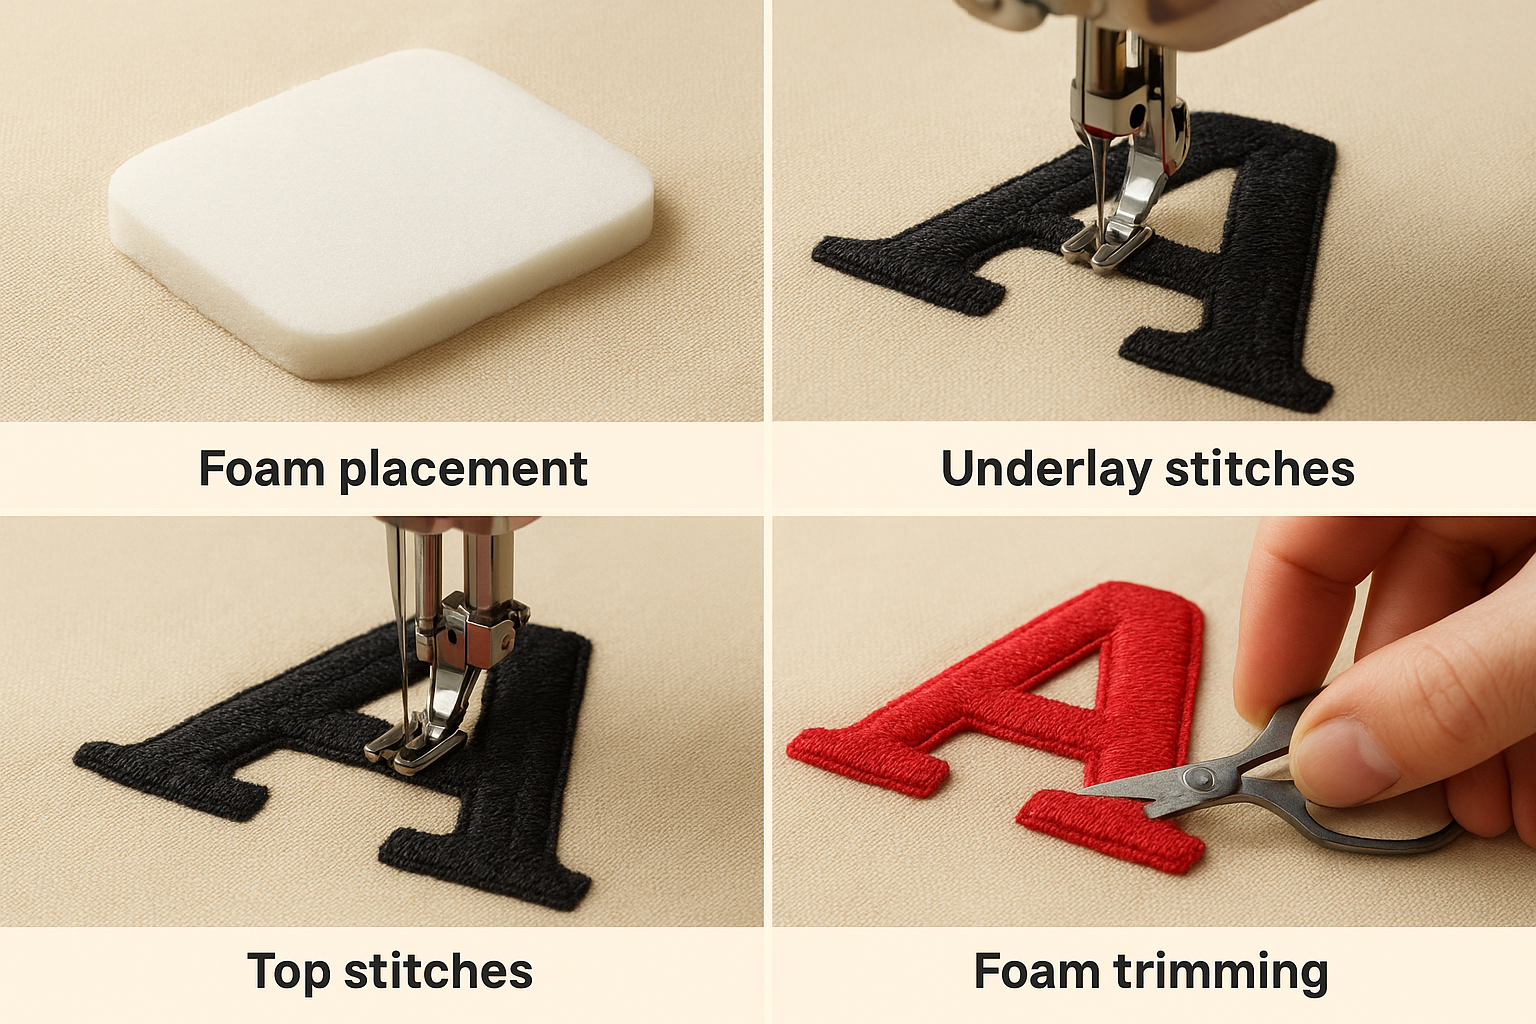
- Foam placement – the foam sheet is positioned on the garment directly over the stitch area
- Underlay stitches run first to stabilise the fabric and anchor the foam
- Top stitches cover the foam completely, wrapping tightly around the edges
- Foam trimming – any excess foam outside the design boundary is torn away cleanly
Foam, thread, and machines used
The materials behind what is 3D puff embroidery are specific, and each one directly affects the quality of your finished design. Using the wrong foam thickness or thread type produces exposed edges, collapsed lettering, or thread breakage mid-run, none of which are recoverable once the garment is on the machine.
Foam types and thickness options
Puff embroidery foam comes in 2mm or 3mm thickness. The 2mm option suits smaller lettering and detailed shapes, while 3mm delivers a bolder raised effect for large block logos. Both are low-density closed-cell materials that compress cleanly under tight satin stitches without crumbling or shifting out of position during the run.
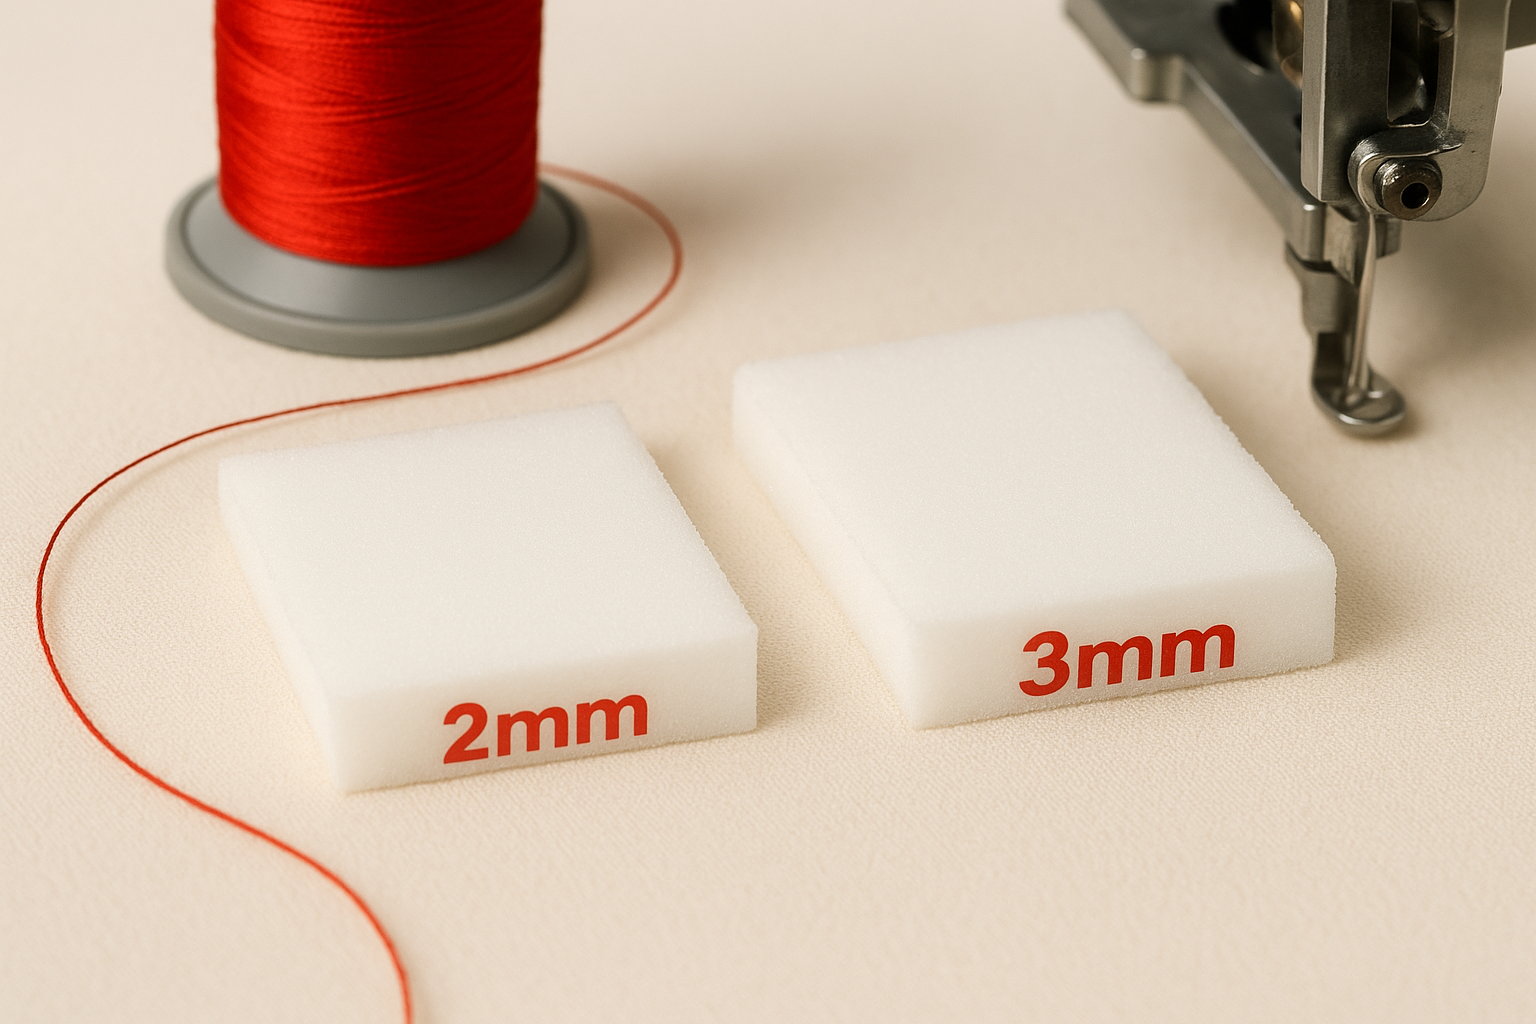
Foam thickness directly shapes how prominent your finished design looks, so match it to the scale of your artwork before you digitise.
Thread and machine requirements
Rayon and polyester threads are both used for puff work, but polyester holds up significantly better on workwear that gets washed regularly. Polyester resists shrinkage and colour fading, which matters when your branded jackets or caps are in daily use.
On the equipment side, commercial multi-needle embroidery machines handle puff work reliably because they maintain the consistent tension and motor speed that high-density stitch files demand. Standard home machines typically cannot manage the stitch counts needed for clean puff results.
Design rules for clean 3D puff results
Not every design translates well into 3D puff embroidery, and understanding what is 3D puff embroidery means knowing which artwork decisions produce clean results versus messy ones. Simple, bold shapes work best because the foam needs enough stitch coverage to stay fully hidden, and thin strokes or fine details will expose raw foam edges that cannot be fixed after production.
If your design includes lettering, keep individual characters at a minimum height of 10mm to ensure the stitches fully cover the foam beneath.
Elements to avoid in your artwork
Certain design elements consistently cause problems with puff work. Thin serifs, gradients, and very small text all fall apart once stitched over foam because the coverage area is too narrow to lock the material down cleanly. Complex multi-colour fills also create registration issues when different foam sections need to sit flush against each other without gaps.
Keeping your design to clean block letters and strong geometric shapes gives your digitiser the best foundation to work with. If you are unsure whether your artwork suits puff embroidery, share it with your producer before digitising starts so you can adjust early rather than absorb an avoidable setup cost.
Cost, limits, and care tips
Understanding what is 3D puff embroidery also means knowing what it costs and how to maintain it. Setup and digitising fees run higher than flat embroidery because the file requires specialist programming to handle foam coverage and border stitches correctly.
Pricing and production limits
Digitising fees for puff work typically range from $20 to $50 CAD depending on design complexity, with per-unit embroidery costs sitting slightly above flat rates due to the higher stitch density required. Bulk orders bring that per-unit figure down considerably, so ordering for a full team or crew is the most cost-effective approach.
Running a single piece is possible, but your cost-per-unit drops significantly once you order in volume.
Very fine details, small text under 10mm, and gradient fills are hard limits for puff work because the foam cannot be fully covered by narrow stitches. Keeping your artwork bold and simple avoids costly re-digitising after the job is already set up.
Caring for your puff embroidered garments
Machine washing on a gentle, cold cycle preserves the raised stitches over time. Turn the garment inside out before each wash, and avoid high-heat tumble drying because sustained heat compresses the foam and permanently reduces the raised effect. Quick care points to follow:
- Cold wash, gentle cycle
- Inside-out before washing
- Air dry or low-heat tumble dry only
- No bleach or harsh detergents
Final takeaways
What is 3D puff embroidery, in short: it’s a technique that uses foam underlay beneath dense stitching to lift your design off the fabric and give it genuine height and dimension. It suits bold, simple artwork on structured caps, jackets, and workwear where visual impact matters, and it holds up well with proper care and the right thread choice.
Your results depend heavily on clean digitising and appropriate foam thickness, and artwork that avoids thin lines or small text. Keep your design simple, communicate your expectations clearly with your producer, and you’ll get embroidered apparel that genuinely looks and feels premium.
Ready to put 3D puff embroidery on your next order? Get a custom embroidery quote from Apex Workwear and our team will review your artwork, advise on design suitability, and deliver a finished product shipped anywhere in Canada.