If you have searched for printful labels, you are probably trying to work out whether Printful lets you brand garments with your own neck or outside tags, and what that actually costs once setup fees and print charges are added up. It is a fair question. Custom labelling is one of those details that separates a generic print-on-demand hoodie from something that looks like it came from a proper brand, and getting the specs wrong can mean rejected files or delayed orders.
This guide walks through exactly how Printful’s labelling options work, from inside neck labels to outside tags, including the file requirements, pricing tiers, and the setup steps inside your Printful dashboard so you get it right the first time.
We also compare this to how custom apparel branding works when you produce locally through a Canadian shop like Apex Workwear, where embroidery or DTG printing on hats, hoodies, and tees comes with design guidance and no minimum order, so you can see which route suits your volume, budget, and turnaround needs before you commit.
What are Printful inside and outside labels
Printful’s custom labelling feature lets you replace the standard blank tag inside a garment, or add a printed tag to the outside, with your own logo or brand name. Instead of a generic "Made in…" label sitting against the wearer’s neck, you get your own branding sewn or printed right into the product. This matters more than it sounds, because a plain white tag is the first thing many customers check when they want to know if a hoodie is a proper brand item or a reseller’s blank stock. Custom labelling turns a print-on-demand piece into something that reads as a real product line, not a side hustle.
Inside neck labels explained
Inside labels sit at the back neckline, exactly where a standard care tag would go, and Printful offers two production methods depending on the garment and your design. The first is a woven label, a small fabric patch with your logo woven into the material, then sewn in during production. The second is a printed label, where your artwork is printed directly onto the inside fabric using the same technology as the rest of the garment print. Woven labels give a more premium, tailored feel and work well for simple logos or wordmarks, while printed labels handle more detail and colour but feel closer to a standard screen print than a stitched tag.
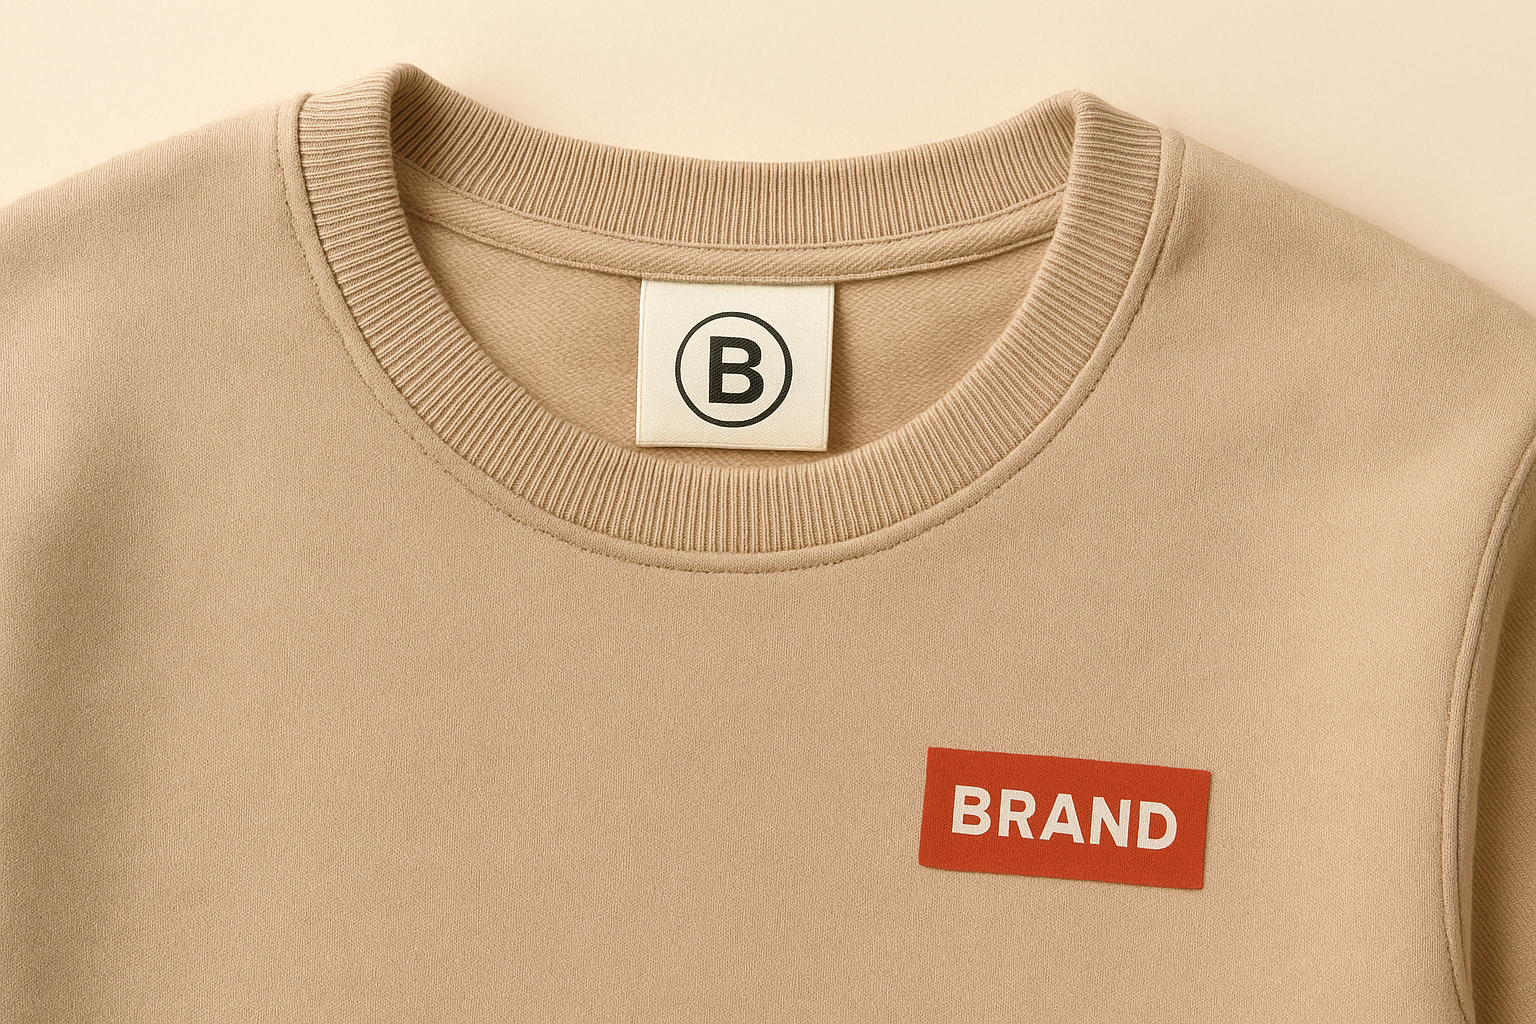
A woven inside label is the single fastest way to make a print-on-demand hoodie feel like a real branded product.
Outside labels and hang tags
Outside labels work differently. Rather than replacing the neck tag, Printful prints or attaches your branding somewhere visible on the exterior of the garment, most commonly on the sleeve, hem, or as a small tag stitched to a side seam. This option suits brands that want a visible logo mark rather than a hidden detail, similar to how many streetwear labels place a small tab on the sleeve cuff or bottom hem. Outside labels are usually produced using direct-to-garment printing or embroidery, depending on the product and design complexity you upload.
File and design requirements
Before you get to the setup steps, it helps to know what Printful expects from your artwork, since rejected files are the most common reason orders get delayed.
- File format: vector files (AI, EPS, PDF) for woven labels; high-resolution PNG or JPEG for printed labels
- Colour limit: woven labels typically support up to 6 thread colours; printed labels support full colour
- Minimum text size: around 6pt for printed labels, larger for woven due to thread thickness
- Label size: standard neck labels run roughly 5cm x 2.5cm, though exact dimensions vary by garment
- Background: transparent background required for printed label artwork
Product availability
Not every item in the Printful catalogue supports labelling, and outside labels are available on a narrower range of products than inside labels. Below is a quick comparison to set expectations before you start designing.
| Label type | Typical products | Production method |
|---|---|---|
| Inside neck (woven) | Hoodies, T-shirts, sweatshirts | Sewn-in fabric patch |
| Inside neck (printed) | Hoodies, T-shirts, tank tops | Direct print on fabric |
| Outside sleeve/hem | Hoodies, T-shirts, select bags | DTG print or embroidery |
Once you know which type fits your product and design, the next step is deciding which one actually makes sense for your brand and budget, which is where setup costs and minimum order considerations come into play.
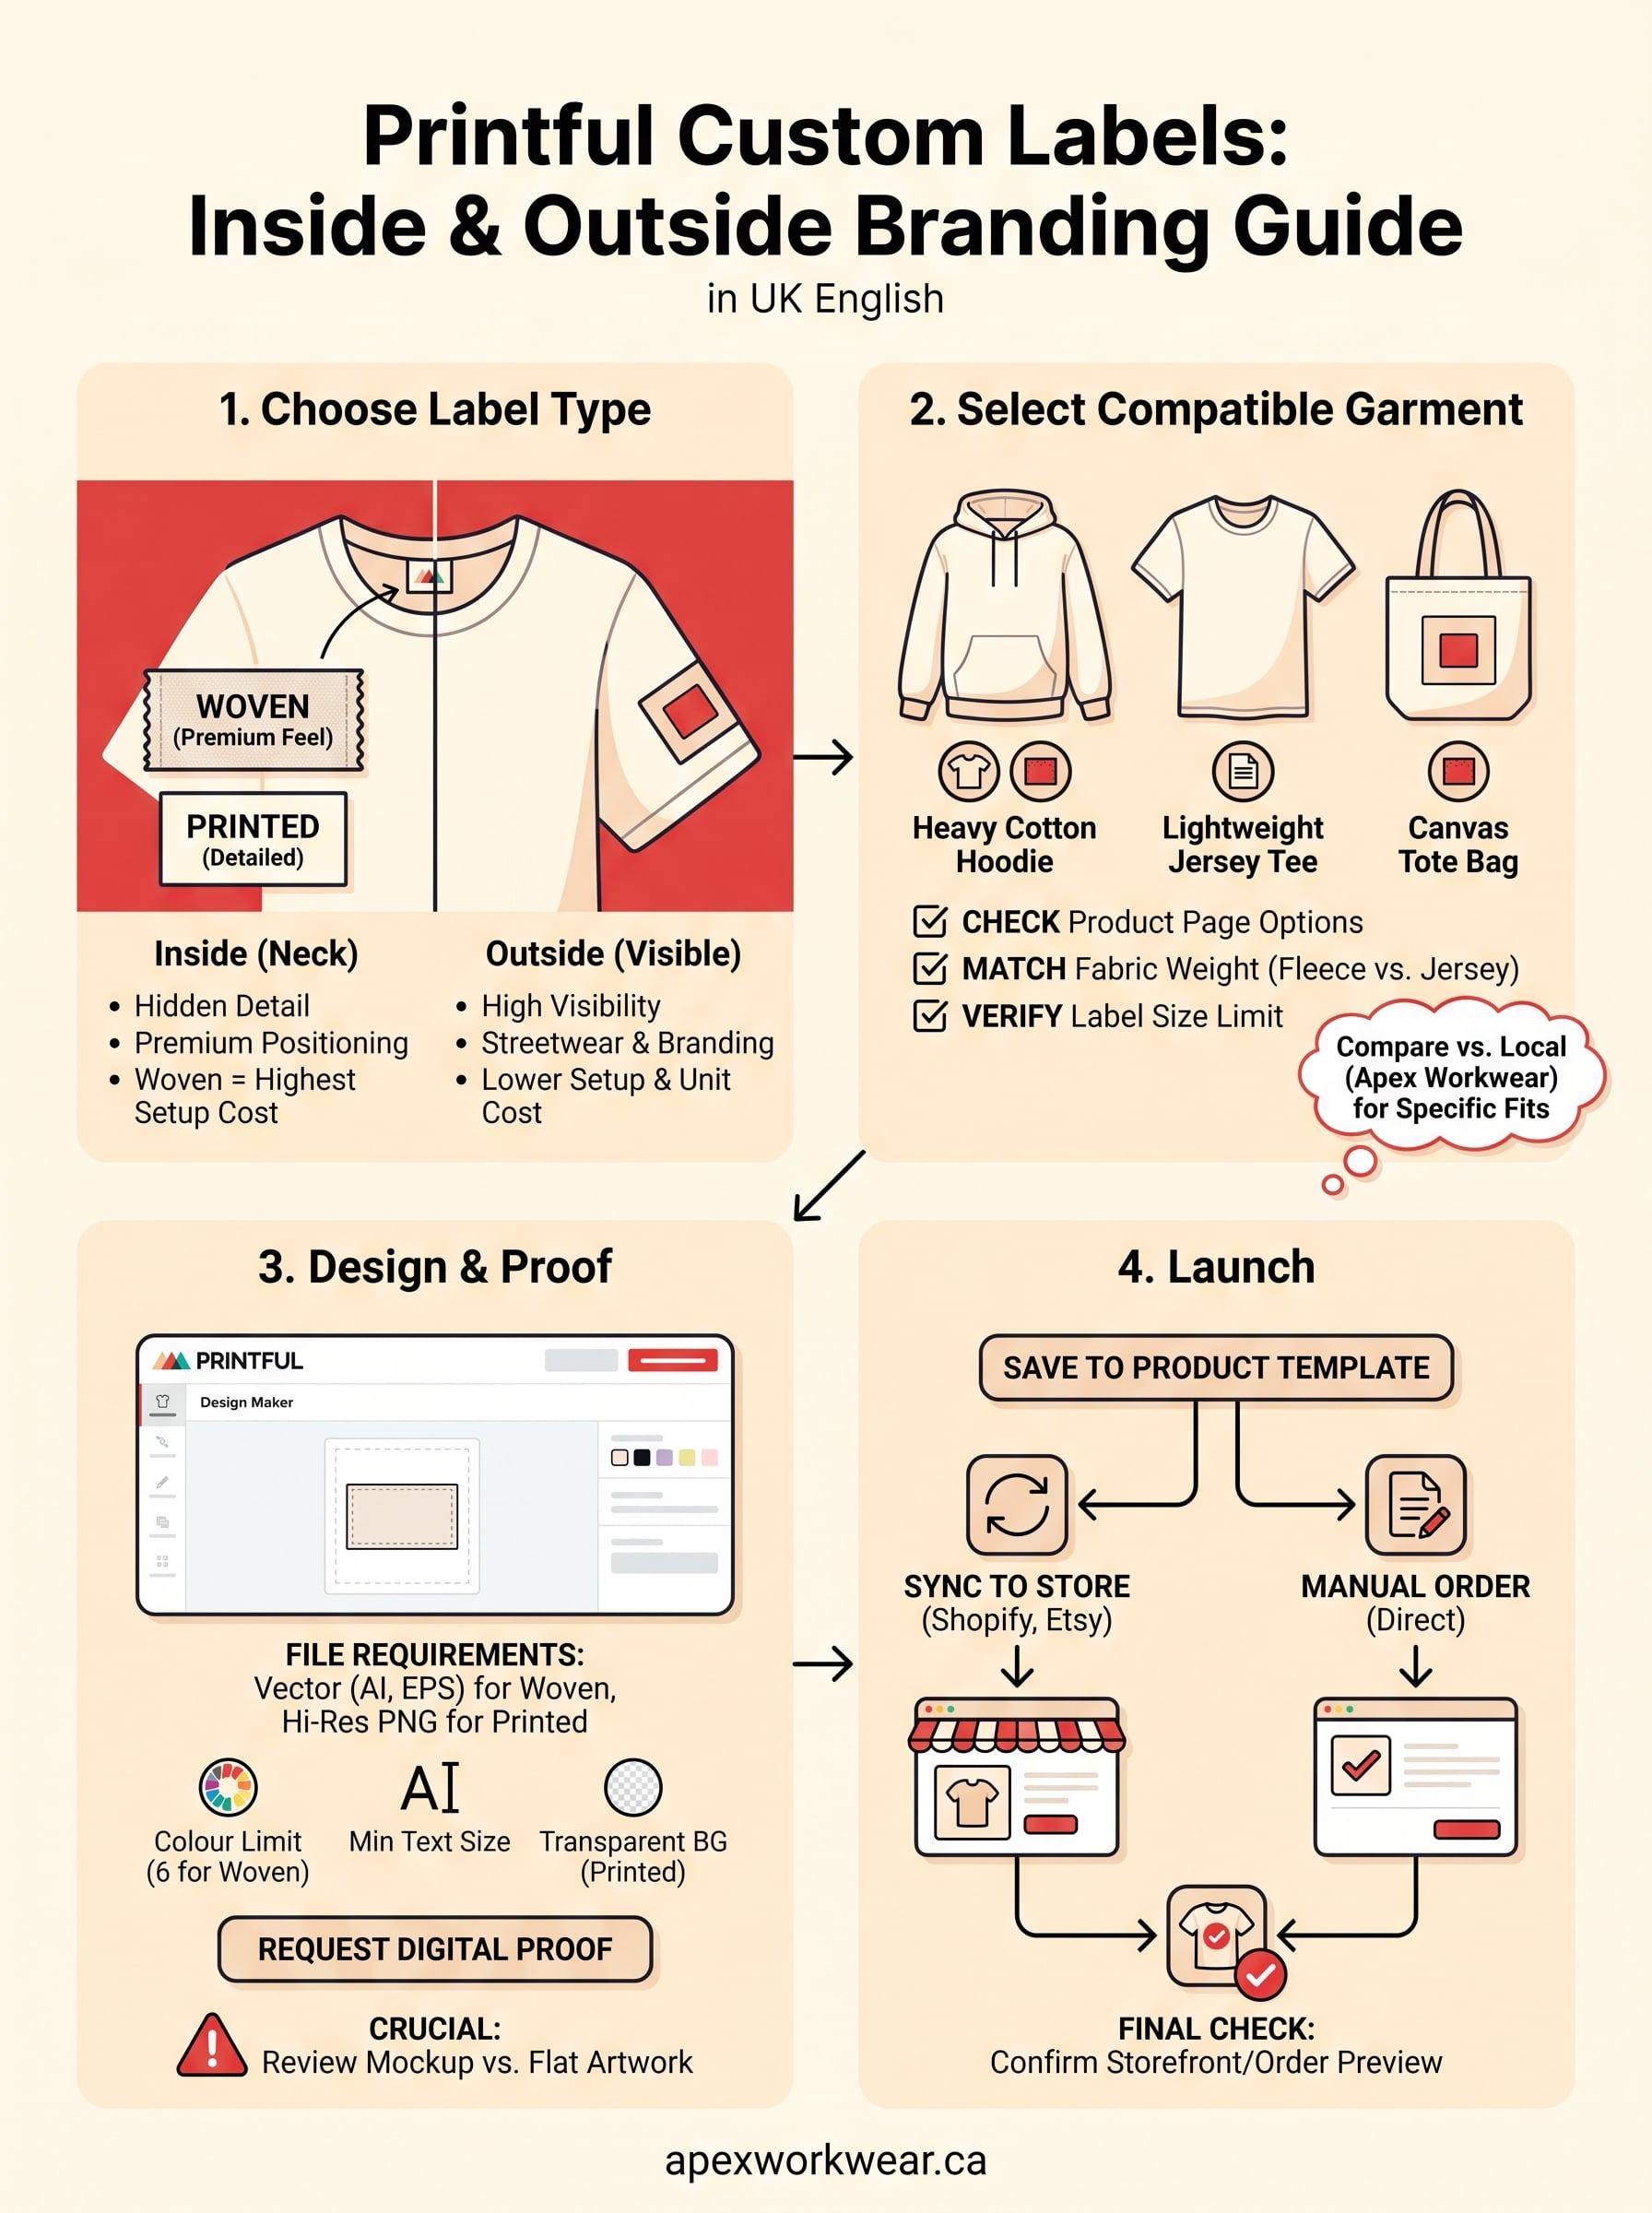
Step 1. Decide between an inside or outside label
Before you touch the Design Maker, work out which label type actually fits your brand, because switching later means re-uploading artwork and sometimes paying a second setup fee. Inside labels suit brands that want a quieter, premium signal, the kind of detail a customer notices only when they check the tag, while outside labels suit brands built on visibility, where the logo needs to be seen from across a room. Think about how your customer already recognises your brand elsewhere. If your Instagram feed is built on a bold wordmark, an outside sleeve print reinforces that. If your product is positioned as quality basics, a woven neck label does more for perceived value.
Weigh cost against visibility
Cost is the other half of this decision, and it varies more than people expect. Woven inside labels carry the highest setup cost because Printful has to produce a physical patch and sew it in, whereas printed inside labels and outside prints use the same DTG equipment already running your order, so the added cost per unit is lower.
| Factor | Inside (woven) | Inside (printed) | Outside (sleeve/hem) |
|---|---|---|---|
| Setup cost | Highest | Moderate | Moderate |
| Per-unit cost | Higher | Lower | Lower |
| Visibility | Hidden | Hidden | Visible |
| Best for | Premium positioning | Detailed logos on a budget | Streetwear, visible branding |
Choose the label based on where your customer expects to see your brand, not on which option is cheapest to set up.
Questions to settle before you commit
Running through a short checklist here saves you from redoing artwork once you’re already in the Design Maker:
- Does your logo work as a small, simple mark, or does it need colour and detail that only printing can capture?
- Is this a one-off product drop or a permanent line item, since setup fees matter less if you’re reordering constantly?
- Do your customers care about tag details, or is visible branding what actually drives repeat sales?
- Are you producing through Printful for print-on-demand scale, or would a locally embroidered batch through a shop like Apex Workwear suit a smaller, higher-margin run better?
Once you’ve answered those, you’ll know which label type to pick, and that decision drives everything in the next step, because not every garment in Printful’s catalogue supports both options.
Step 2. Choose a compatible garment
Garment choice isn’t just about fit and fabric weight, it also determines whether your chosen label type is even possible. Printful’s catalogue restricts labelling to a specific subset of products, and the split isn’t always obvious from the main listing page. A hoodie that supports woven inside labels might not support an outside sleeve print, and a tank top that takes a printed inside label often can’t take a woven patch at all because the fabric is too thin to sew through without puckering.
Check the product page before you design anything
Open the product page in your Printful dashboard and look for the labelling option under customisation settings, rather than assuming it’s available because a similar product supports it. This single check saves you from designing artwork for a garment that will simply reject it at the setup stage.
- Confirm the exact garment style and colour, since labelling availability can differ between colourways of the same product
- Check fabric weight, as heavier fleece and cotton blends handle woven patches better than lightweight jersey
- Look for a stated maximum label size on that specific product, since it’s rarely identical across styles
- Note the production method offered, printed or woven, because some garments only allow one
Never assume a garment supports labelling just because a similar product in the catalogue does.
Match the garment to your audience
Beyond compatibility, think about who’s actually wearing the piece. Heavyweight hoodies and crewnecks are the workhorses of custom labelling because they’re thick enough for a woven patch and popular enough with customers to justify the setup cost. Lighter tees and tanks lean toward printed inside labels, since the fabric can’t take a sewn patch cleanly. Bags and accessories are the exception, and only a handful support any labelling at all, so check availability rather than assuming.
Compare against a local production route
Once you’ve confirmed a compatible garment, it’s worth pausing to compare that against ordering through a Canadian supplier instead. Apex Workwear runs embroidery and DTG printing on hoodies, tees, and hats without the same per-garment catalogue restrictions, since production happens locally rather than through a fixed print-on-demand system. That matters most when your brand needs a specific fabric weight or fit that Printful’s labelled products don’t offer, or when you want the same label style across a mixed order of apparel that print-on-demand can’t cleanly support.
Step 3. Design your label in the Design Maker
Once you’ve picked a compatible garment, open the Design Maker from your Printful dashboard and select the label placement option, which appears as a separate layer from the main garment print. This is where the file requirements you checked earlier actually matter, because the Design Maker will flag low-resolution artwork or missing transparency before you can move forward, saving you from a rejected proof later.
Set up the label placement
Inside the Design Maker, choose "inside label" or "outside label" from the placement menu, and the canvas will resize automatically to match the exact printable or embroiderable area for that specific garment. Don’t try to eyeball this against a generic template, since label dimensions shift between garment styles even within the same product line.
Always design to the exact canvas size Printful gives you for that garment, not a template from a different product.
Upload and position your artwork
Upload your file and use the built-in grid to centre it precisely, since even a few millimetres off-centre reads as sloppy on a woven patch. Follow this order to avoid rework:
- Upload the vector or high-resolution file matching the format required for your label type
- Check the colour preview against your thread or ink limit, six colours maximum for woven
- Resize within the given canvas, never stretching artwork to fill space it wasn’t built for
- Confirm text remains above the minimum size threshold once scaled
Preview and proof before you confirm
Request the digital proof before finalising anything, since this is your only chance to catch spacing or colour issues before production starts. Printful generates a mockup showing the label on the actual garment, and it’s worth comparing this against the flat artwork file side by side, because colours can shift slightly once rendered on fabric versus screen.
Submitting without a careful proof review is the most common reason brands end up reordering samples, so treat this step as mandatory rather than optional. Reviewing the mockup against your original brand guidelines, particularly logo colour codes, also helps you catch drift before it reaches a full production run rather than after fifty units arrive with the wrong shade.
Step 4. Add the label to your store or order
With your proof approved, the last job is attaching that label to an actual product listing rather than leaving it sitting in the Design Maker as a saved file. Printful ties labels to a specific product template, so you need to save the label as part of that template before it will show up on anything you sync to your store or submit as a manual order.
Save the label to a product template
Go back to the product page where you built the design and confirm the label appears as a locked layer alongside your main print, not as a separate draft sitting in your file library. Templates saved this way carry the label automatically every time that product variant gets ordered, so you don’t have to re-attach it for each colour or size.
- Save the template under a clear name that includes the label type, so you can find it fast later
- Duplicate the template for each garment colour that needs the same label, since colours don’t always inherit settings automatically
- Double-check the label layer still shows the correct placement after duplicating, since colour swaps occasionally shift the canvas
A label that isn’t saved to the product template won’t appear on a single order, no matter how good the proof looked.
Push the product to your connected store
If you’re selling through Shopify, Etsy, or another connected storefront, sync the finished template from your Printful dashboard rather than rebuilding it on the store side. This keeps the label locked to every future order automatically, so you’re not manually re-adding it each time a customer buys that item.
Place a manual order instead
For a one-off run rather than an ongoing store listing, skip the sync step and place a manual order directly from the same template inside your dashboard. Select the quantity, confirm the label preview one final time on the order screen, and submit. Manual orders pull the exact same label settings, so there’s no extra setup required beyond what you already built.
Once the order or store listing is live, run a final check by pulling up the product page as a customer would see it, confirming the label preview still matches your approved proof before real money changes hands on the first batch.
A small detail that builds your brand
Getting Printful labels right comes down to matching the label type to your product, checking garment compatibility before you design, and proofing carefully before you commit to a full run. Skip any of those steps and you end up reordering samples or explaining a smudged tag to a customer. Get them right, and a simple hoodie starts reading like a proper brand piece rather than a blank with a logo slapped on top.
If your volume is smaller, your fit requirements are specific, or you’d rather work with someone who checks your proof by phone rather than a support ticket, local production solves the same problem without the catalogue restrictions. Apex Workwear handles embroidery and DTG printing on hoodies, tees, and hats across the GTA with no minimum order and fast turnaround, so your branding gets the same attention whether you’re ordering five pieces or five hundred. Get a free quote from Apex Workwear and see what your label looks like on a real garment before you commit.