Siser EasyWeed Stretch is one of the most popular heat transfer vinyl (HTV) options for athletic wear, activewear, and any garment that needs to move with the body. But getting a perfect press isn’t just about slapping it on and hoping for the best. If your siser easyweed stretch instructions are off, wrong temperature, too little time, not enough pressure, you’ll end up with peeling, cracking, or bubbling that ruins both the vinyl and the garment underneath.
At Apex Workwear, we work with custom apparel every day, from printed team uniforms to branded hoodies for small businesses across Canada. That hands-on experience with garment decoration and fabric behaviour means we know exactly what it takes to get clean, lasting transfers on stretchy materials. We put this guide together to give you the precise settings and techniques that actually work.
Below, you’ll find the recommended temperature, press time, and pressure settings for Siser EasyWeed Stretch, along with step-by-step application instructions for both heat press and home iron methods. We also cover common mistakes, fabric-specific tips, and care instructions so your designs hold up through wear and wash without lifting at the edges.
What EasyWeed Stretch is and when to use it
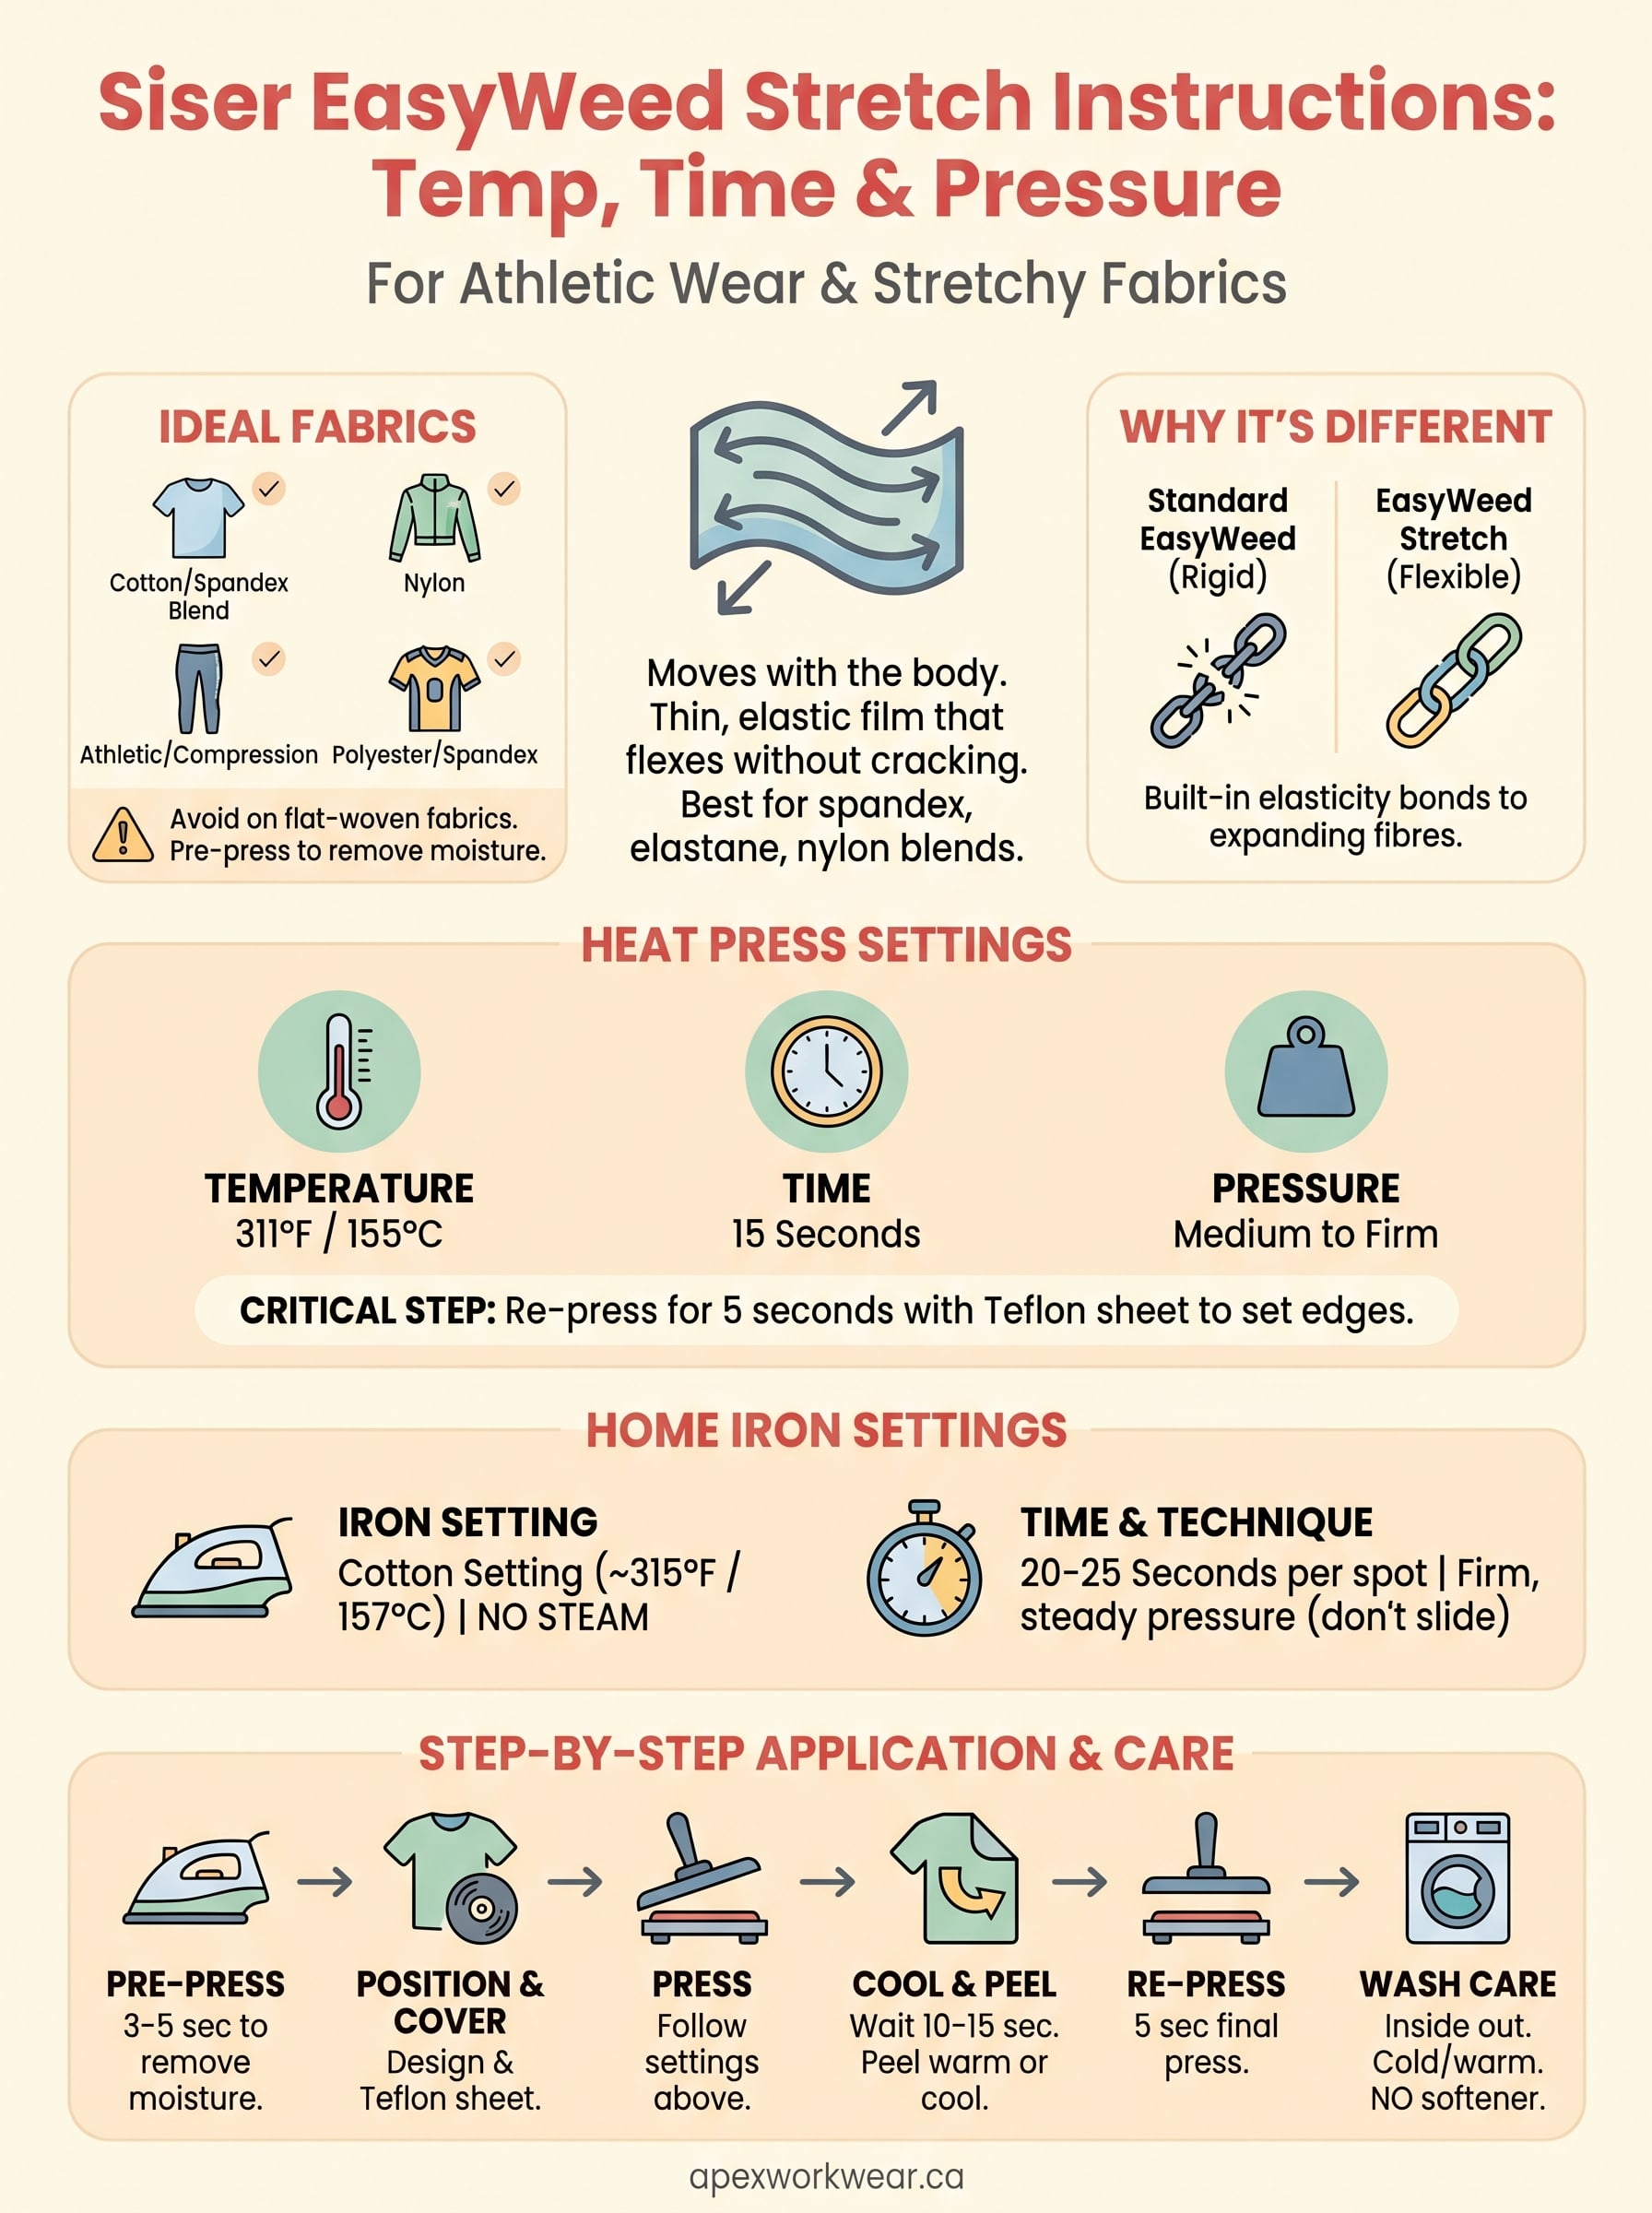
Siser EasyWeed Stretch is a heat transfer vinyl designed specifically for fabrics that move. Unlike standard HTV, it contains a polyurethane base with built-in elasticity, which means it flexes and recovers with the fabric instead of cracking under tension. That makes it the right choice whenever your garment is going to be pulled, stretched, or repeatedly washed hard.
What makes it different from standard EasyWeed
Regular Siser EasyWeed works well on cotton and polyester blends that don’t stretch much. EasyWeed Stretch has a softer hand feel and a thinner, more flexible film that moves with spandex, nylon, and elastane-based fabrics without losing adhesion. The key difference is in the adhesive chemistry and film construction, which is formulated to bond to fibres that expand and contract during wear.
EasyWeed Stretch is not a substitute for regular EasyWeed on flat-woven fabrics; each product is built for a specific fabric behaviour.
Standard EasyWeed applied to a moisture-wicking jersey or compression legging will eventually crack or peel at the edges because the base film can’t keep pace with the movement. EasyWeed Stretch solves that problem directly, and once you press it correctly using proper siser easyweed stretch instructions, the transfer stays intact through repeated wear and washing.
The right fabrics for EasyWeed Stretch
Choosing the correct vinyl starts with knowing your fabric composition and stretch percentage. EasyWeed Stretch performs best on materials that contain a meaningful percentage of spandex, elastane, or lycra. It also works well on nylon and performance polyester blends used in athletic wear.

Here is a quick fabric compatibility reference:
| Fabric Type | EasyWeed Stretch Compatible? |
|---|---|
| 100% Cotton | Works, but standard EasyWeed is a better fit |
| Cotton/Spandex blend | Yes |
| Polyester/Spandex blend | Yes |
| Nylon | Yes |
| Athletic/Compression fabric | Yes |
| 100% Polyester (non-stretch) | Works, but verify press temperature |
Always do a test press on a scrap piece of the exact same fabric before committing to a full run. This is especially important if you’re working with a new fabric blend or an unfamiliar garment construction you haven’t pressed before.
When to choose EasyWeed Stretch over other HTV
A simple physical test will answer the question for you quickly. Pull the fabric in both directions. If it has noticeable give in multiple directions, EasyWeed Stretch is the right call. If it barely moves, standard EasyWeed will handle the job without any issues.
Typical use cases include team sports uniforms, yoga and gym wear, dance costumes, and any custom apparel where the design sits across a seam or curved body section. These are situations where film flexibility directly affects how long the transfer lasts, and using the wrong product will cost you a complete redo.
Before you start: tools, materials, and setup
Getting your tools and workspace ready before you press saves time and prevents costly mistakes. Having the right equipment on hand and your fabric properly prepared is just as important as following the correct siser easyweed stretch instructions when you actually apply the vinyl.
What you need
Before you press a single piece of vinyl, check that you have everything on this list ready to go. Missing even one item, like a pressing pillow or a lint roller, can affect the quality of your finished transfer and risk damage to the garment itself.
- Heat press or home iron (heat press strongly recommended for stretch fabrics)
- Siser EasyWeed Stretch vinyl, pre-cut or ready to cut
- Cutting machine (Cricut, Silhouette, or similar) if you haven’t already cut your design
- Teflon sheet or parchment paper to protect the vinyl surface during pressing
- Pressing pillow or folded towel to manage seams and uneven fabric thickness
- Lint roller to clean the garment surface before pressing
- Ruler or tape measure for accurate design positioning
Setting up your workspace
Your garment needs to be clean, dry, and pre-pressed before you place the vinyl. Any moisture trapped in the fabric will interfere with adhesion, so run a quick pre-press of 3 to 5 seconds to drive out humidity before you position your design.
Skipping the pre-press is one of the most common reasons transfers lift at the edges within the first few washes.
Place a pressing pillow inside the garment if it has a pocket, lining layer, or internal seam that would create an uneven pressing surface. This keeps the fabric flat and ensures even pressure across the entire design area. For tubular items like sleeves or leggings, the pillow also stops the vinyl from accidentally bonding to the back layer of fabric during the press.
Heat press settings and step-by-step
A heat press gives you the most consistent results with Siser EasyWeed Stretch because it delivers even pressure and stable temperature across the entire design area. Following the correct siser easyweed stretch instructions for your heat press will make the difference between a transfer that lasts years and one that starts peeling after the third wash.
Recommended heat press settings
Siser’s official settings for EasyWeed Stretch are a reliable starting point. You may need to make small adjustments based on your specific press and fabric weight, but stay within close range of these numbers.
| Setting | Recommended Value |
|---|---|
| Temperature | 311°F / 155°C |
| Press Time | 15 seconds |
| Pressure | Medium to firm |
| Peel | Warm or cool peel |
Always verify the actual platen temperature with a heat press thermometer before pressing, since many machines run hotter or cooler than what the display shows.
Step-by-step application
Follow these steps in order to get a clean, lasting press every time.
- Pre-press the garment for 3 to 5 seconds to remove moisture and wrinkles.
- Position your design with the carrier sheet facing up. Use a ruler to centre it accurately.
- Cover with a Teflon sheet or parchment paper to protect the vinyl surface.
- Press at 311°F (155°C) for 15 seconds with medium-to-firm pressure.
- Lift the platen and allow the transfer to cool for 10 to 15 seconds before peeling.
- Peel the carrier sheet back slowly at a low angle. If the vinyl lifts at any point, return it to the press for another 5 seconds.
- Re-press for 5 seconds with a Teflon sheet on top to fully set the transfer.
That final re-press step is often skipped, but it noticeably improves edge adhesion and prevents the design from lifting at corners after washing.
Home iron settings and step-by-step
A home iron can work for Siser EasyWeed Stretch, but it requires more attention and physical effort than a heat press. Because a household iron delivers uneven heat and no consistent pressure, you need to compensate with technique to get a reliable result. This method is best suited for small, simple designs on flat fabric sections rather than full-chest graphics or garments with heavy seams underneath.
Recommended iron settings
Set your iron to the highest cotton setting, which typically falls between 300°F and 320°F (148°C to 160°C). Disable the steam function completely, since moisture will interfere with the adhesive and cause the vinyl to lift. If your iron has a digital display, aim for 315°F (157°C) as your target. Without a thermometer, the cotton setting on most modern irons gets close enough to work with EasyWeed Stretch.
Never use the steam function when pressing HTV, regardless of the fabric type, as steam introduces moisture that weakens the bond between the vinyl and the garment.
| Setting | Recommended Value |
|---|---|
| Temperature | Cotton setting (~315°F / 157°C) |
| Press Time | 20 to 25 seconds |
| Steam | Off |
| Peel | Warm or cool peel |
Step-by-step with a home iron
Following the correct siser easyweed stretch instructions with a home iron means pressing in short, overlapping sections rather than moving the iron back and forth. Dragging the iron shifts your design and creates uneven adhesion across the transfer.
- Pre-press the garment for 5 seconds to remove all moisture.
- Place your design carrier-side up and cover it with a piece of parchment paper.
- Press firmly with the iron, holding each spot for 20 to 25 seconds without sliding.
- Overlap each press zone slightly to ensure full coverage across the design.
- Allow the vinyl to cool for 15 seconds, then peel the carrier at a low angle.
- Re-press with parchment paper for another 10 seconds to fully set the edges.
Fixes, layering, and wash care
Even when you follow the correct siser easyweed stretch instructions to the letter, things can go wrong. A partial peel, lifted edge, or bubbled section does not always mean you have ruined the garment. Many common press problems are fixable if you catch them early and respond with the right technique.
Fixing a bad press
If your vinyl lifts at the edges or peels away after you remove the carrier, return it to the press immediately. Cover the affected area with a Teflon sheet and press for an additional 10 seconds at the same temperature. Apply firm downward pressure rather than trying to smooth the vinyl by hand. For a home iron, hold each problem zone for 15 seconds with steady pressure and no sliding.
If the vinyl has cooled completely before you notice the lift, a re-press still works, but you may need to extend the press time to 15 seconds to fully reactivate the adhesive.
Layering EasyWeed Stretch
You can layer EasyWeed Stretch over itself or over standard EasyWeed. Press your base layer first and let it cool completely before adding the next colour. When pressing subsequent layers, reduce your press time to 10 seconds to avoid overheating the layer underneath. Always place a Teflon sheet between the platen and any previously pressed vinyl to prevent scorching or colour distortion.
Wash care
Proper washing keeps your transfers intact far longer than any press technique can on its own. Turn garments inside out before washing and use a cold or warm machine wash cycle. Avoid high-heat tumble drying and lay the garment flat or hang it to dry instead. Skip fabric softener entirely, since it coats fibres and gradually weakens the bond between the vinyl and the fabric.
| Wash Care Step | Recommendation |
|---|---|
| Wash temperature | Cold or warm (max 40°C) |
| Wash cycle | Gentle or normal |
| Tumble dry | Avoid high heat; air dry preferred |
| Iron after washing | Press inside out on low heat |
| Fabric softener | Do not use |
Wrap-up and next steps
Following the correct siser easyweed stretch instructions gives you a transfer that moves with the fabric, holds through repeated washing, and looks clean from the first press. The key variables are temperature, press time, and pressure, and as long as you stay within the recommended ranges for your heat press or iron, you will avoid the most common problems like peeling edges and bubbling film.
Your fabric choice matters just as much as your technique. Always pre-press to remove moisture, use a Teflon sheet to protect the vinyl surface, and do that final 5-second re-press to lock the edges down fully. For layered designs, let each layer cool before pressing the next, and always wash garments inside out in cold water.
If you want professionally applied custom apparel without the guesswork, browse Apex Workwear’s custom printing services and get a free quote within 24 hours.