Picking the wrong mesh count can turn a sharp design into a blurry, ink-heavy mess, or leave fine details looking starved and incomplete. Whether you’re printing bold text on work hoodies or detailed logos on lightweight tees, your screen printing mesh count guide starts with one decision: how open or tight your mesh needs to be for the job at hand.
At Apex Workwear, we handle custom screen-printed apparel for businesses, teams, and contractors across Canada every day. We’ve seen firsthand how mesh count affects ink deposit, print clarity, and overall durability, and how the wrong choice leads to wasted time and materials. That hands-on experience is exactly what shaped this guide.
Below, you’ll find a practical breakdown of mesh count ranges, what each one is best suited for, and how to match your mesh to your ink type, artwork detail, and substrate. By the end, you’ll be able to choose the right screen with confidence, no guesswork involved.
Mesh count basics you need to know
Mesh count refers to the number of threads woven per linear inch of the screen fabric. A screen rated at 110 mesh has 110 threads crossing per inch, while a 230 mesh screen has 230. The higher the number, the tighter the weave and the smaller the openings between threads. That single measurement controls how much ink passes through your screen and how much fine detail your print can actually hold.
What the number actually measures
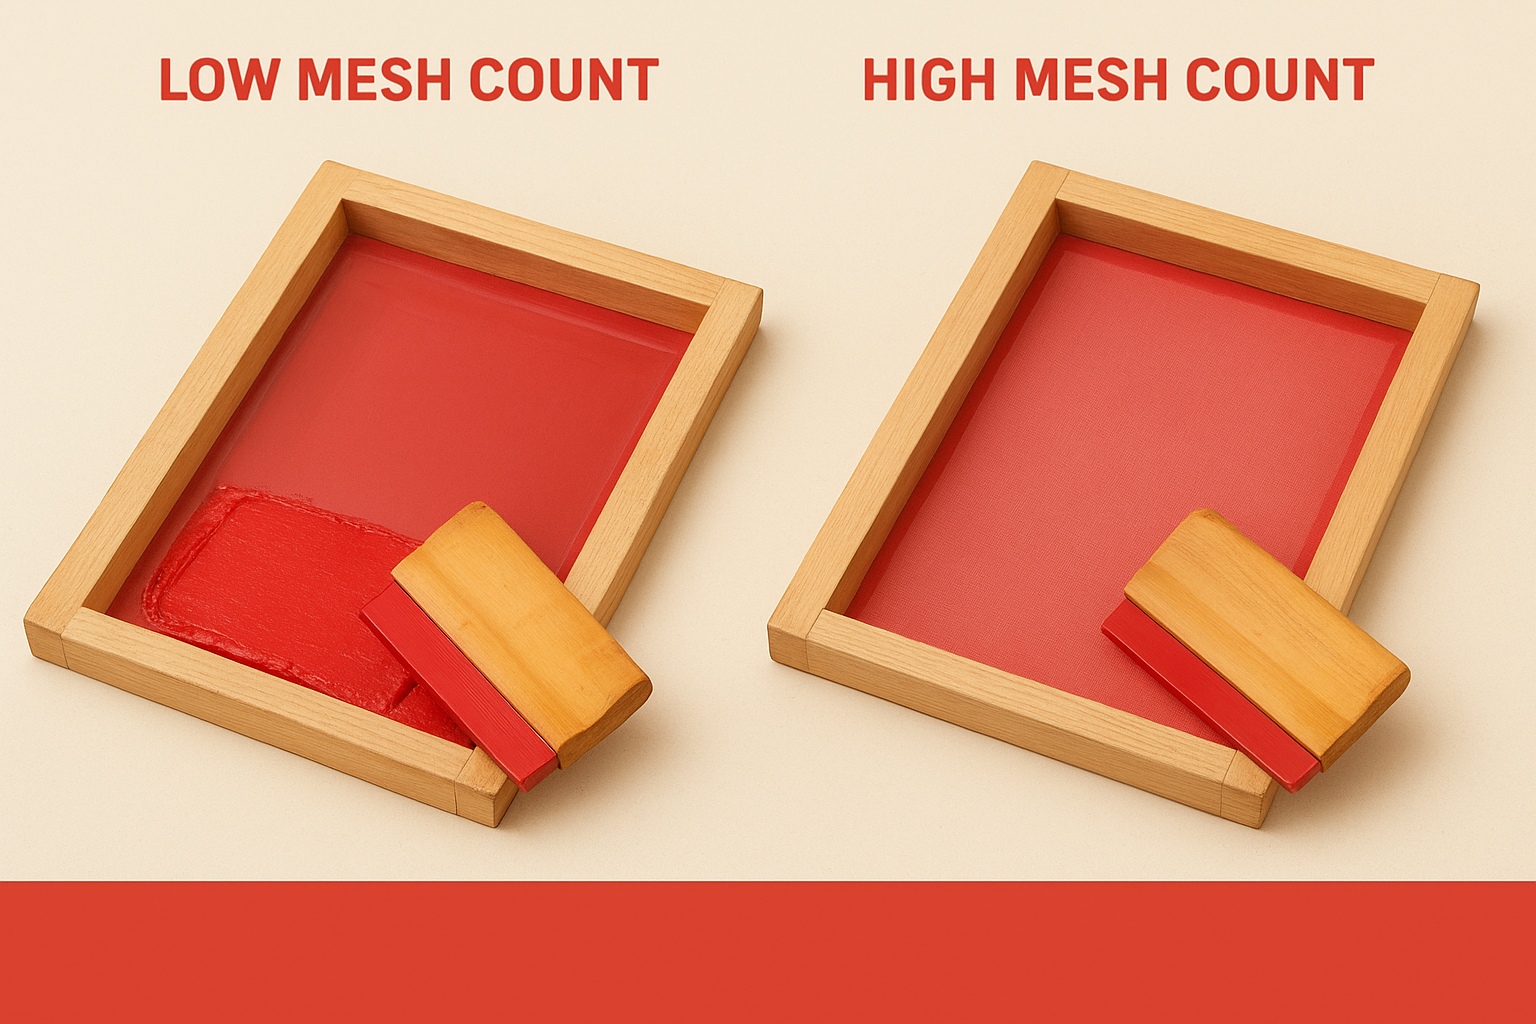
The mesh itself is a woven polyester fabric stretched tightly over a wooden or aluminium frame. When you push ink across it with a squeegee, the ink travels through the open gaps between threads and onto your substrate. A lower mesh count has larger openings, so more ink deposits with each pass. A higher mesh count has smaller openings, so less ink comes through, but the finer grid can reproduce sharper edges and more intricate shapes with accuracy.
The mesh count you choose sets a ceiling on what your print can achieve, no matter how good your artwork or ink quality is.
Low vs. high mesh count at a glance
Understanding the two ends of the spectrum helps you make faster decisions on any project. Here is how the full range breaks down:
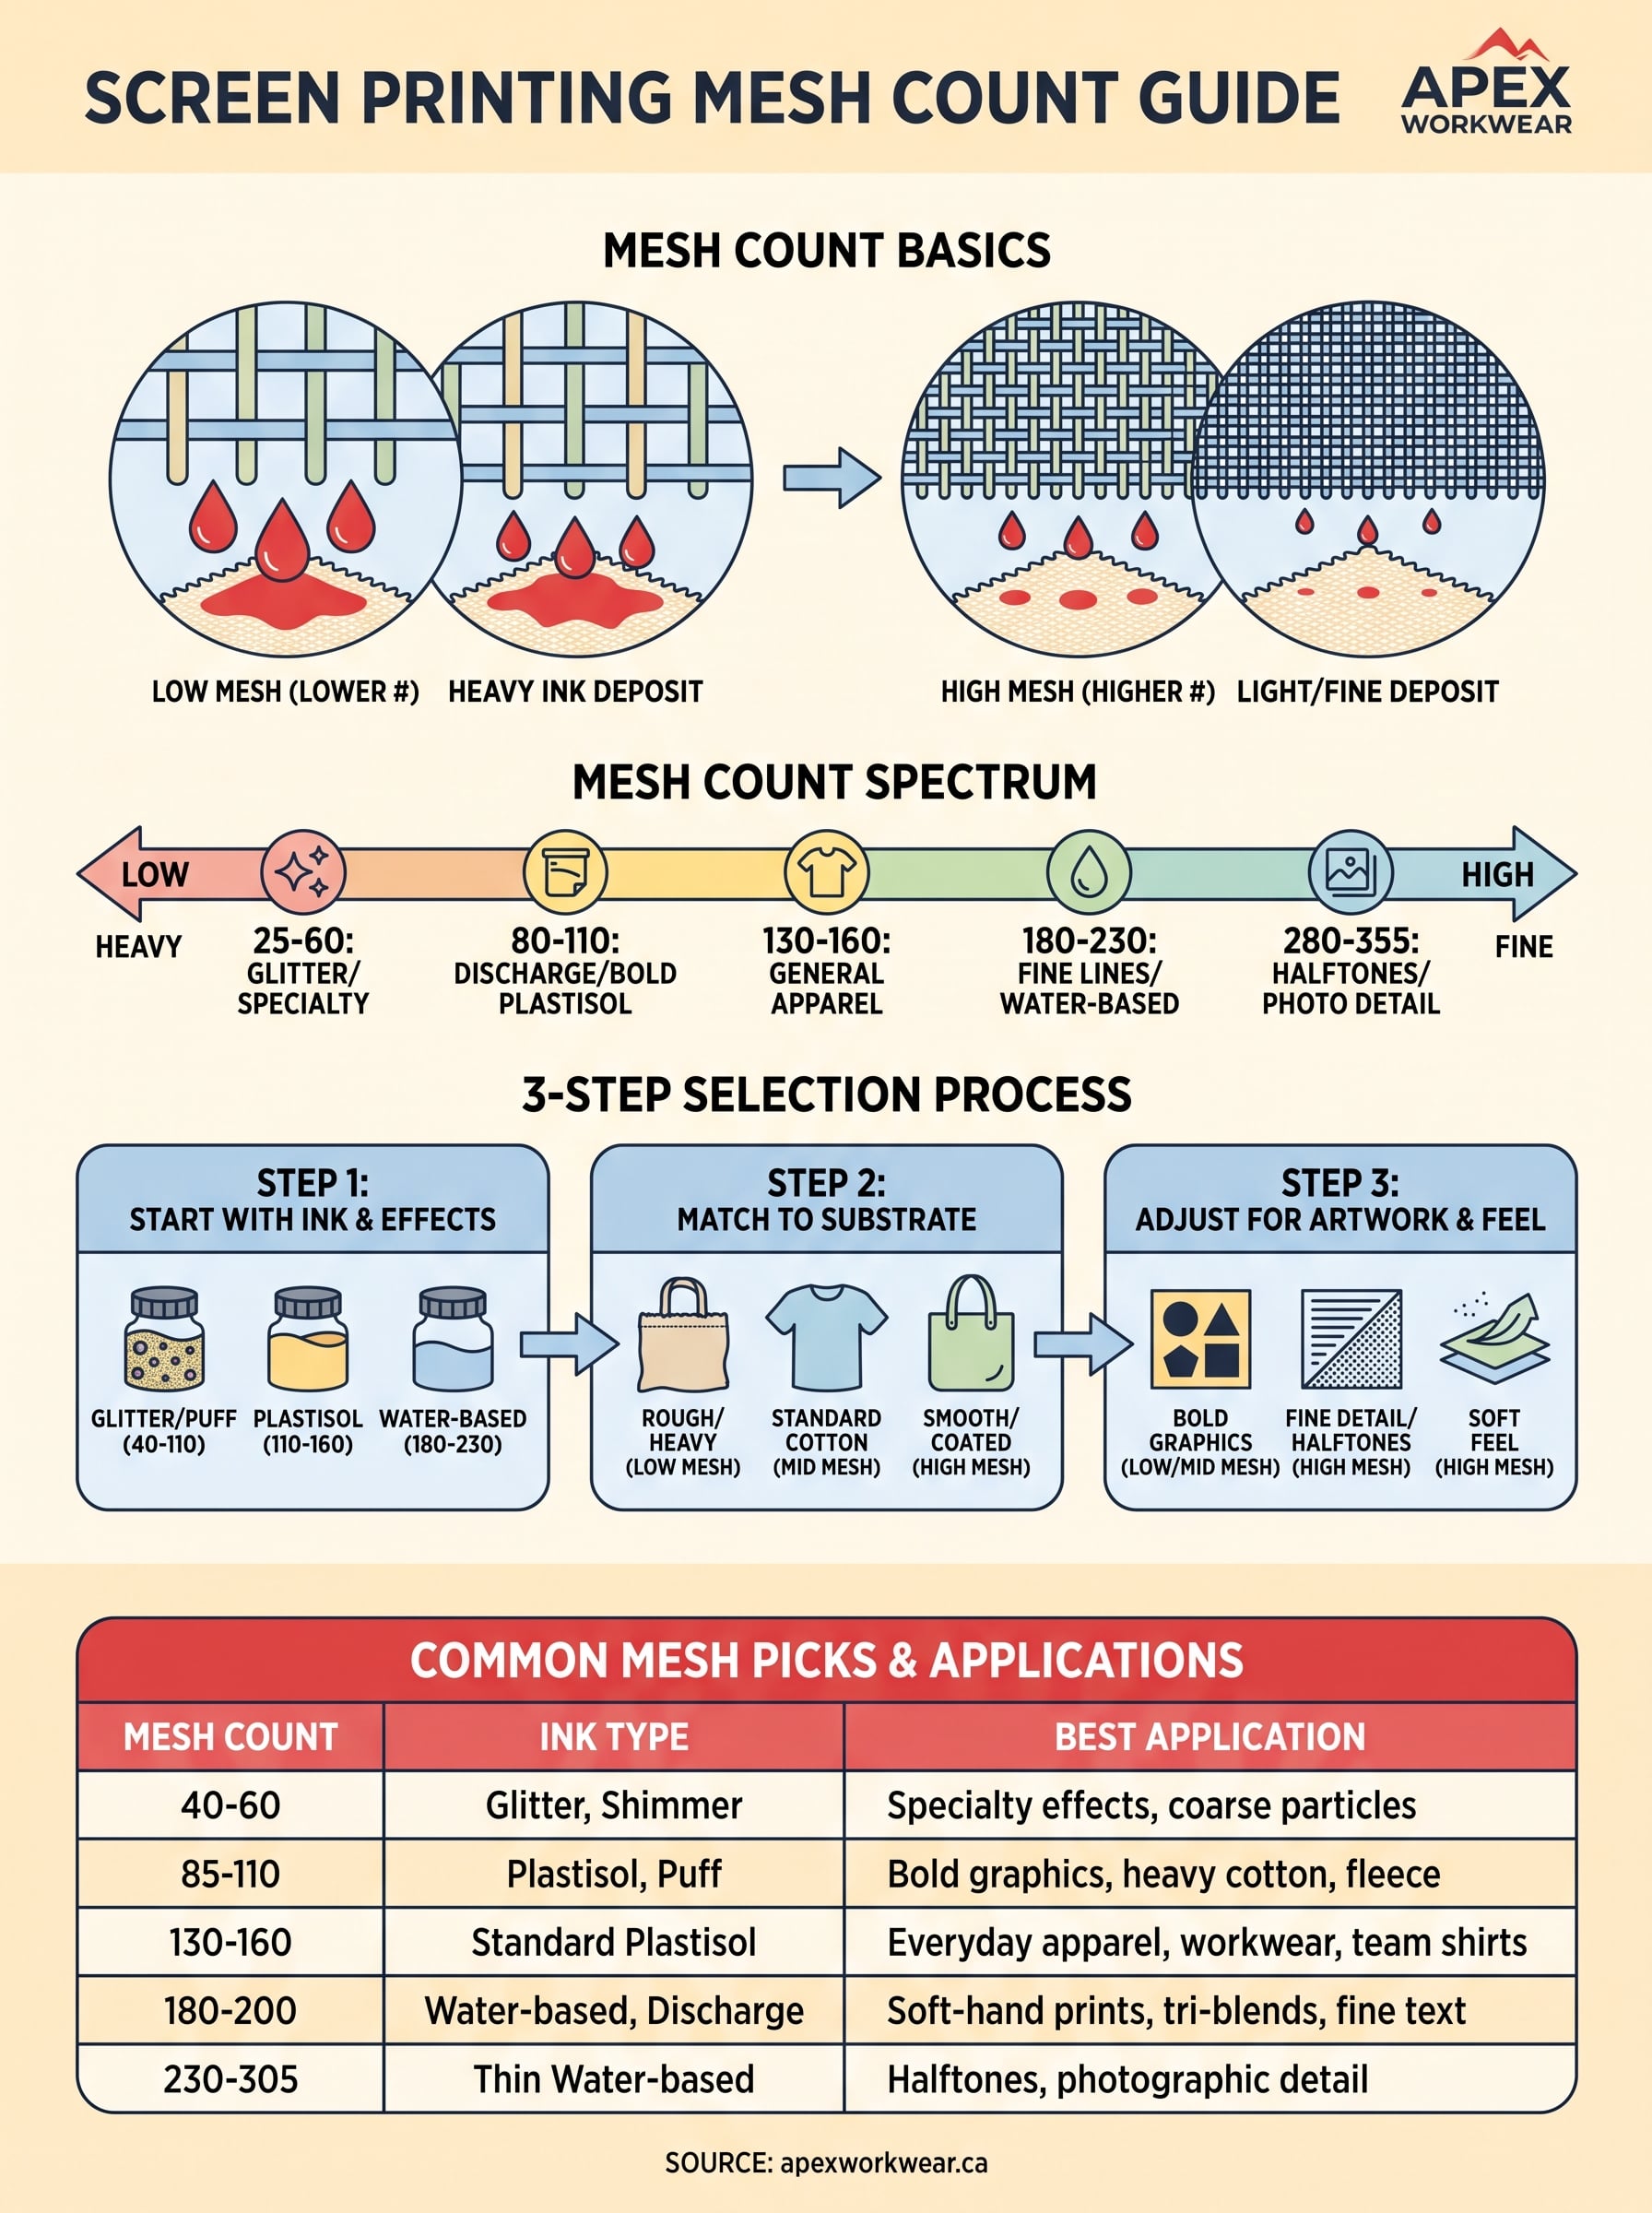
| Mesh Count Range | Ink Deposit | Best For |
|---|---|---|
| 25 to 60 | Very heavy | Glitter, chunky specialty inks |
| 80 to 110 | Heavy | Discharge, athletic, thick plastisol |
| 130 to 160 | Medium | General apparel, standard plastisol |
| 180 to 230 | Light to fine | Fine lines, halftones, water-based inks |
| 280 to 355 | Very fine | Photographic detail, thin substrates |
This screen printing mesh count guide uses these ranges as your baseline reference throughout every step that follows. Most standard apparel jobs land between 110 and 160, which gives you a solid middle ground before you start factoring in ink type and design complexity.
Step 1. Start with ink and special effects
Your ink type is the first filter you apply before anything else. Different inks have different viscosities and particle sizes, which directly controls how easily they push through the mesh and deposit onto fabric. Getting this wrong means either clogging your screen or flooding your print with too much ink.
Plastisol and water-based inks
Plastisol ink is the most common choice for apparel printing, and it works well across a broad mesh range. For standard plastisol on everyday cotton tees or work shirts, stay between 110 and 160 mesh. That range deposits enough ink for solid, opaque coverage without overloading the fabric. If you switch to water-based or discharge inks, move up to 180 to 230 mesh. These inks are thinner and need a tighter weave to control the deposit and keep edges clean.
Matching mesh to ink viscosity is the single most important step in this screen printing mesh count guide, because no other adjustment compensates for getting it wrong here.
Specialty inks and effects
Specialty effects follow a different logic entirely. Glitter and shimmer inks contain coarse metallic particles that physically cannot pass through a tight mesh without clogging, so drop to 40 to 60 mesh for those applications. Puff and foil inks typically print well at 85 to 110 mesh, giving the ink enough room to expand or adhere properly during curing. Always check your ink supplier’s recommended mesh range before you expose your screen.
Step 2. Match the mesh to your substrate
Once you have your ink type locked in, your substrate surface becomes the next deciding factor. Different materials absorb ink at different rates and have varying surface textures, which means a mesh count that works perfectly on a smooth cotton tee can completely fail on a rougher or coated surface.
Soft fabrics and standard cotton
Standard cotton and cotton-poly blends are the most forgiving substrates, and they perform well across the 110 to 160 mesh range that most apparel jobs use. Ringspun cotton and tri-blend fabrics have a finer, tighter surface, so you can push toward 160 mesh for cleaner results without sacrificing ink coverage. Thicker fleece and heavyweight hoodies benefit from a slightly lower mesh, around 110, because the looped surface needs a heavier ink deposit to sit on top rather than sink into the material.
Printing on a rougher substrate with too high a mesh count gives you weak, patchy coverage that no amount of pressure from the squeegee will fix.
Rough, coated, or hard substrates
Rough-weave fabrics, canvas bags, and workwear materials pull ink into the fibres aggressively, so dropping to 80 to 110 mesh gives you the heavy deposit needed for solid, durable coverage. For coated or smooth hard surfaces like tote bags with a treated finish or promotional items, move up toward 180 to 200 mesh to prevent ink flooding. This screen printing mesh count guide treats substrate texture as a direct dial for adjusting your mesh range up or down from your ink-based starting point.
Step 3. Adjust for artwork detail and feel
Your ink type and substrate narrow your mesh range considerably, but artwork complexity and the desired feel of the finished print are what push you to the final number. A bold, two-colour logo needs a very different mesh than a photo-realistic halftone, even when you’re printing on the same shirt with the same ink.
Fine lines, halftones, and photographic detail
Fine line artwork and halftone gradients demand a higher mesh count to reproduce accurately. If your design includes text smaller than 6 points, tight linework, or percentage-based halftone dots, you need at least 180 to 230 mesh to hold those edges cleanly. Dropping below that range causes halftone dots to merge together and fine lines to bleed, which destroys the detail your client is expecting from the final print.
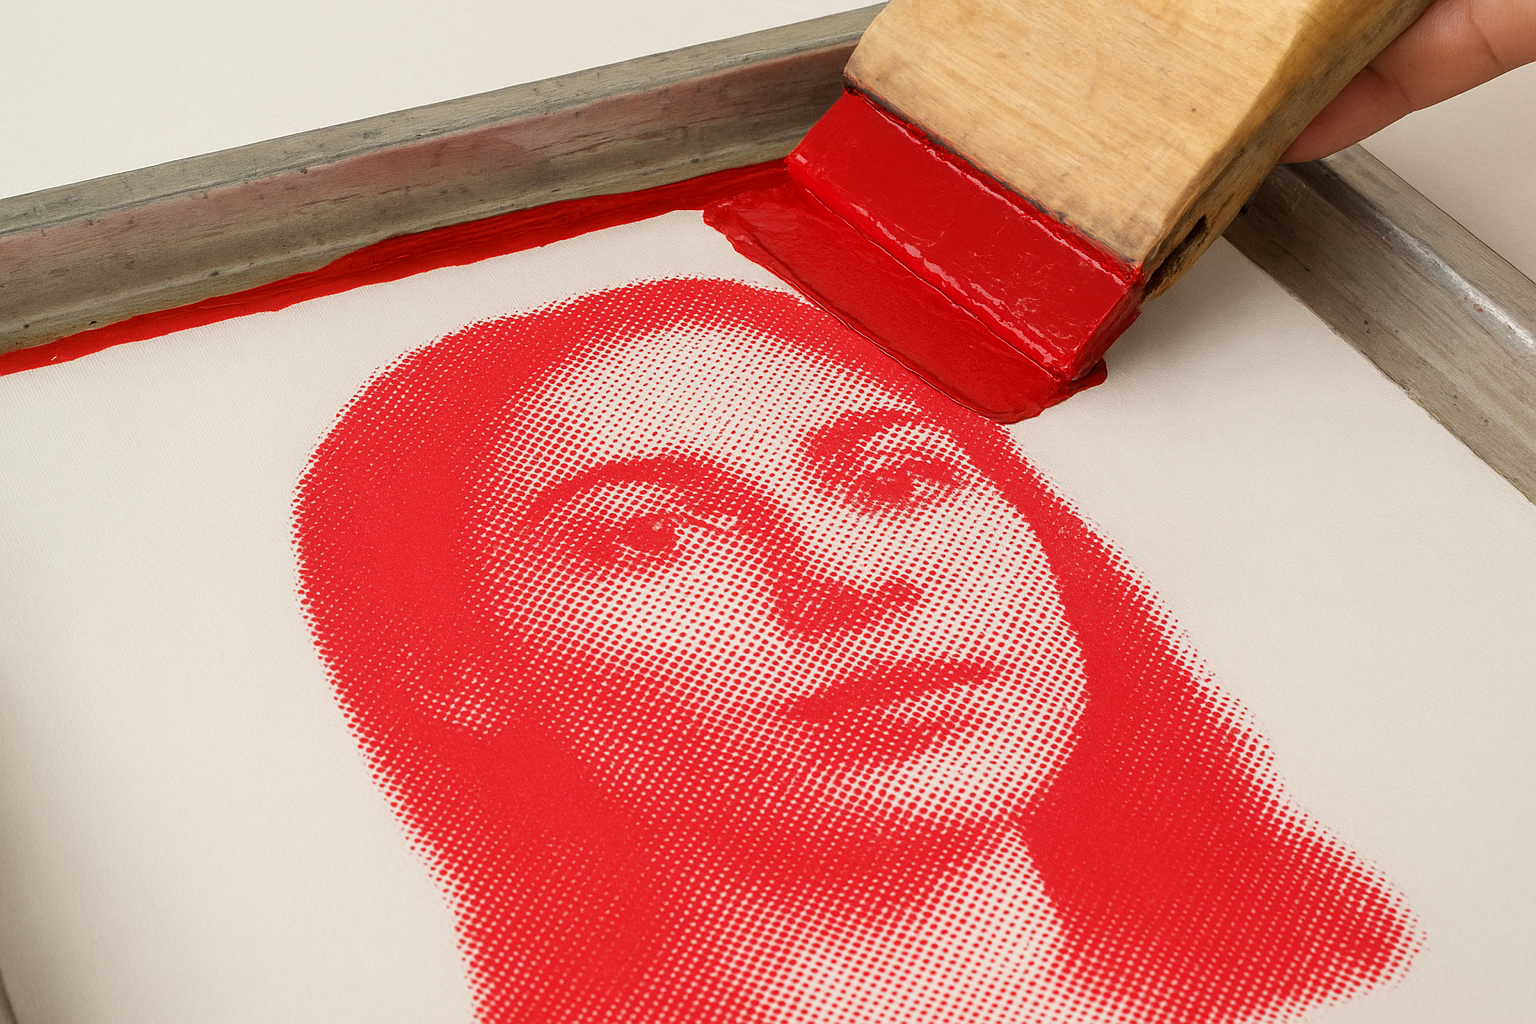
A practical rule to follow: if your halftone uses dots at 55 lines per inch, your mesh count should be at least four times that number to reproduce them without dot gain distorting the image.
Ink deposit and the feel of the print
A heavier ink deposit from a lower mesh count creates a raised, tactile feel on the fabric surface. If your client wants a soft, breathable print that blends into the shirt rather than sitting on top of it, move toward 160 to 200 mesh. That tighter weave deposits less ink and produces a lighter, more comfortable result that holds up well after repeated washing. Use this screen printing mesh count guide step as your final fine-tuning pass before locking in your screen choice.
Mesh count chart and common picks
After working through ink type, substrate, and artwork detail, you need a single reference point that ties all three variables together. This screen printing mesh count guide compiles the most common mesh counts used in real apparel production into one chart so you can cross-reference your choices quickly before committing to a screen.
The full reference chart
Use this table as your go-to lookup for any standard print job. Each row pairs a specific mesh count with its typical application, so you can confirm your decision or catch a mismatch before you burn your screen.
| Mesh Count | Ink Type | Best Application |
|---|---|---|
| 40 to 60 | Glitter, shimmer | Specialty effects, coarse particles |
| 85 to 110 | Plastisol, puff | Bold graphics, heavy cotton, fleece |
| 130 to 160 | Standard plastisol | Everyday apparel, workwear, team shirts |
| 180 to 200 | Water-based, discharge | Soft-hand prints, tri-blends, fine text |
| 230 to 305 | Thin water-based | Halftones, photographic detail |
The three picks that cover most jobs
For the majority of custom apparel orders, three mesh counts handle almost everything: 110 for heavy specialty work, 156 for standard cotton and workwear, and 200 for soft-hand water-based prints. Lock in those three screens and follow the steps in this guide, and you will cover roughly 90 percent of everyday print jobs without second-guessing your setup each time.
When in doubt between two mesh counts, choose the higher one for detail-heavy artwork and the lower one for solid, opaque coverage.
Quick recap and next steps
This screen printing mesh count guide gives you a repeatable decision process rather than a single number to memorise. Start with your ink type, because viscosity and particle size set your baseline range before anything else factors in. Then adjust for your substrate texture, moving lower for rough or absorbent materials and higher for smooth or coated surfaces. Fine artwork and halftones push you toward the upper end of your range, while bold, solid graphics pull you back down for heavier deposit and more durable coverage.
Three mesh counts handle the bulk of everyday apparel work: 110 for heavy specialty printing, 156 for standard workwear and cotton tees, and 200 for soft-hand water-based results. Keep that chart from earlier bookmarked as a quick reference, and run through all three steps each time you take on a new project.
Ready to put this into practice? Get a free quote on custom printed apparel from Apex Workwear and we will help you get the right result from the start.