You’ve spent hours perfecting a design for custom apparel, banners, or business cards, only for the printer to flag missing fonts or broken image links. Knowing how to package files for print is one of those skills that separates a smooth production run from a frustrating back-and-forth. Yet it’s a step many designers and business owners skip, usually because nobody told them it existed.
At Apex Workwear, we receive print-ready files from customers across Canada every day. The difference between a file that’s properly packaged and one that isn’t can mean days added to your turnaround, and sometimes a result that doesn’t match what you saw on screen. We built this guide because we’d rather help you get it right before you submit than send revision requests after.
Below, you’ll find a clear, step-by-step walkthrough for packaging files in both Adobe Illustrator and InDesign. Whether you’re preparing a single business card layout or a full set of branded materials, this process ensures your printer receives every asset they need, fonts, linked images, and colour profiles, bundled neatly in one folder.
What packaging for print includes and why it matters
When you design in Illustrator or InDesign, your file doesn’t store everything in one place. Fonts are referenced from your system, and linked images are stored externally on your hard drive. Your design software simply points to those files rather than embedding them. That setup works fine on your machine, but the moment you send the design file alone to a printer, those references break. The printer’s computer has no idea where your fonts live, and the linked images never travel with the file.
The components of a complete print package
Packaging solves this by collecting every external reference and bundling it alongside your design file in a single folder. Understanding what goes into that folder helps you verify that the package is complete before you send anything. A proper print package includes five key components:
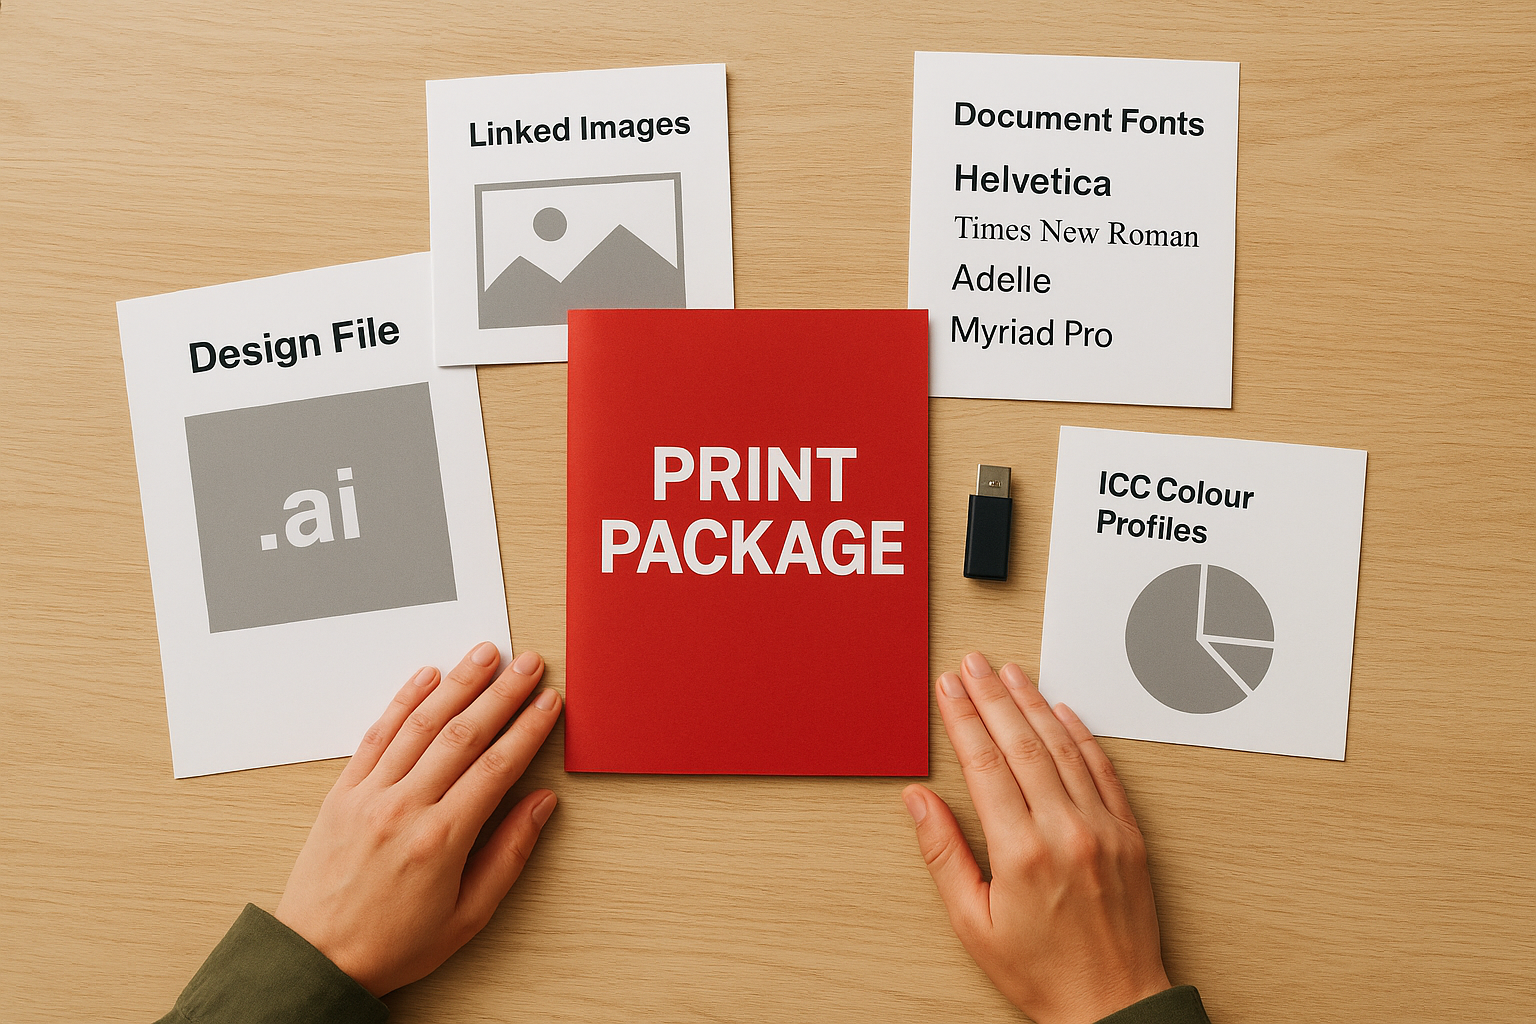
- The design file (your .ai or .indd document)
- Linked images (every placed graphic, photograph, or logo at its full resolution)
- Document fonts (every typeface used in the layout, including those in embedded graphics)
- ICC colour profiles (the profiles that define how colours are reproduced on press)
- A package report (a plain-text file listing all collected assets and any warnings)
A missing font is the single most common reason a printer flags a file before production begins. Packaging eliminates that problem entirely.
Why missing assets break your print job
A printer works with professional RIP software (Raster Image Processor) that processes your file and prepares it for output. When that software encounters a missing font, it substitutes a default typeface, which can shift line breaks, alter spacing, and completely change how your layout looks. Missing linked images cause an even more visible problem: the software prints a low-resolution screen preview instead of the full-resolution file, resulting in pixelated, unusable output.
These are not edge cases. They happen regularly when designers send only the main design file. Knowing how to package files for print means you avoid both issues because every required asset is already included in the folder your printer receives, with no guesswork on either side.
What a printer needs to produce your job accurately
Beyond the package folder itself, your printer needs a few additional items to match what you see on screen. The table below covers the full set of deliverables you should plan to send.
| Deliverable | Why it matters |
|---|---|
| Packaged folder (.ai or .indd + assets) | Contains all fonts, images, and profiles in one place |
| Print-ready PDF | Gives the printer a flattened, press-ready version to output from |
| Colour mode confirmation (CMYK) | Ensures colours shift predictably on press |
| Bleed and safe zone notes | Confirms your artwork is set up correctly for trimming |
| Proof approval | Provides a reference so both sides agree on the expected result |
Sending the packaged folder and a print-ready PDF together is the standard professional approach. The PDF is what the printer runs through their production workflow, while the packaged folder stays on file in case edits come up later. Both items together give your printer complete control over your job from start to finish.
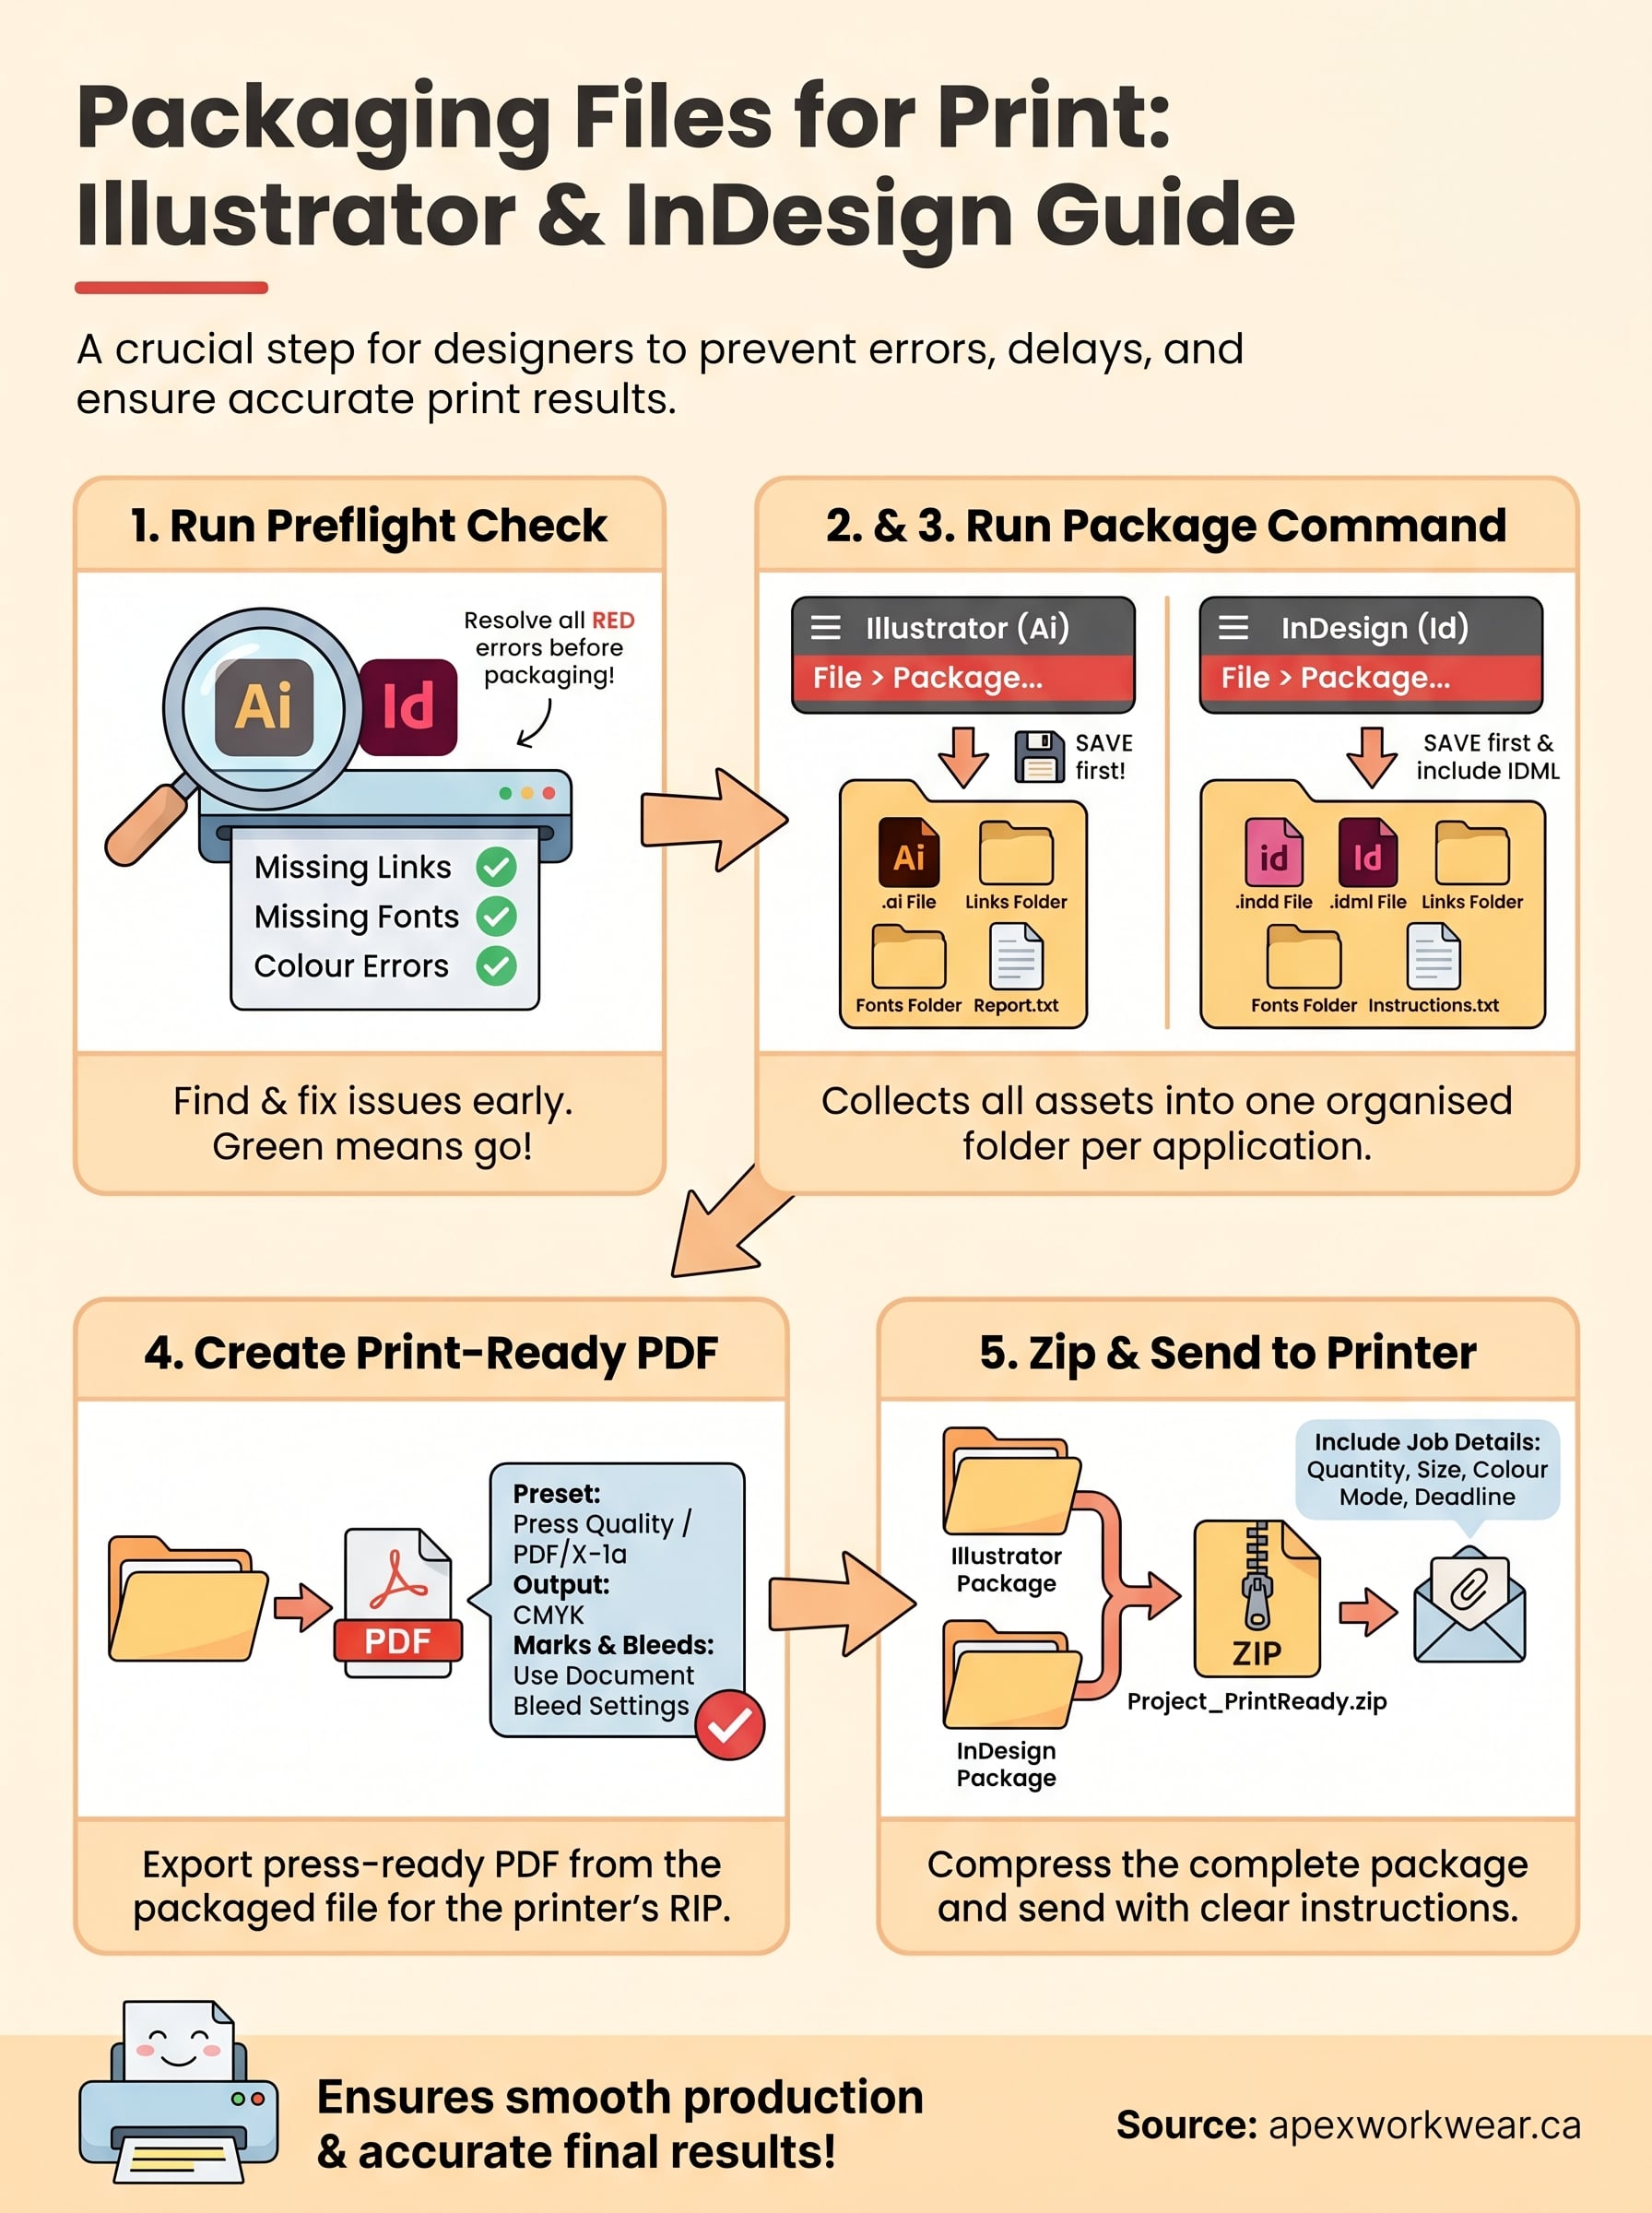
Step 1. Run a preflight check before you package
Running a preflight check before you package is the single most important habit you can build into your print workflow. Both Illustrator and InDesign include a built-in preflight tool that scans your file for problems before you commit to a package, catching missing links, overset text, and colour mode errors while you still have time to fix them on your own machine.
What the preflight panel checks for
The preflight panel reviews your document against a defined set of rules and flags anything that could cause problems at the printer. Errors appear in red and require your attention before you send the file. Warnings appear in yellow and are worth reviewing even if they don’t always stop production. Below are the most common issues preflight will surface:
- Missing links: placed images that have moved or been deleted from their original folder
- Modified links: images that exist but have been edited after you placed them
- Missing fonts: typefaces not installed on your current machine
- Colour mode conflicts: RGB images embedded in a CMYK document
- Overset text (InDesign only): text that extends beyond its frame and won’t print
Fix every red error before you package. A clean preflight result confirms the file is ready for the next step.
How to run preflight in Illustrator and InDesign
The process differs slightly between applications, but both tools are easy to access and take under a minute to run.
In Adobe Illustrator, open the Document Info panel by going to Window > Document Info. Select "Linked Images" and "Fonts" from the panel menu to review what your file references. To confirm colour mode, go to Edit > Document Colour Mode and verify it reads CMYK before you do anything else.
InDesign handles this differently. The preflight panel runs automatically in the background, and a green or red indicator sits at the bottom left of your document window at all times. To review it in detail, go to Window > Output > Preflight. Click any flagged item in the panel to jump directly to the problem in your layout. InDesign also lets you create custom preflight profiles that match your printer’s exact specifications, which is worth setting up if you send files regularly.
Once your preflight panel shows no errors, you’re ready to move on to learning how to package files for print inside your chosen application.
Step 2. Package files for print in Adobe Illustrator
Illustrator’s Package command collects your design file, linked images, and fonts into a single folder on your computer. This is the core of knowing how to package files for print in Illustrator, and the process takes less than two minutes once your preflight check is clear. Before you start, save your document and confirm you’re working in CMYK colour mode, which is essential for accurate colour reproduction on press.
Always save your file immediately before packaging. Illustrator packages the last saved version, not any unsaved changes sitting in the background.
How to run the Package command in Illustrator
Running the Package command in Illustrator is straightforward. Go to File > Package, and Illustrator opens a dialogue box with several options you need to review before confirming. Here is exactly what to do at each step:
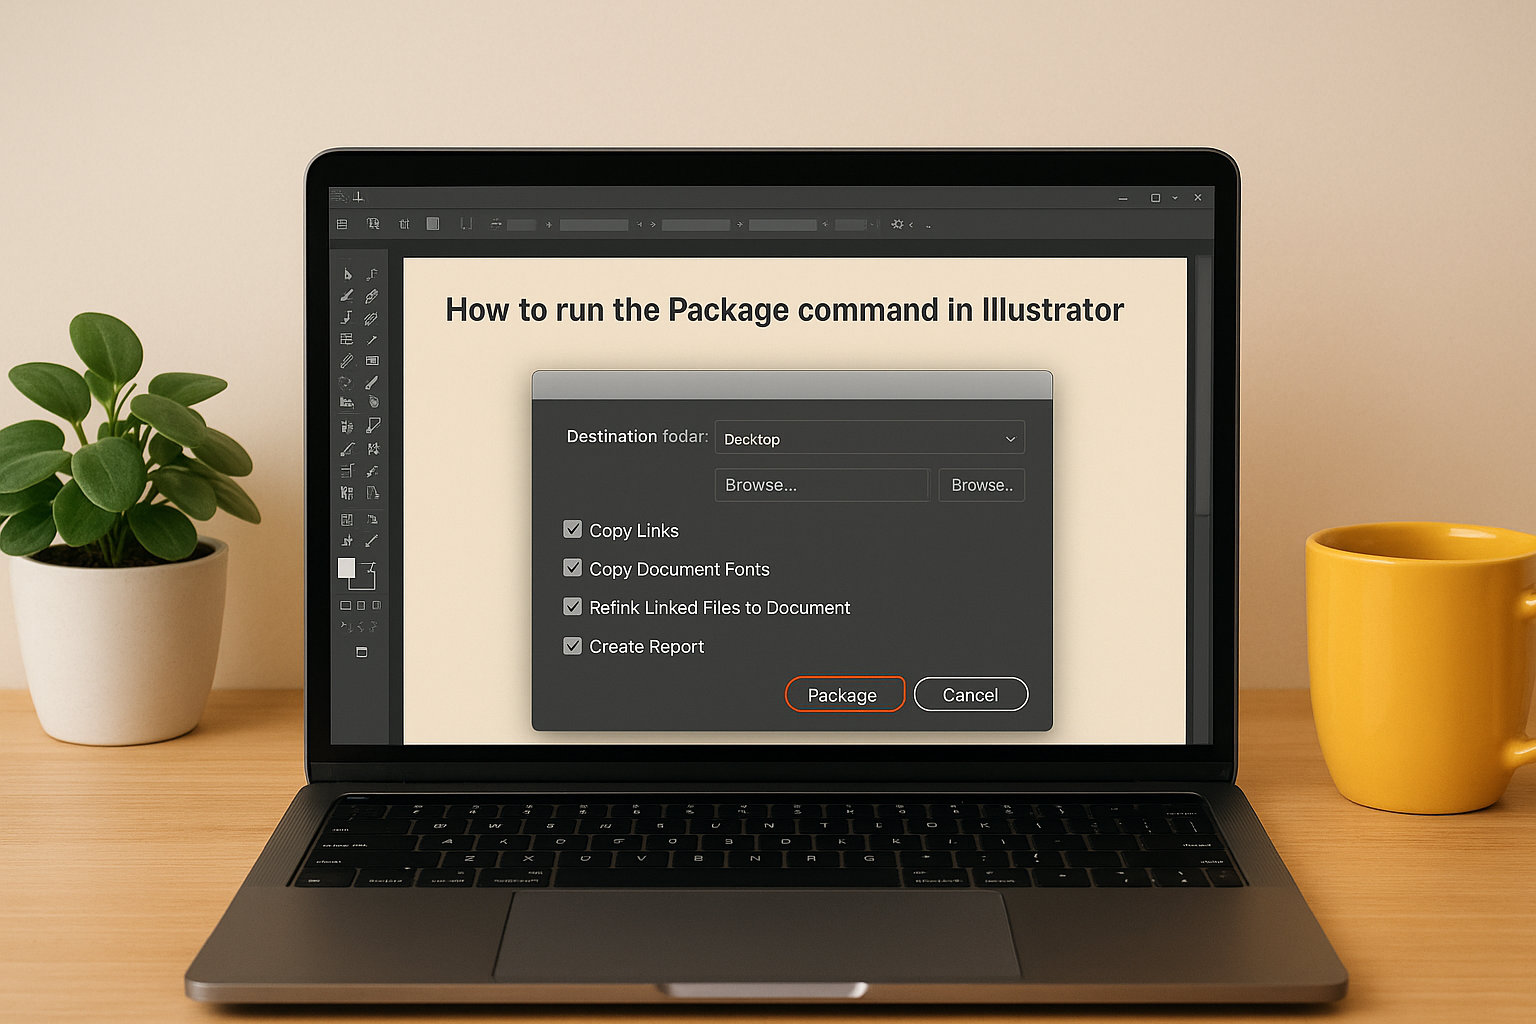
- Set the folder location. Choose a destination that is easy to find, such as your desktop or a dedicated project folder. Illustrator creates a new subfolder automatically.
- Tick "Copy Links". This copies every placed image into the package folder at its full resolution.
- Tick "Copy Document Fonts". This collects every font used in your layout. Some font licences restrict redistribution, but your printer still needs these files to output your job accurately.
- Tick "Relink Linked Files to Document". This updates all image links inside the packaged .ai file to point to the newly collected copies rather than your original hard drive locations.
- Tick "Create Report". This generates a plain-text summary of every collected asset, which is useful for your own records and for the printer’s reference.
- Click Package to confirm, and Illustrator builds the folder in your chosen location.
What your completed Illustrator package folder contains
Once Illustrator finishes, open the folder and verify its contents before you send anything. A complete package folder should contain three items: the original .ai file, a "Links" subfolder holding all placed images at full resolution, and the package report as a plain-text document. Fonts are embedded directly inside the .ai file in most cases, but if Illustrator creates a separate "Document Fonts" folder, keep it inside the package alongside everything else.
If any linked image is missing from the Links subfolder, go back to your document, fix the broken link using the Links panel (Window > Links), and run the Package command again before proceeding.
Step 3. Package files for print in Adobe InDesign
InDesign’s Package command works on the same principle as Illustrator’s, but it offers more granular control over what gets collected and how the package is structured. This makes it the preferred tool for multi-page documents like brochures, booklets, and presentation folders. Before you run the command, save your document and confirm that the preflight panel at the bottom of your screen shows no red errors. If it shows errors, go back to Step 1 and resolve them first.
How to run the Package command in InDesign
The packaging process in InDesign uses a multi-step dialogue that covers fonts, links, colour profiles, and settings in sequence. This is where knowing how to package files for print in InDesign really pays off, because the dialogue surfaces information you might otherwise overlook. Go to File > Package to open it, then work through each screen:
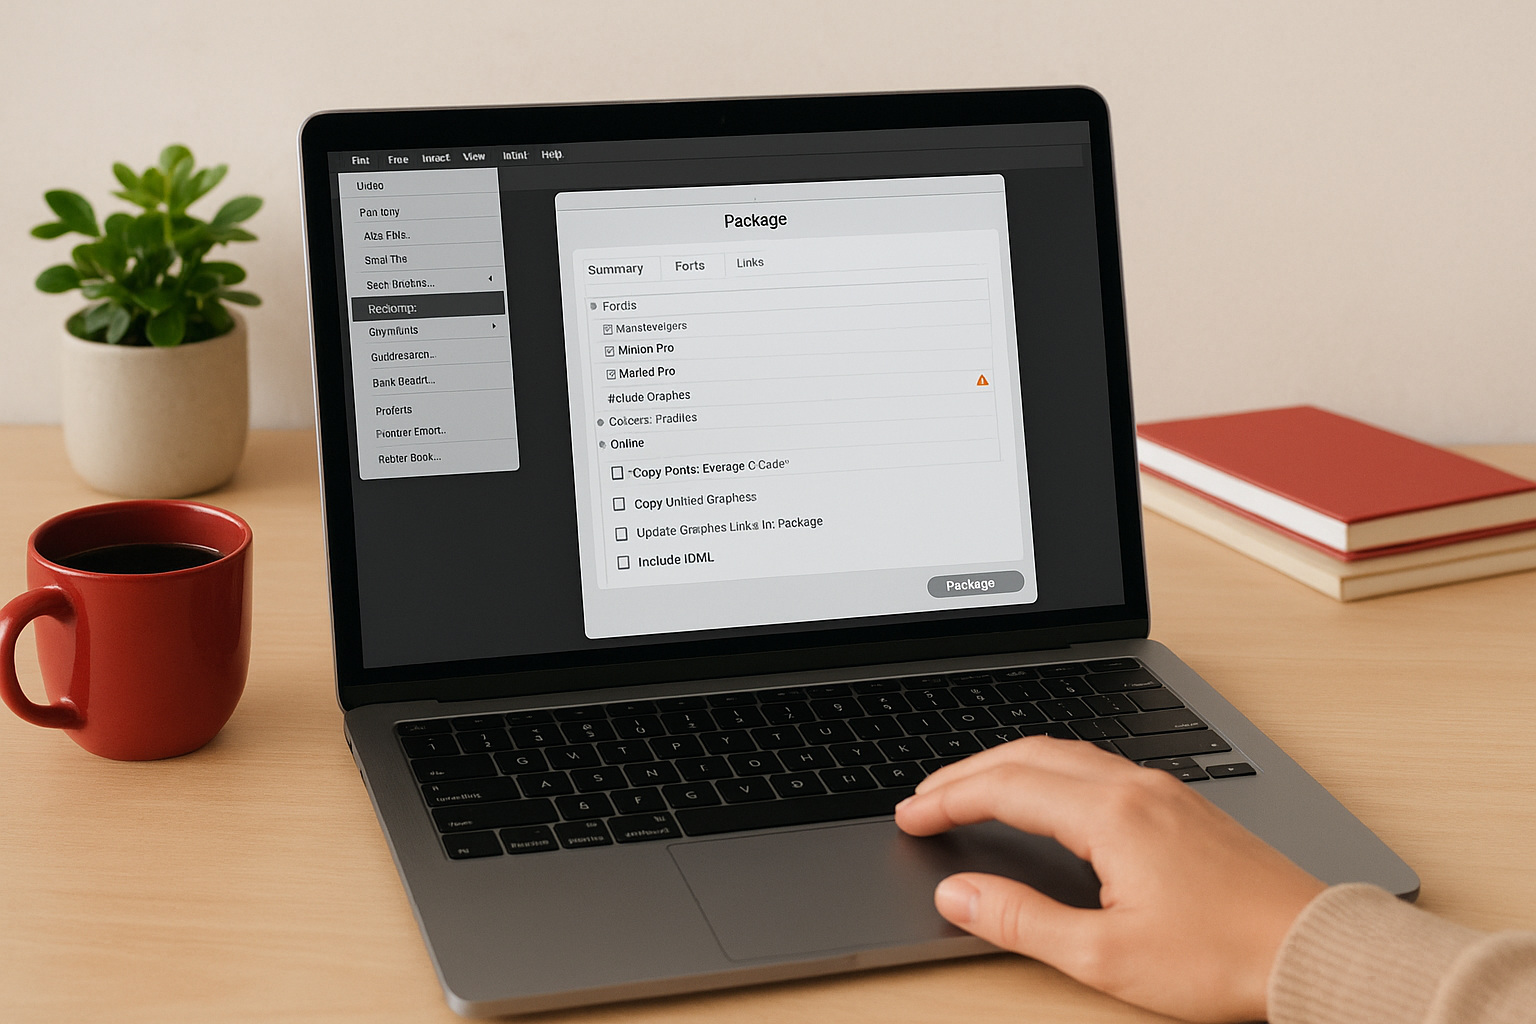
- Review the Summary screen. InDesign shows a full overview of fonts, linked images, and colours used in your document. If any item shows a warning, click it to see more detail before you continue.
- Click "Instructions". Add your name, contact details, and any notes about the job. Your printer reads this screen first, so include relevant information about bleed settings or special finishing.
- Tick "Copy Fonts (Except CJK)". This collects all typefaces into a "Document Fonts" subfolder inside the package.
- Tick "Copy Linked Graphics". This pulls every placed image into a "Links" subfolder at full resolution.
- Tick "Update Graphic Links in Package". This rewrites the link paths inside the packaged .indd file so they point to the newly copied images rather than their original locations on your drive.
- Tick "Include IDML". This saves a backwards-compatible version of your file, which is useful if your printer runs an older version of InDesign.
- Click Package, choose a destination folder, and confirm.
Ticking "Include IDML" costs nothing and eliminates version compatibility problems before they start.
What your completed InDesign package folder contains
Once the process finishes, your package folder will hold several items worth verifying before you send anything. A complete InDesign package includes the original .indd file, the .idml file, a "Document Fonts" subfolder, a "Links" subfolder, and an instructions text file. Open the Links subfolder and confirm the file count matches the number of linked graphics shown in InDesign’s preflight summary. If the counts do not match, relink any missing images through Window > Links and run the Package command again.
Here is a quick reference for what each item in the folder does:
| Item | Purpose |
|---|---|
| .indd file | The original editable InDesign document |
| .idml file | Backwards-compatible version for older InDesign installs |
| Document Fonts folder | All typefaces used in the layout |
| Links folder | All placed images at full resolution |
| Instructions text file | Job notes and contact details for your printer |
Step 4. Create a print-ready PDF from the packaged project
Your packaged folder holds all the editable assets your printer needs for revisions, but the print-ready PDF is what actually runs through their production workflow. Sending both together is the standard professional approach, and it completes the process of knowing how to package files for print correctly. The PDF you export must use the right preset to ensure bleed, colour mode, and font data all transfer to your printer’s RIP software without errors.
Always export your PDF from the packaged .ai or .indd file, not from an earlier version sitting elsewhere on your drive.
Export a print-ready PDF from Illustrator
Open the .ai file inside your packaged folder and go to File > Save a Copy. Change the format to Adobe PDF and click Save. Illustrator opens the PDF export dialogue, where the preset you choose controls everything that follows.
Select "Press Quality" from the Adobe PDF Preset dropdown at the top. This preset automatically sets the correct resolution, colour handling, and compression for professional printing. Then work through the key panels in the left sidebar and confirm the following settings before you export:
| Panel | Setting to confirm |
|---|---|
| General | Compatibility: Acrobat 5 (PDF 1.4) or higher |
| Marks and Bleeds | Tick "Use Document Bleed Settings" |
| Output | Colour Conversion: Convert to Destination (CMYK) |
| Advanced | Subset Fonts Below: 100% |
Click Save PDF once you have confirmed each panel. Your PDF saves directly into the packaged folder, which keeps everything in one location for your printer.
Export a print-ready PDF from InDesign
Open the .indd file inside your packaged folder and go to File > Export. Choose Adobe PDF (Print) from the format dropdown and click Save. InDesign opens its own PDF export dialogue with the same panel structure.
Select "PDF/X-1a:2001" or "Press Quality" from the preset menu. PDF/X-1a is the most widely accepted preset for commercial print because it flattens transparency, embeds all fonts, and locks the colour space to CMYK automatically. Confirm these settings across the panels:
| Panel | Setting to confirm |
|---|---|
| General | Pages: All (or your chosen range) |
| Marks and Bleeds | Tick "Use Document Bleed Settings" |
| Output | Colour Conversion: Convert to Destination |
| Advanced | Subset Fonts Below: 100% |
Click Export to generate the PDF inside your packaged folder. At this point you have both the editable package and a press-ready PDF sitting together, which is exactly what your printer needs to move forward.
Step 5. Zip the package and send it to your printer
Once your package folder contains the design file, linked assets, document fonts, and the print-ready PDF, the last step is to compress everything into a single zip file and send it to your printer. Sending a zip file rather than individual files or a loose folder protects the internal folder structure, prevents files from being separated in transit, and gives the printer a clean, complete archive they can expand and work from immediately.
How to zip your package folder on Mac and Windows
The zip process takes seconds on both operating systems. Right-click the package folder and choose the appropriate option for your system:
- Mac: Right-click the folder and select "Compress [folder name]". macOS creates a .zip file in the same location as the original folder.
- Windows: Right-click the folder, select "Send to", then choose "Compressed (zipped) folder". Windows saves the .zip file in the same directory.
Before you send anything, open the zip file once to confirm it expands correctly and that all subfolders (Links, Document Fonts) are intact inside. A corrupted zip file is a common source of delay, and checking it yourself takes under thirty seconds.
Name your zip file clearly before you send it. A filename like "ClientName_JobName_PrintReady.zip" tells your printer exactly what the file contains at a glance.
What to send alongside the zip file
Knowing how to package files for print also means knowing how to communicate clearly when you submit your files. Send your printer a short message that covers the key details of your job so nothing gets lost between submission and production. Include the following information:
- Job description: what you’re printing (e.g., double-sided business cards, 18×24 banner)
- Quantity and size: exact dimensions and the number of copies you need
- Colour mode: confirm CMYK and note any spot colours if applicable
- Bleed and trim: confirm bleed dimensions match your document setup
- Deadline: state your required delivery date upfront
Attach the zip file directly to your email rather than using a consumer file-sharing link, unless your printer has a preferred upload portal. Many print providers, including Apex Workwear, accept files through a direct submission process and confirm receipt with a digital proof before production begins. Providing all this detail upfront means fewer back-and-forth messages and a faster path to getting your job on press.
Fix common packaging problems fast
Even when you follow each step correctly, packaging doesn’t always go smoothly on the first attempt. Knowing which problems to look for and how to resolve them quickly keeps your job on schedule and saves you from starting the whole process over. The issues below cover the most common errors that come up when learning how to package files for print, along with the specific fix for each one.
Missing fonts and broken image links
These two errors account for the majority of packaging failures, and both have straightforward fixes. If fonts are missing from your package, the most likely cause is that the typeface is a system font or cloud-activated font that the Package command cannot copy due to licence restrictions. Replace the affected text with an outline by selecting it and going to Type > Create Outlines in Illustrator, or check with your font provider about redistribution rights before you send anything.
Broken image links happen when a placed file has moved, been renamed, or deleted after you placed it in your layout. Open the Links panel (Window > Links in both applications), click any flagged item, and use "Relink" to point the software to the correct file location. Once all links show a green status, run the Package command again to collect the updated references into a clean folder.
Colour mode and bleed errors
RGB images sitting inside a CMYK document are a consistent source of colour shift on press. Your preflight panel will flag these, but the fix requires opening each image in Photoshop and converting it via Edit > Convert to Profile, then choosing a CMYK output profile such as FOGRA39 or SWOP before re-saving and relinking.
If your printer hasn’t specified a colour profile, ask them directly before you convert. Using the wrong profile introduces colour inaccuracies that are difficult to reverse after production begins.
Missing bleed is another frequent flag. If your document was set up without bleed, go to File > Document Setup in either application and add 3mm (0.125 inch) on all sides. Extend any background colours or images to fill the new bleed area, then re-export your PDF using the Press Quality preset with "Use Document Bleed Settings" ticked.
Corrupted or incomplete zip files
A zip file that won’t open on your printer’s end is almost always caused by an interrupted compression process or a file path that exceeds your operating system’s character limit. Shorten your folder name, move the package to your desktop, and compress it again from scratch. Confirm the zip expands correctly on your own machine before you send it to avoid another round of delays.
Ready to send it to print
You now have a complete workflow for how to package files for print in both Illustrator and InDesign. From running a preflight check to zipping your final folder, each step removes a specific risk that would otherwise slow down your job or produce a result that doesn’t match your screen. The process takes less than ten minutes once you know what each step involves, and it becomes second nature on every project after.
Getting your files right before you submit means fewer revision requests, faster turnaround, and a final product that looks exactly the way you intended. When your packaged folder and print-ready PDF are both confirmed and ready, the next step is finding a printer that makes submission straightforward. Get a custom print quote from Apex Workwear and receive expert file review, a digital proof, and a response within 24 hours, seven days a week.