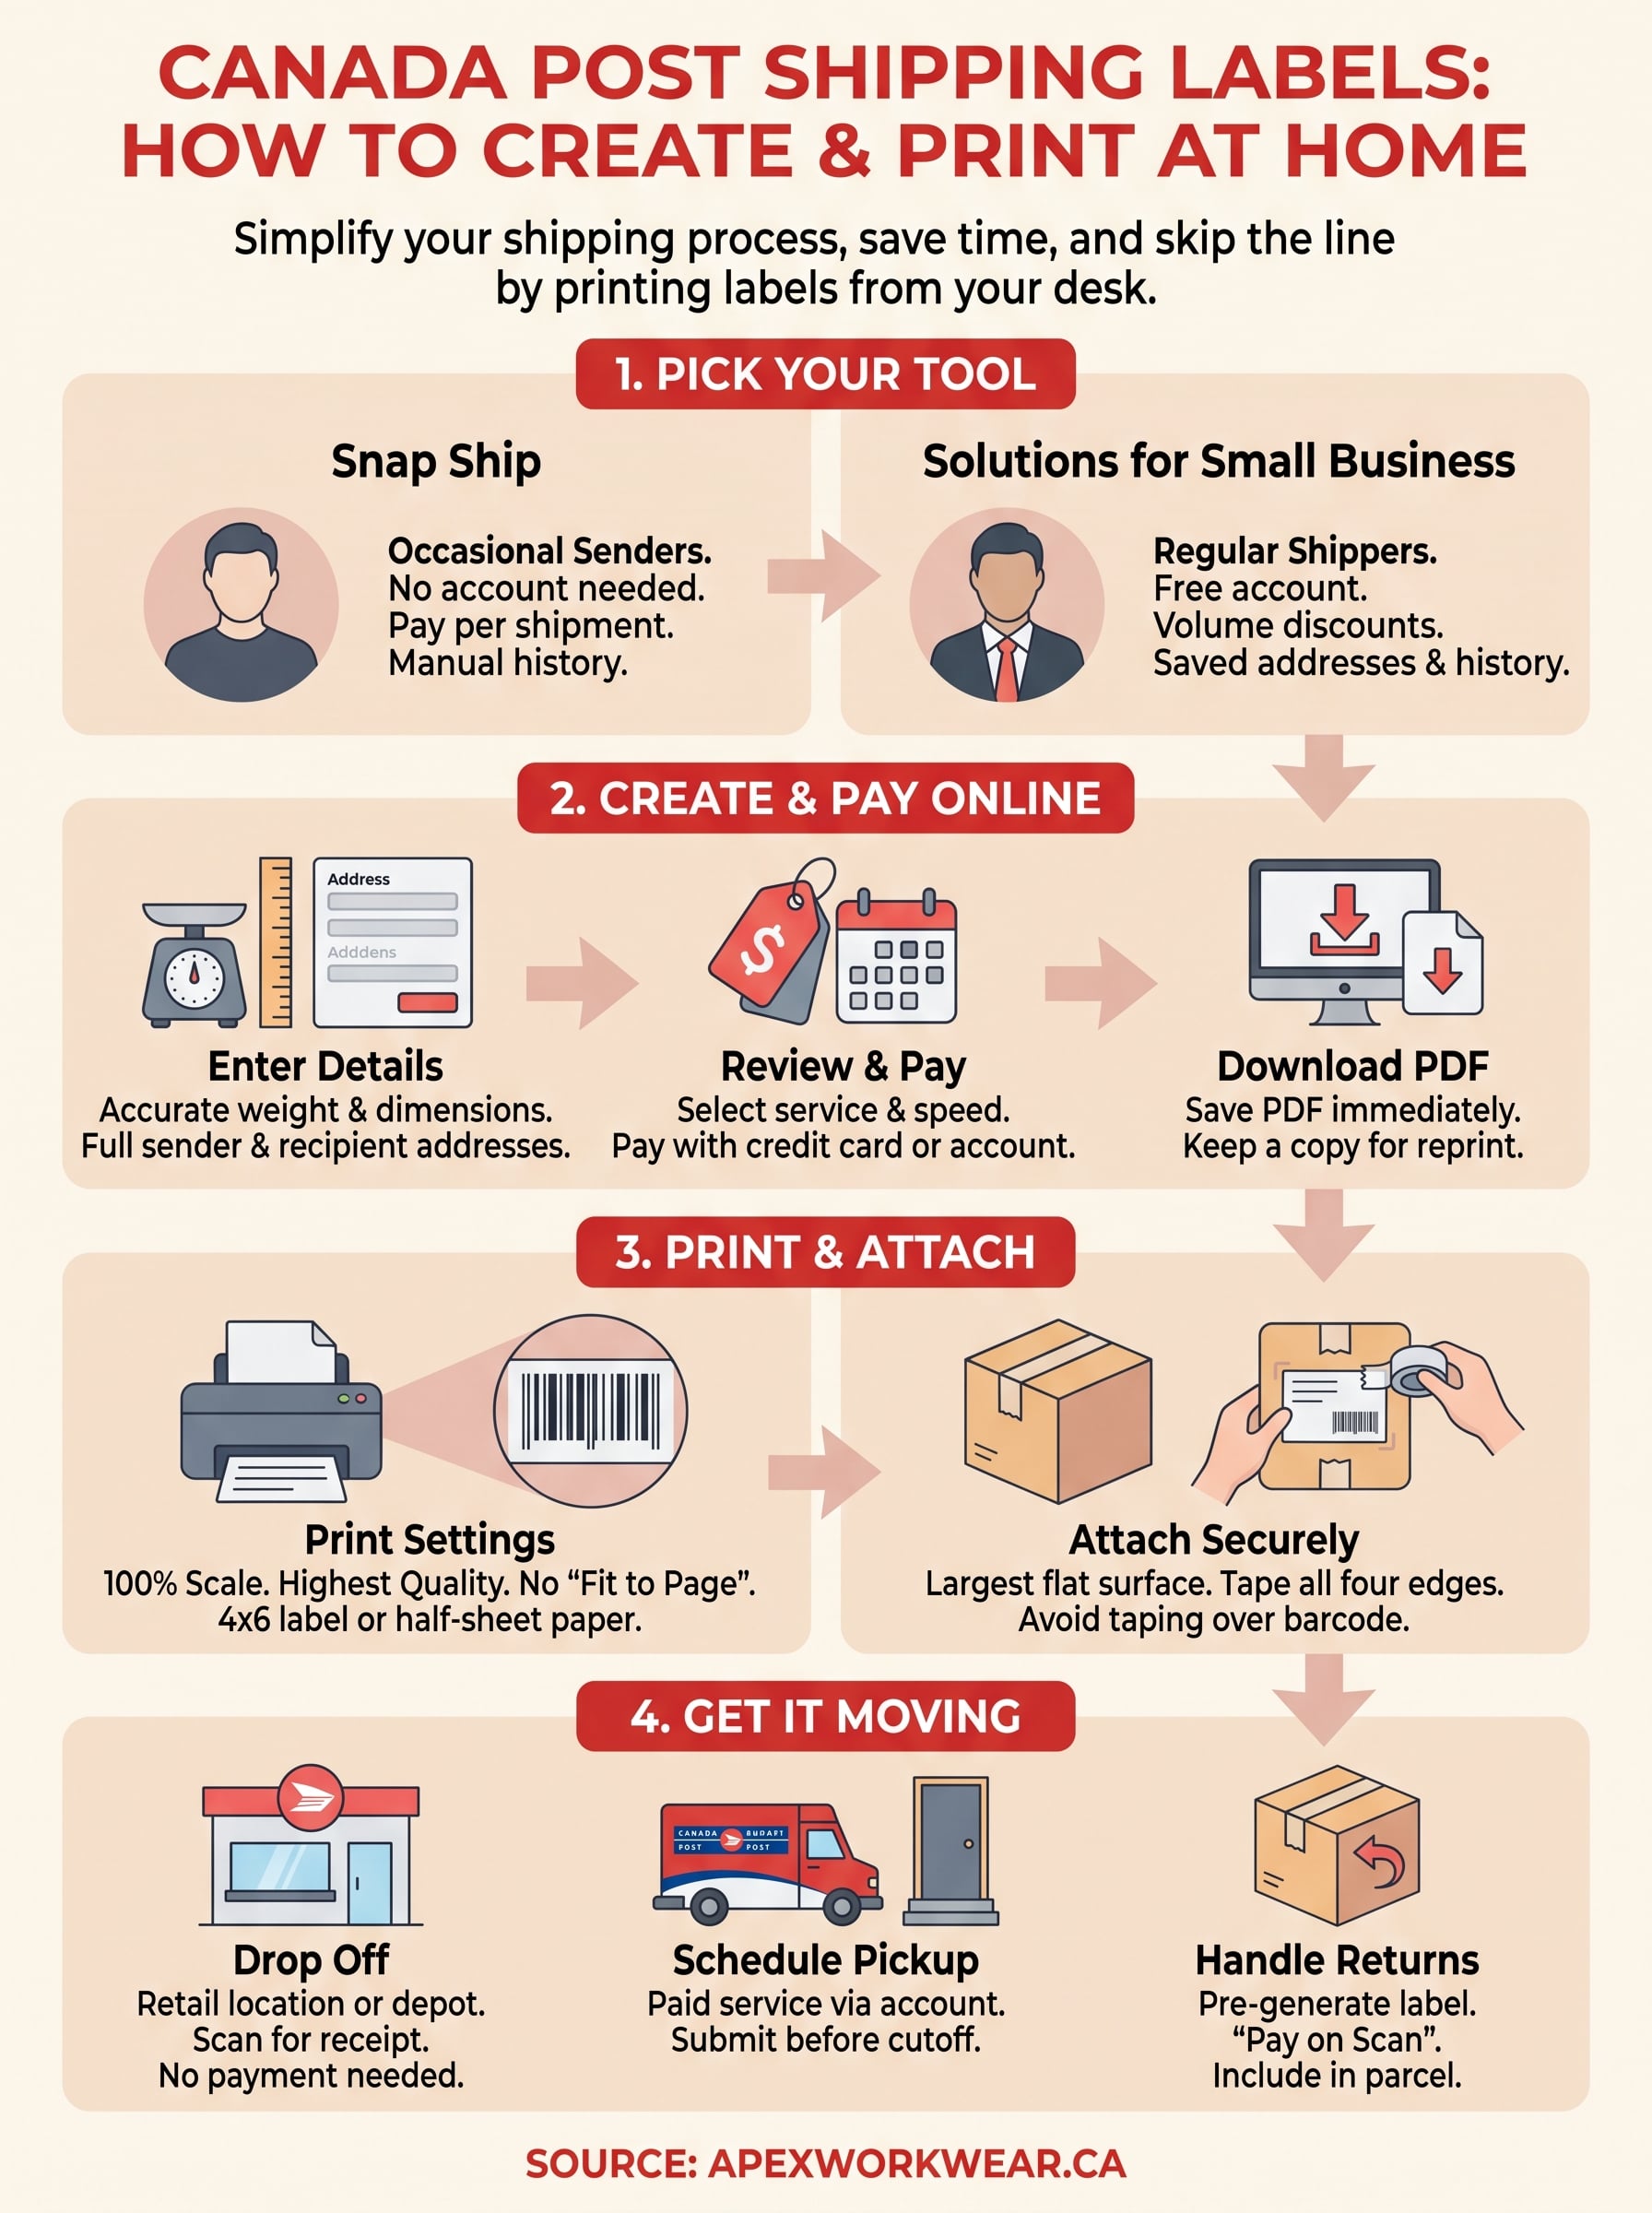
If you sell products online or ship orders to customers, you’ve probably spent more time than you’d like standing in line at the post office. The good news? You can create Canada Post shipping labels from your desk, print them at home, and skip that line entirely. It’s one of those small workflow changes that saves real time every single week.
At Apex Workwear, we ship custom apparel and print products to businesses across Canada daily, so we know the shipping process inside and out. Whether you’re a small business owner sending out your first batch of orders or a contractor mailing materials to a job site, getting your labels sorted makes everything smoother.
This guide walks you through exactly how to create, purchase, and print Canada Post shipping labels at home. We’ll cover the tools you need, label size requirements, and what to do if you’d rather handle things in person at a post office location.
What Canada Post shipping labels include
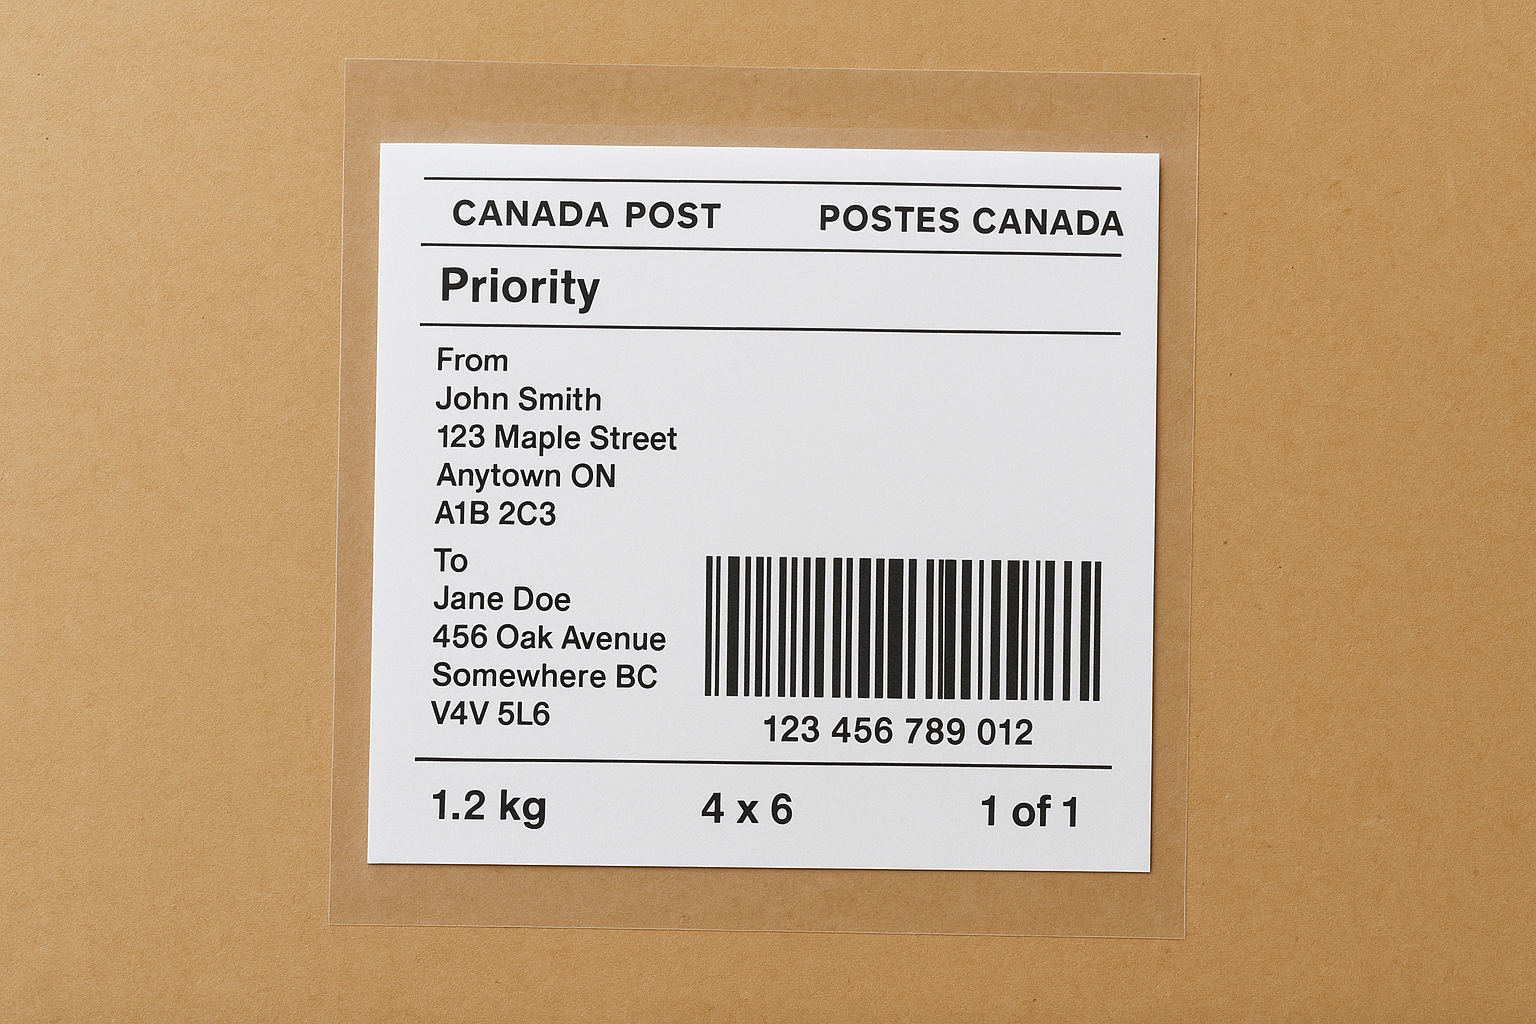
Before you print anything, it helps to know what a valid Canada Post shipping label actually contains. Every label carries a specific set of data that postal workers and automated scanners need to route your parcel correctly. If any element is missing or unclear, your package can get delayed or returned to sender, so understanding the components upfront saves you real trouble down the line.
The core information on every label
Every Canada Post label must display your complete sender and recipient addresses, including the full postal code for both parties. It also carries a unique barcode that Canada Post’s scanners read at each processing facility. This barcode ties directly to your tracking number, which is how you and your customer follow the parcel from drop-off to delivery confirmation.
A missing or partially printed barcode is the most common reason a parcel gets delayed at a sorting facility, so always check your print quality before sealing the package.
Beyond the addresses and barcode, your label will also show:
- Service type (for example, Xpresspost, Priority, Regular Parcel, or Expedited Parcel)
- Postage amount paid, or a "postage paid" indicator if you pre-purchased online
- Estimated delivery date or service timeframe
- Weight and dimensions used to calculate the shipping rate
- A return address so undeliverable parcels come back to you
- Special handling indicators, such as "Signature Required" or "Do Not Safe Drop"
Label size and format requirements
Canada Post accepts labels in a few standard formats, and using the right size makes a noticeable difference to scan reliability in processing facilities. The most popular home-printing format is 4 x 6 inches (approximately 10 x 15 cm), which fits standard thermal label stock and keeps all text large enough for high-speed scanners to read without errors.
If you print on a regular inkjet or laser printer, a half-sheet of standard 8.5 x 11 paper works perfectly well. Always print at 100% scale and never use "fit to page," because scaling down shrinks the barcode and causes scan failures at sorting hubs. Once printed, tape all four edges of the paper label firmly to your parcel, and never place tape directly over the barcode itself.
Pick the right Canada Post tool for your shipment
Canada Post offers two main online options for creating canada post shipping labels, and picking the right one from the start saves you real time. Your choice comes down to how often you ship and whether you need stored address books, volume discounts, and the ability to print multiple labels in one session.
Snap Ship for occasional senders
Snap Ship is Canada Post’s guest shipping tool, which means you don’t need an account to use it. You enter your origin and destination postal codes, select a service level, pay by credit card, and download your label immediately after checkout.
The key limitation is that Snap Ship does not save your shipment history, so you need to record your tracking numbers manually after each transaction. If you ship a handful of parcels per month and want a fast, no-login process, it gets the job done.
If you regularly ship more than five to ten parcels per month, a Solutions for Small Business account will almost certainly cover its own setup effort through volume discounts alone.
Solutions for Small Business for regular shippers
A Solutions for Small Business account is free to create directly through Canada Post and gives you access to discounted rates on most domestic and international services. Once you’re logged in, you can batch-print multiple labels at once, maintain a saved address book, and pull your full shipment history at any time. This tool works best for small business owners, e-commerce sellers, and contractors who ship regularly and want lower costs per parcel. Key features include:
- Volume-based rate discounts on domestic and international shipments
- Batch label creation for multiple orders in one session
- Full shipment history and tracking in a single dashboard
- Saved address book for repeat recipients
Create and pay for a shipping label online
Once you’ve picked your tool, the actual process of generating canada post shipping labels moves quickly. Both Snap Ship and the Solutions for Small Business portal follow the same core steps, so the instructions below apply to either platform.
Enter your shipment details
Start by entering your sender postal code and recipient postal code to pull up available service options. Then input your parcel’s weight in kilograms and its dimensions in centimetres. Canada Post calculates rates based on actual weight versus dimensional weight, using whichever is higher, so accurate measurements prevent unexpected fees later. Round up to the nearest 0.1 kg if your scale reads between values.
Dimensional weight uses the formula: length x width x height (cm) divided by 5,000. A large, lightweight box can cost more to ship than its actual weight alone suggests.
The key fields to complete at this stage are:
- Sender name and full address with postal code
- Recipient name and full address with postal code
- Parcel weight (kg) and dimensions (cm)
- Declared value for coverage purposes
Review rates and pay
Canada Post displays all eligible service options with rates and estimated delivery dates once you submit your parcel details. Select the service that fits your budget and timeline. If you use Solutions for Small Business, your discounted rate loads automatically after login. On Snap Ship, pay by credit card at checkout.
Your label downloads as a PDF the moment payment clears. Save that file immediately before closing the browser, because you cannot retrieve it without contacting Canada Post support directly. Keep a copy in a dedicated shipping folder so you can reprint if your first attempt comes out unclear.
Print and attach the label so it scans every time
A printed label only works if the barcode scans cleanly at every sorting facility it passes through. Poor print quality and incorrect attachment are the two most common reasons canada post shipping labels get rejected by automated scanners, so getting these two steps right matters as much as entering the correct address in the first place.
Print settings that protect the barcode
Open your label PDF and set your printer to 100% scale before hitting print. Never select "fit to page" or "shrink to fit," because even a 5% size reduction makes barcodes unreadable at high-speed processing hubs. Use the highest quality print setting your printer allows, and inspect the output under bright light before touching the paper. A crisp, high-contrast barcode with no smearing or faded lines is what you need.
If you use an inkjet printer, let the ink dry for at least 30 seconds before handling the label, because smeared ink on a barcode causes sorting errors at automated facilities.
For best results, match your print format to your printer type:
| Printer type | Recommended label format |
|---|---|
| Inkjet or laser | Half-sheet on 8.5 x 11 paper |
| Thermal label printer | 4 x 6 inch label stock |
How to attach the label securely
Place the label on the largest flat surface of your parcel so scanners can read it without repositioning the package. Use [clear packing tape](https://apexworkwear.ca/how-to-apply-stickers-without-bubbles/) to cover the entire label surface, including all four edges, but keep tape away from the barcode itself as it can cause glare under scanner lights. If you printed on plain paper, tape down every corner firmly so edges do not lift during transit and obscure the tracking number.
Drop off, schedule pickup, and handle returns
With your canada post shipping labels printed and attached, you have three practical options for getting your parcel into the postal network. Your choice depends on how many parcels you’re sending and how much time you have.
Drop off your parcel at a post office or depot
Take your sealed, labelled parcel to any Canada Post retail location or authorized depot near you. The staff will scan the barcode, confirm acceptance, and give you a receipt with your tracking number. You do not need to purchase postage at the counter because you’ve already paid online during label creation. Keep your receipt until the tracking status shows "delivered" on Canada Post’s website.
If you ship regularly, finding a depot location with extended hours saves you from rushing before a 5 p.m. post office closing time.
Schedule a pickup from your address
Canada Post offers a paid pickup service that sends a carrier directly to your door. Log into your Solutions for Small Business account, navigate to the pickup request section, select your preferred date, and confirm your address. Pickup requests must be submitted before the daily cutoff time shown in your account, which varies by region. This option works best when you have multiple parcels ready at once and want to avoid a trip entirely.
Generate and manage return labels
You can pre-generate a return label through your Solutions for Small Business account and include it inside the parcel for your customer. Set the label to "pay on scan" so Canada Post only charges you if the customer actually uses it. Download the return label PDF, print a second copy, and store it in your shipment records alongside the outbound label.
You’re ready to ship
You now have everything you need to create canada post shipping labels from your desk, pay online, and get parcels moving without standing in line. The process takes under five minutes once you’ve run through it the first time, and those time savings add up quickly when you’re shipping multiple orders every week.
Your next step is straightforward: pick your tool, measure your parcel accurately, and print your first label today. Whether you use Snap Ship for a one-off shipment or a Solutions for Small Business account for regular orders, the core steps stay consistent every time. Keep a dedicated folder of your label PDFs so you can reprint quickly if your first copy comes out unclear.
If your business also needs custom apparel or branded print materials to include with your shipments, Apex Workwear handles everything from T-shirts to large-format signage with fast Canadian production and no minimums on select products.